Overview
Booking a service appointment is the most essential scheduling action for any salon or spa.
The updated New Appointment popup in MioSalon brings together client lookup, service selection, staff assignment, and availability checking into a single, streamlined two-panel experience.
Front-desk staff can search for clients, review their visit history and financial details, browse categorized services with smart badges, assign staff and resources, configure buffer times, and finalize bookings — all without navigating away from the booking screen.
This guide walks you through the complete service appointment flow from start to finish.
Navigation Path
Appointment (left menu) → Plus (+) icon (top-left) → New Booking or Click the Calender page
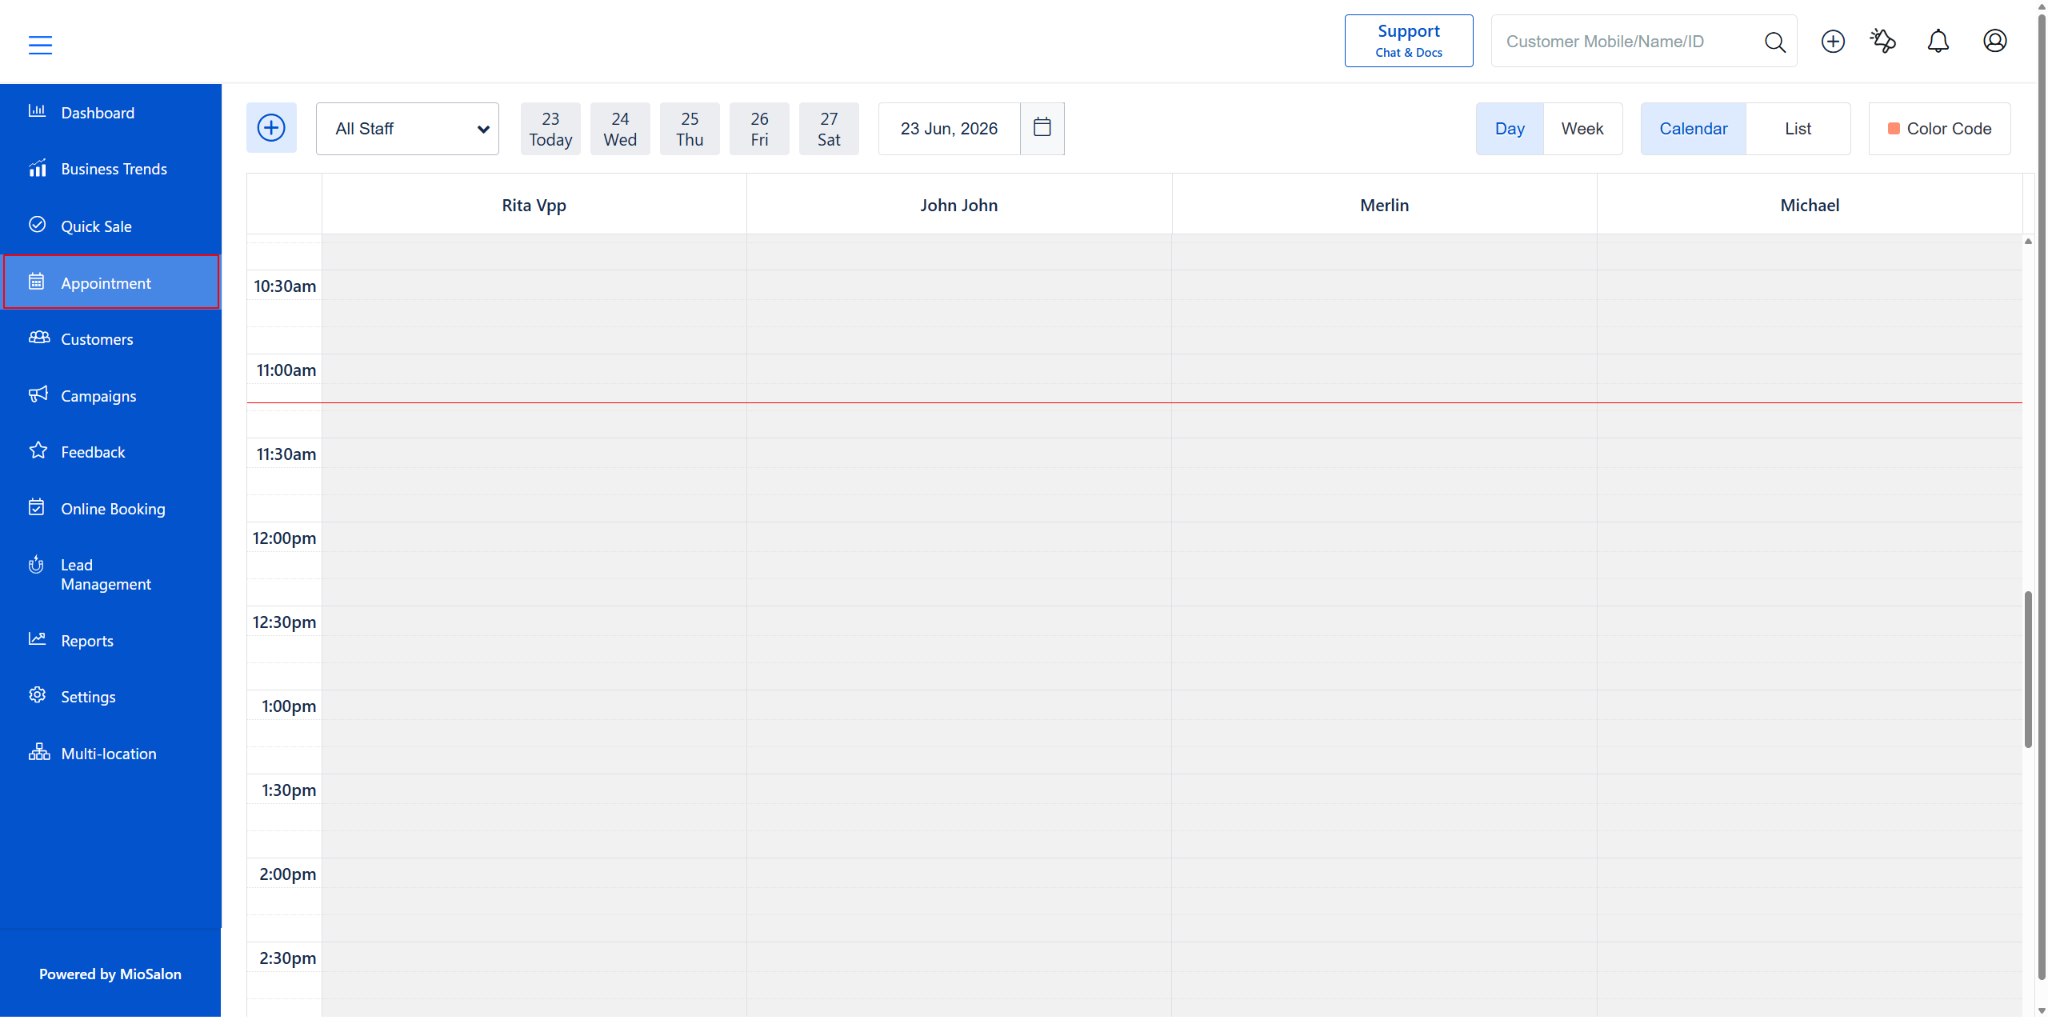
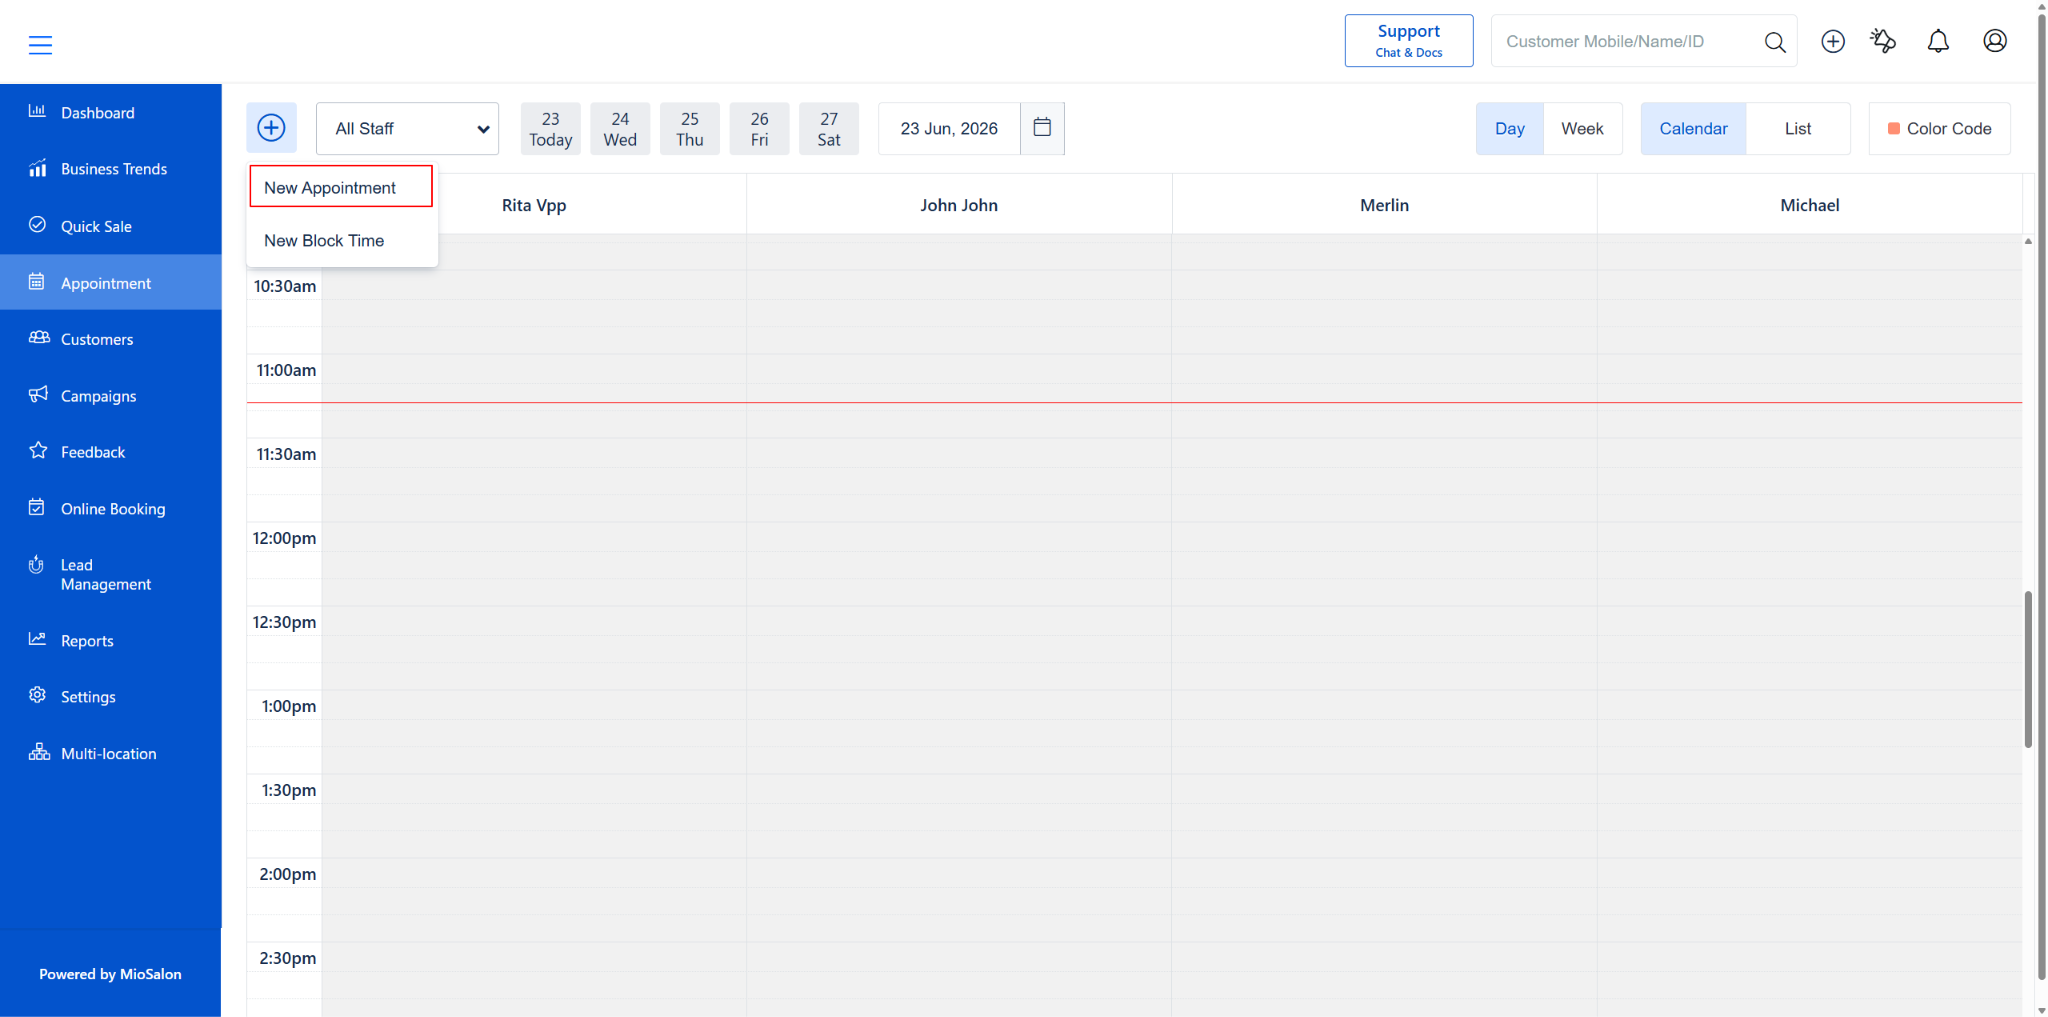
You can also create a new appointment by clicking directly on a calendar date and time slot for a specific staff member or resource.
Step-by-Step Instructions
Step 1: Open the New Appointment Popup
1. Log in to MioSalon.
2. Go to Appointment from the main navigation menu on the left-hand side.
3. Click the Plus (+) icon in the top-left corner, then select “New Booking”.
4. The “New Appointment” popup will appear with two panels:
o Left panel: Client search and details
o Right panel: Date, time, and booking type selection
The right panel: “Choose a Service, Package, or Purchased Package to continue booking.” Two buttons appear by default,
1. Service
2. Package.
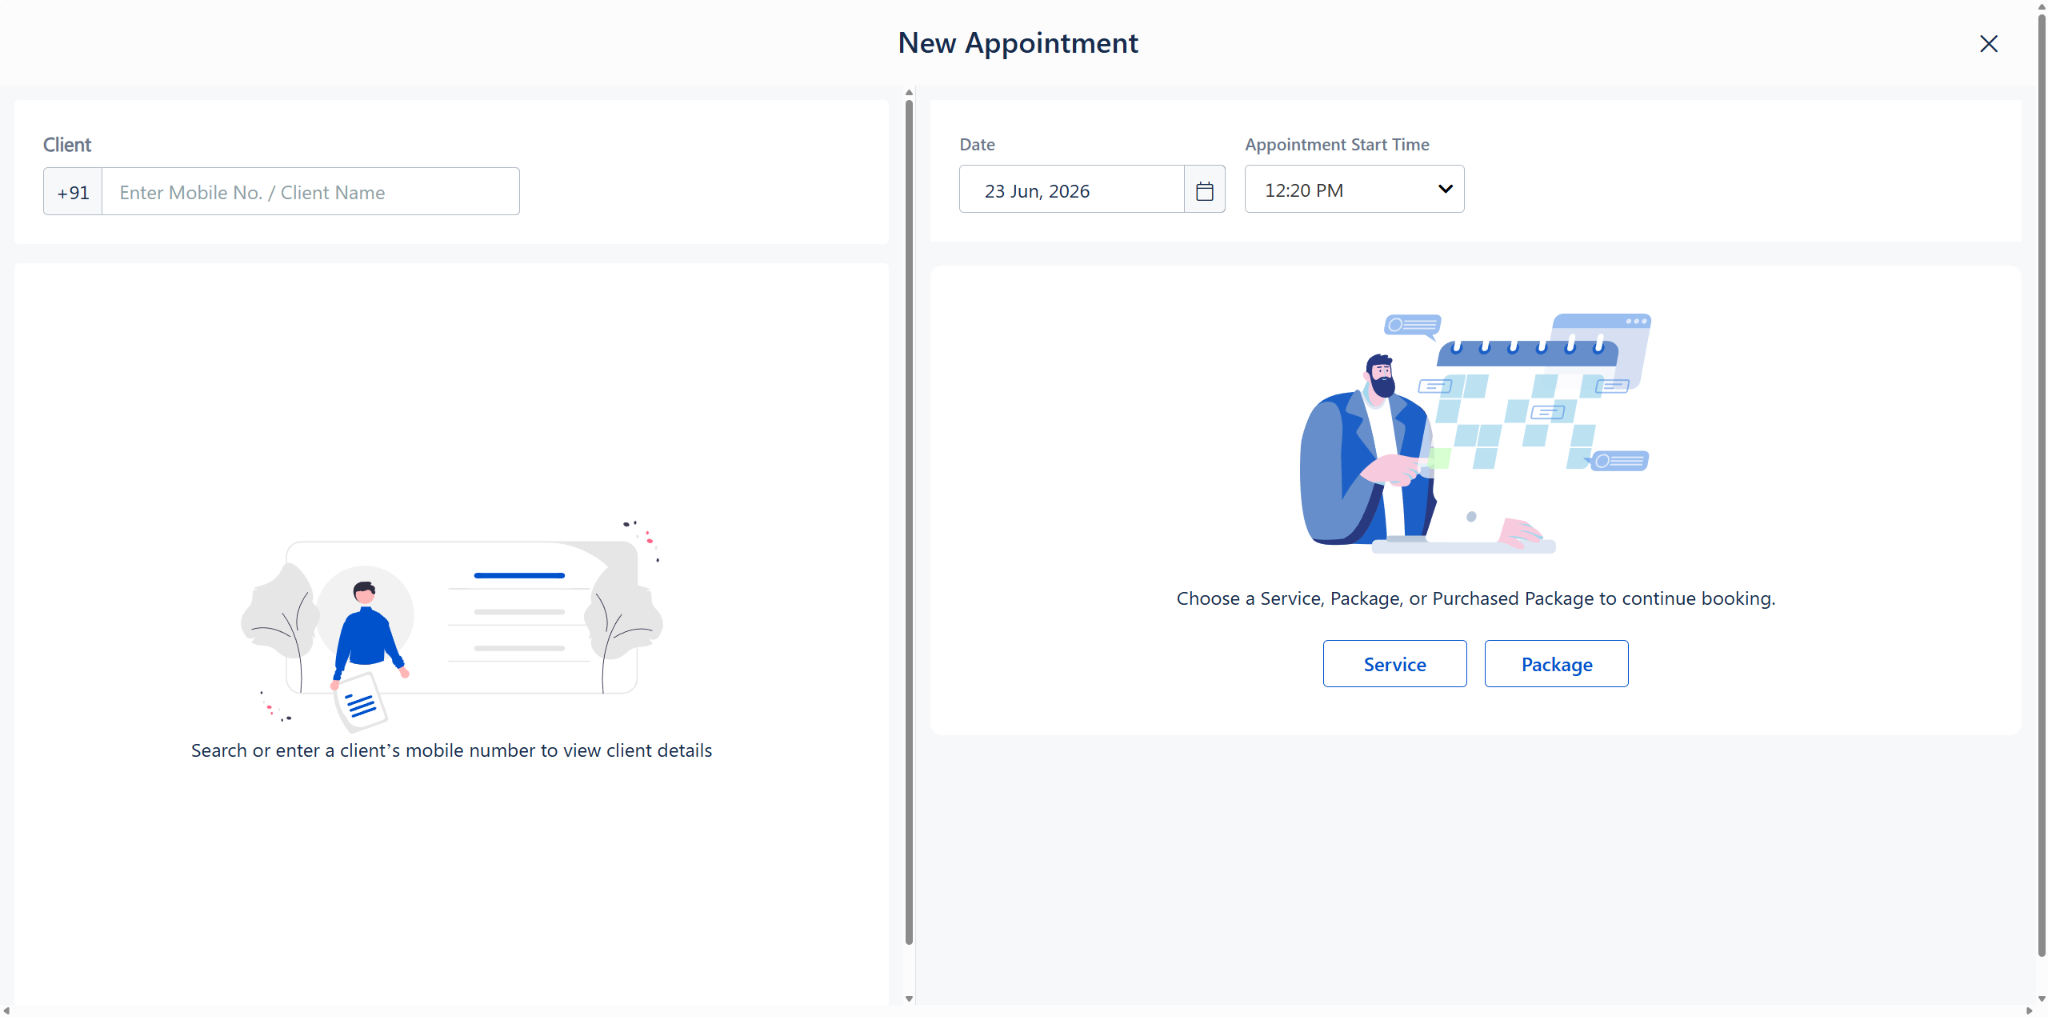
New Appointment popup — client search on the left, booking type selection on the right
Step 2: Search and Select a Client
1. In the Client section (left panel), enter the client’s mobile number or name.
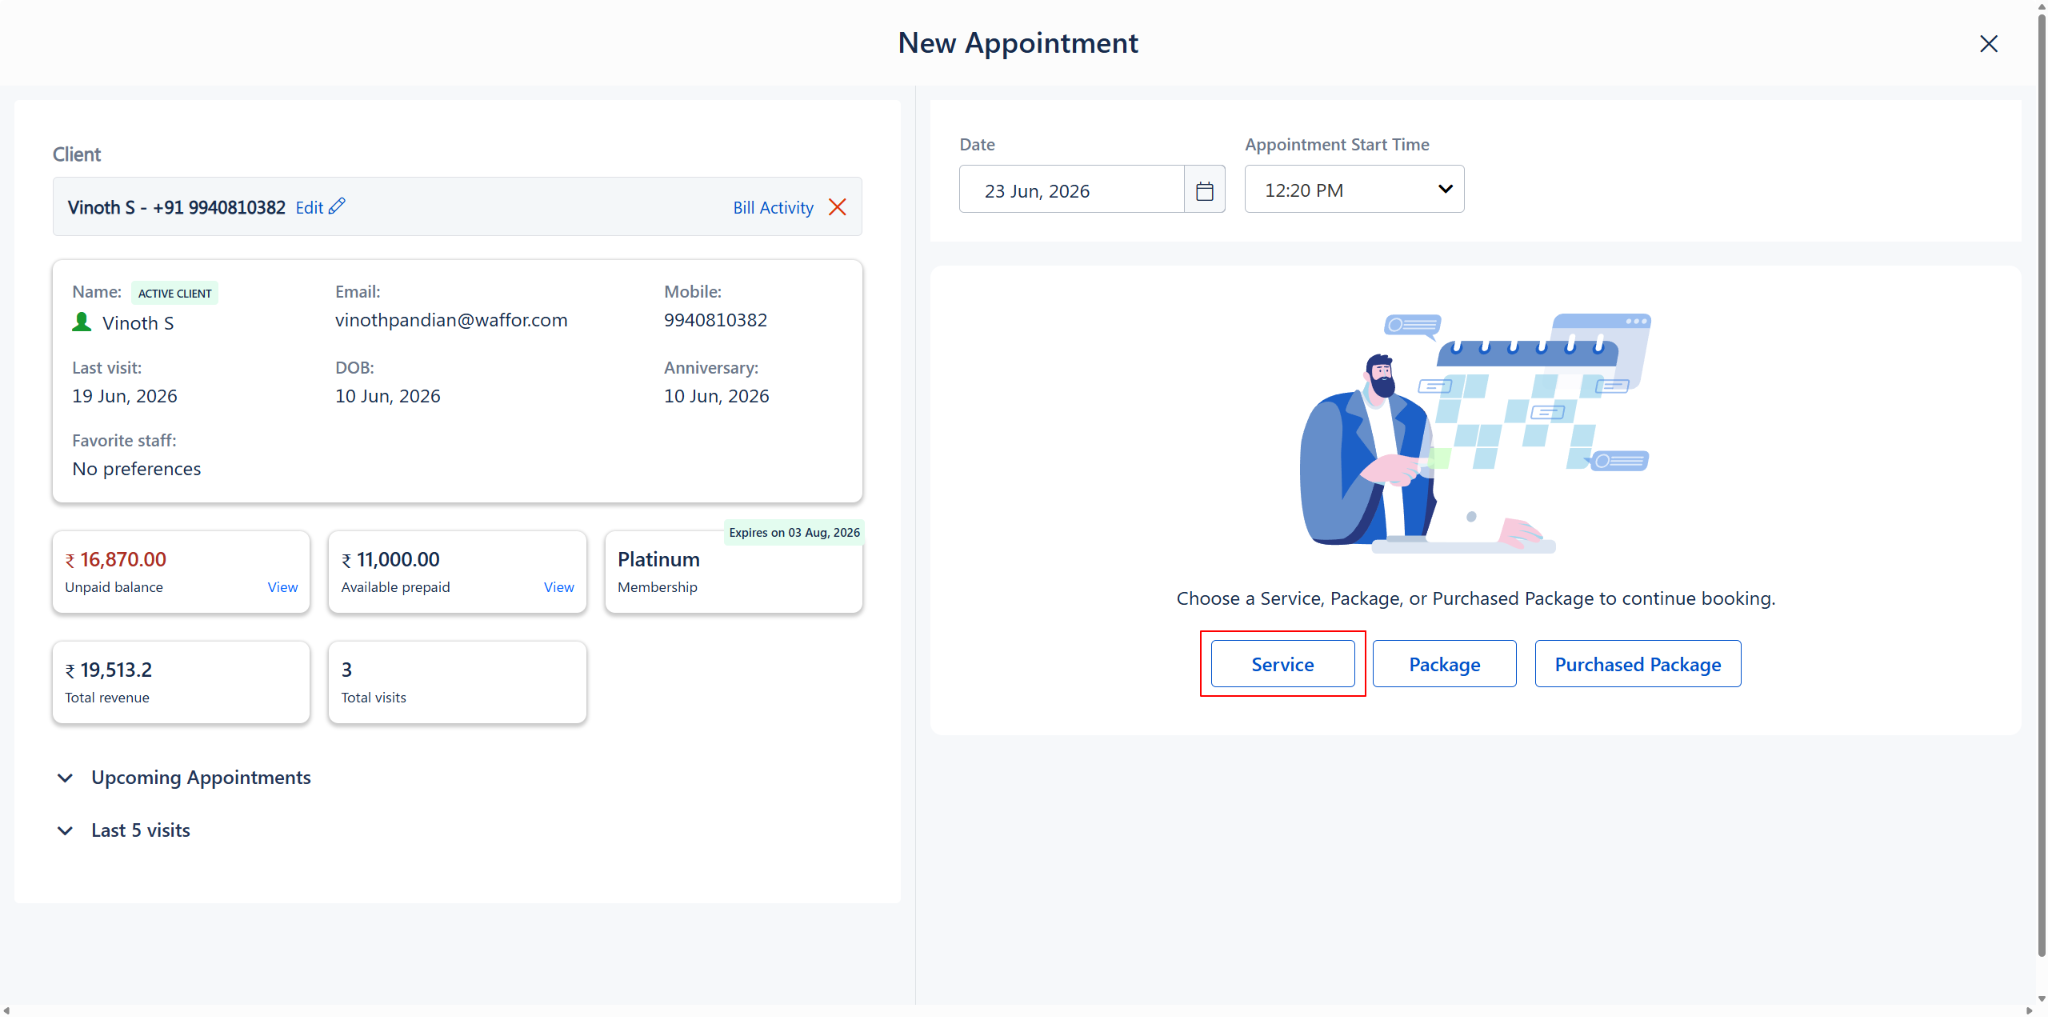
2. Once a matching client is found, a detailed Client Information Card loads automatically, showing:
3. Below the profile cards display:
o Unpaid Balance (in red) — with a “View” link
o Available Prepaid — with a “View” link
o Membership — Active membership name and expiry date
o Total Revenue — Lifetime revenue from this client
o Total Visits — Total number of visits
4. Click “Bill Activity” to open the client’s billing history.
5. Click the edit icon next to the mobile number to update client details.
TIP:
Once a client with an active purchased package is selected, a third button — Purchased Package — appears alongside Service and Package on the right panel.
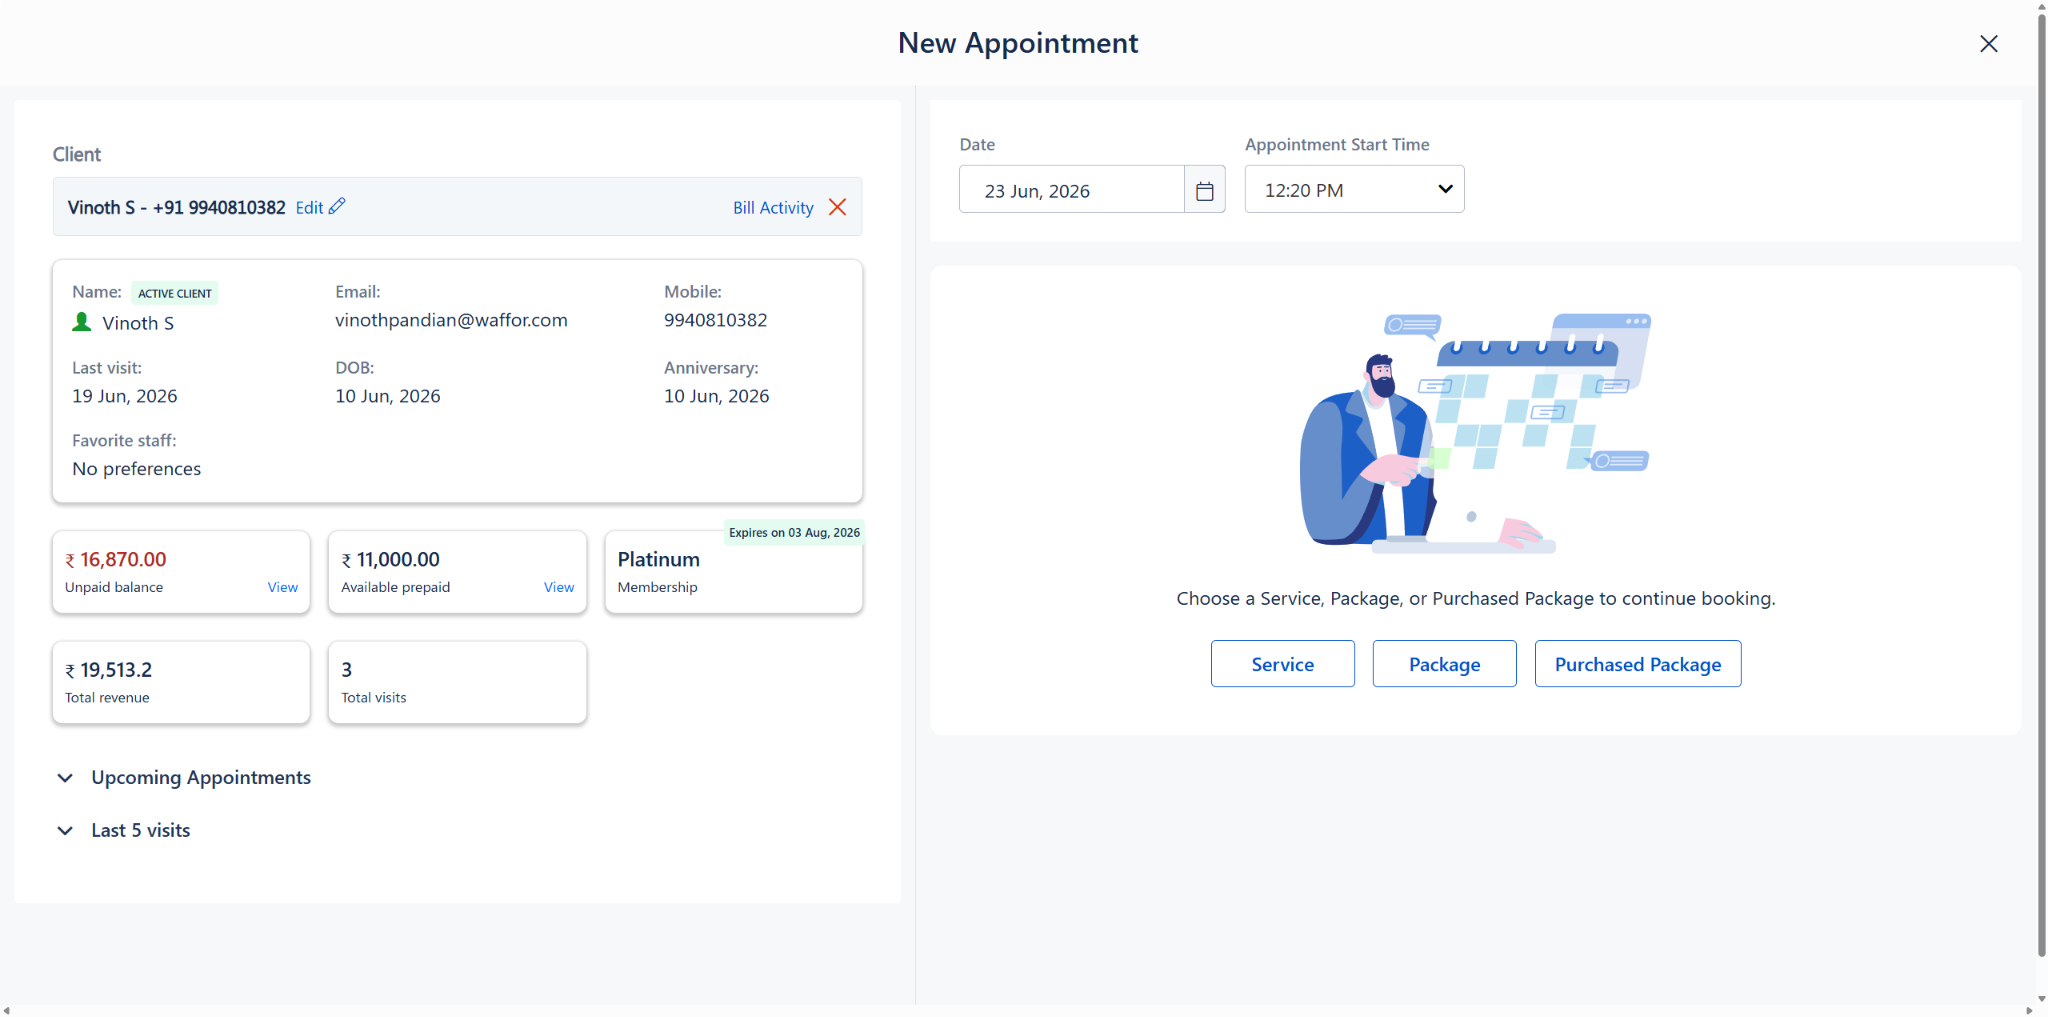
Client details card with profile, financial summary, and booking type options
Step 3: Review Client History
Scroll down on the left panel to view two expandable sections:
· Upcoming Appointments — Any future bookings for this client. Displays “No upcoming appointments” if none exist.
· Last 5 Visits — A table showing recent visit dates and services availed.
This information helps staff provide personalized recommendations and avoid scheduling conflicts.
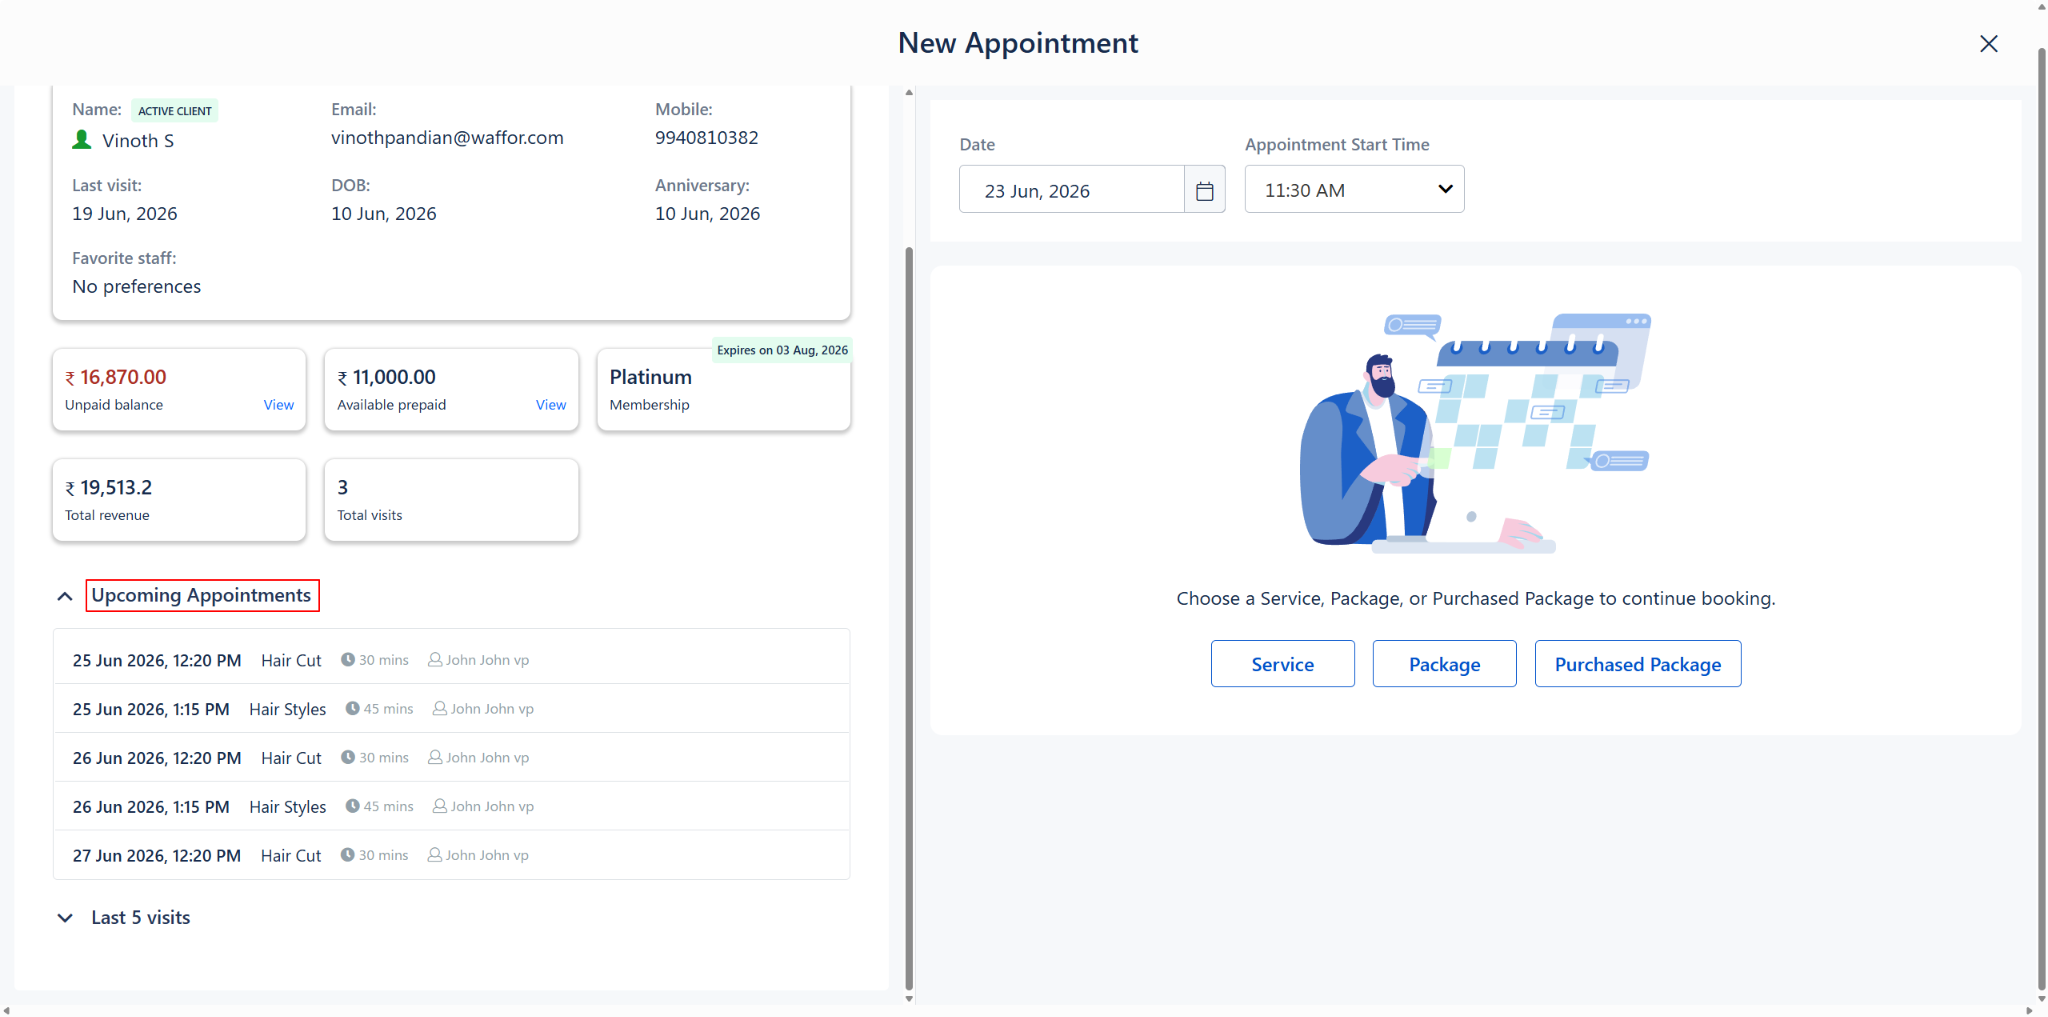
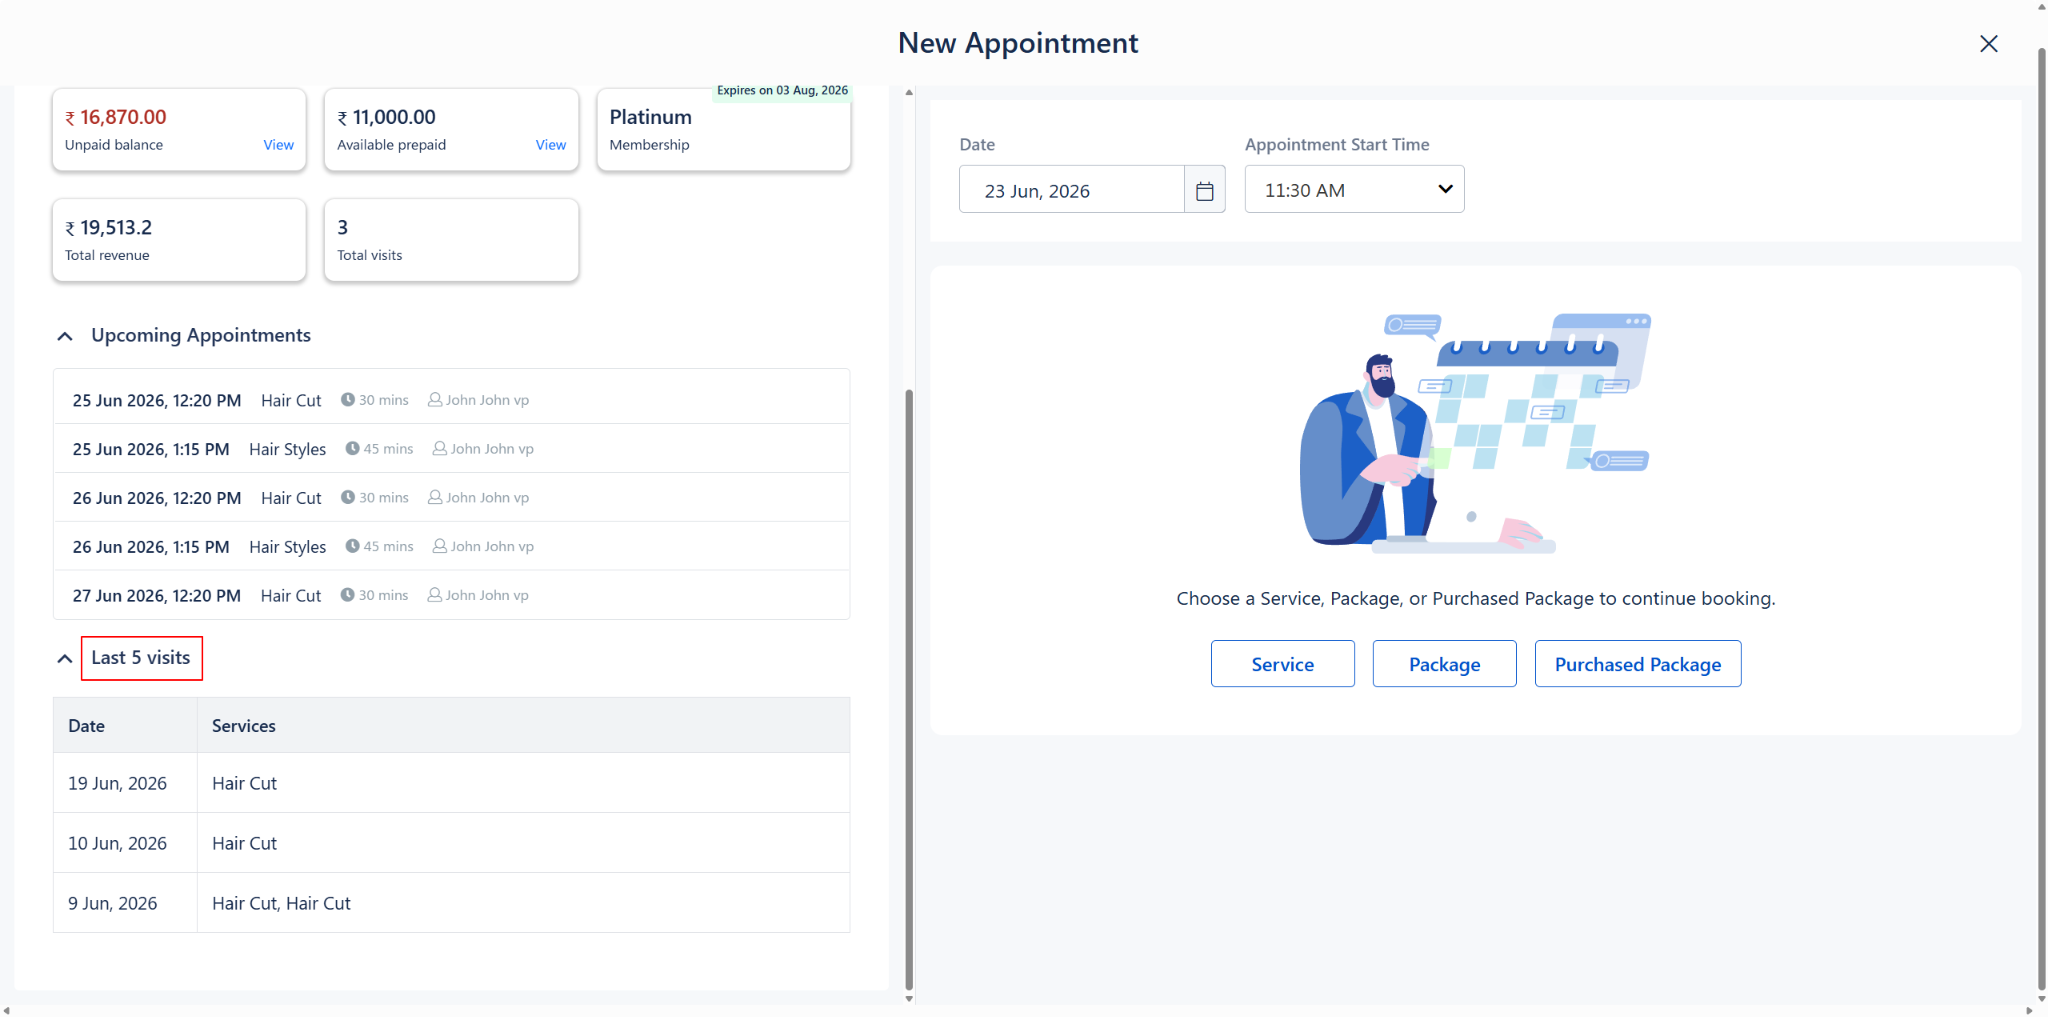
Client history — Upcoming Appointments and Last 5 Visits table
Step 4: Select “Service” and Set Date & Time
1. On the right panel, set the Date using the calendar picker and select the Appointment Start Time from the dropdown.
2. Click the “Service” button to proceed with a service-based appointment.
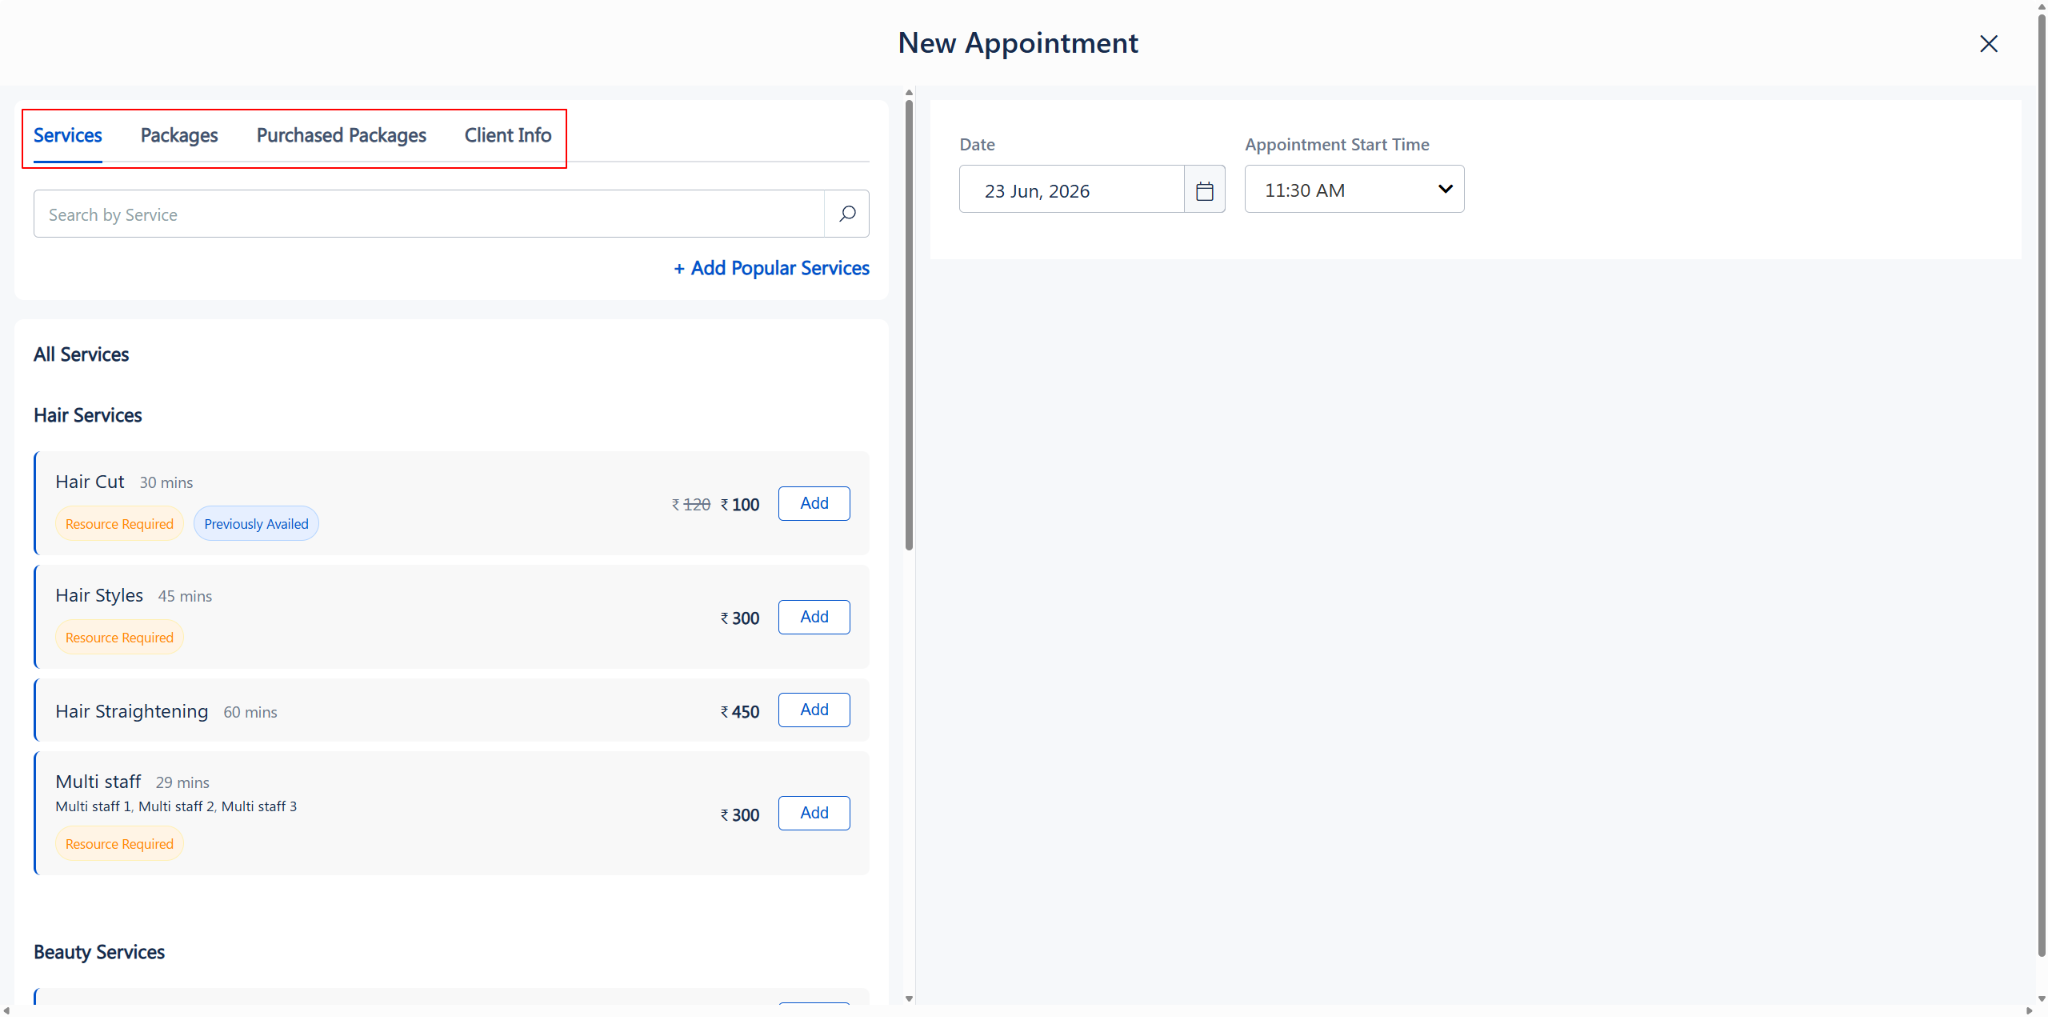
3. The left panel switches to the Services view with four tabs across the top:
o Services — Browse and add individual services
o Packages — View available packages
o Purchased Packages — Access the client’s purchased packages
o Client Info — For viewing the complete client profile
Step 5: Browse and Add Services
Services are organized under category headings (e.g., Hair Services, Beauty Services). Each service card displays:
· Service name and duration (e.g., Hair Cut — 30 mins)
· Price — with strikethrough for discounted pricing (e.g., ₹ 120 ₹ 100)
· “Previously Availed” badge — appears for services the client has used before
· “Resource Required” badge — appears for services that need a room or equipment
· Multi-staff indicator — lists assigned staff members if the service involves multiple staff
To add a service:
1. Click the “Add” button next to the desired service.
2. Use the “Search by Service” bar at the top to quickly locate a specific service.
3. After adding, use the minus (−) and plus (+) buttons to adjust the quantity.
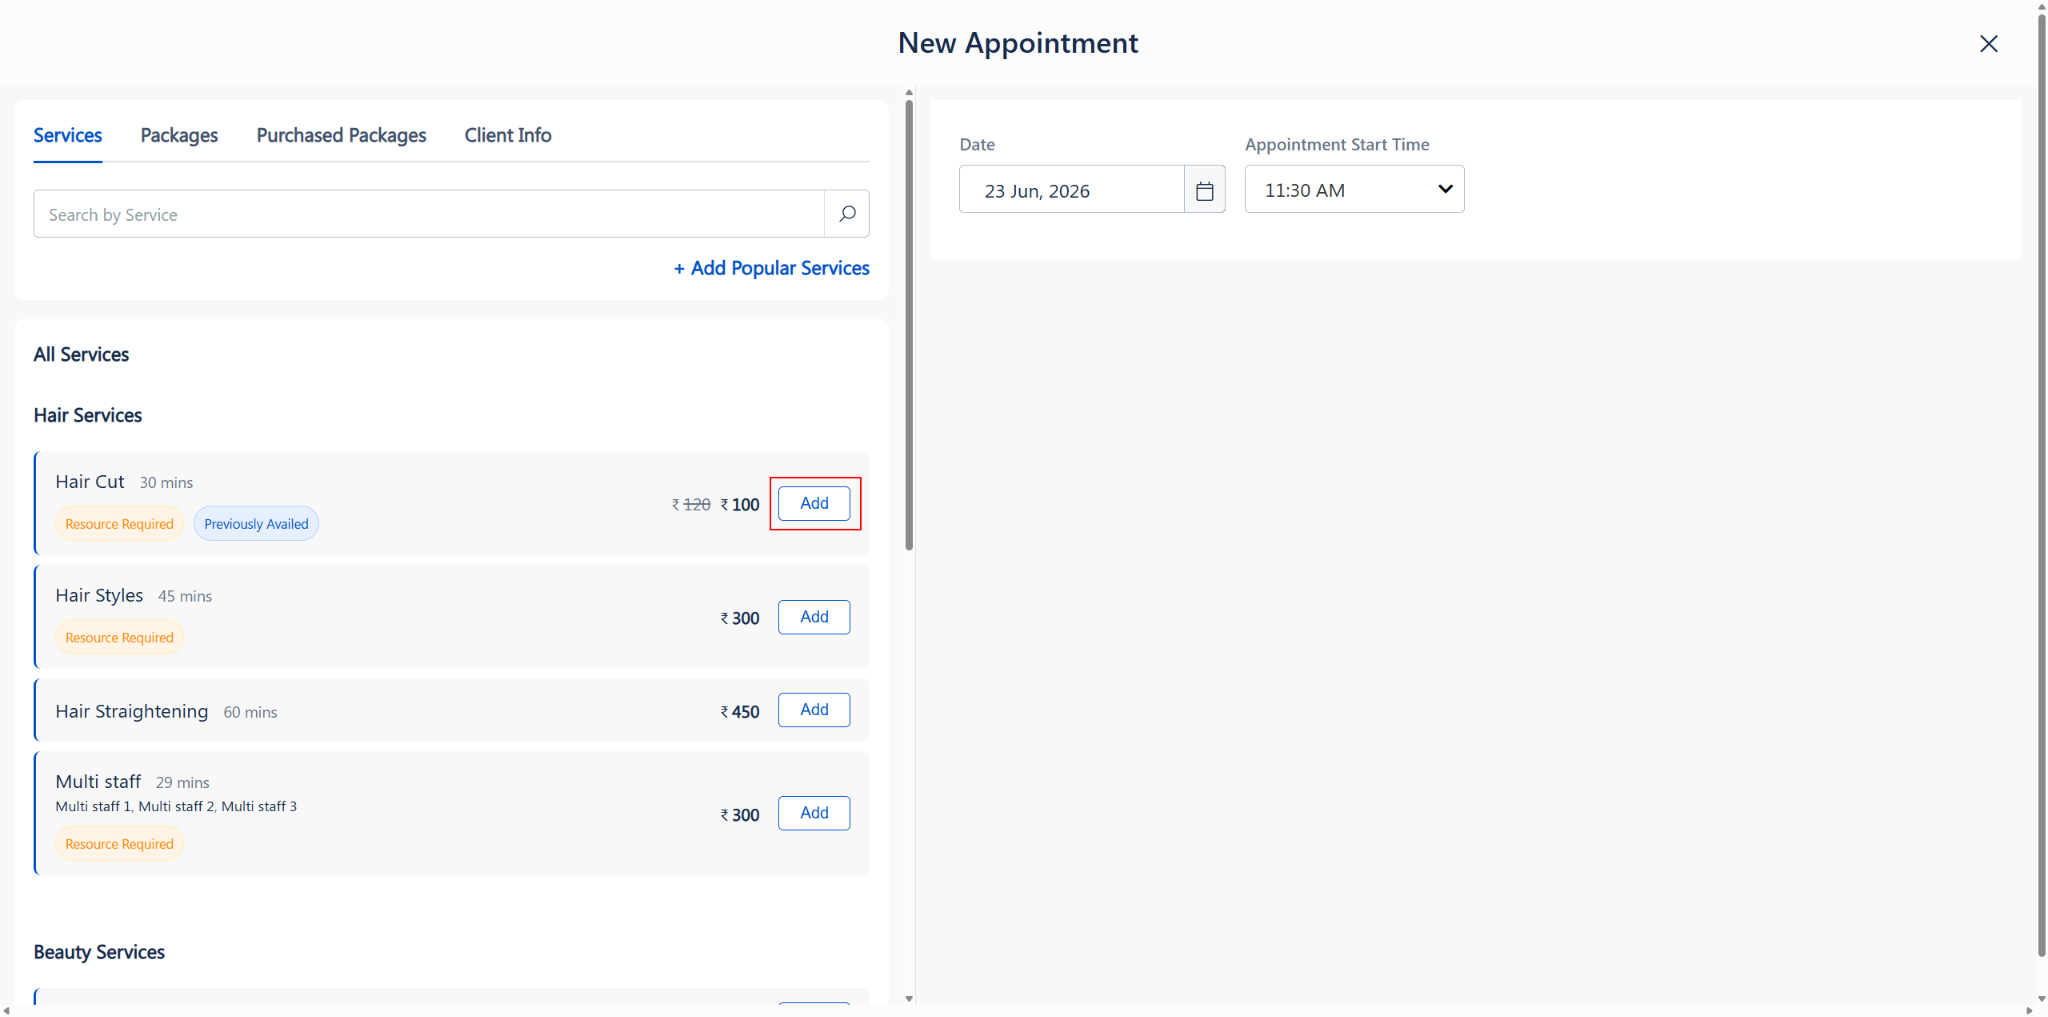
Services listed by category with Add button, pricing, and smart badges
Service listing showing Resource Required and Previously Availed badges
Step 6: Manage Popular Services
1. Click “+ Add Popular Services” located above the service list.
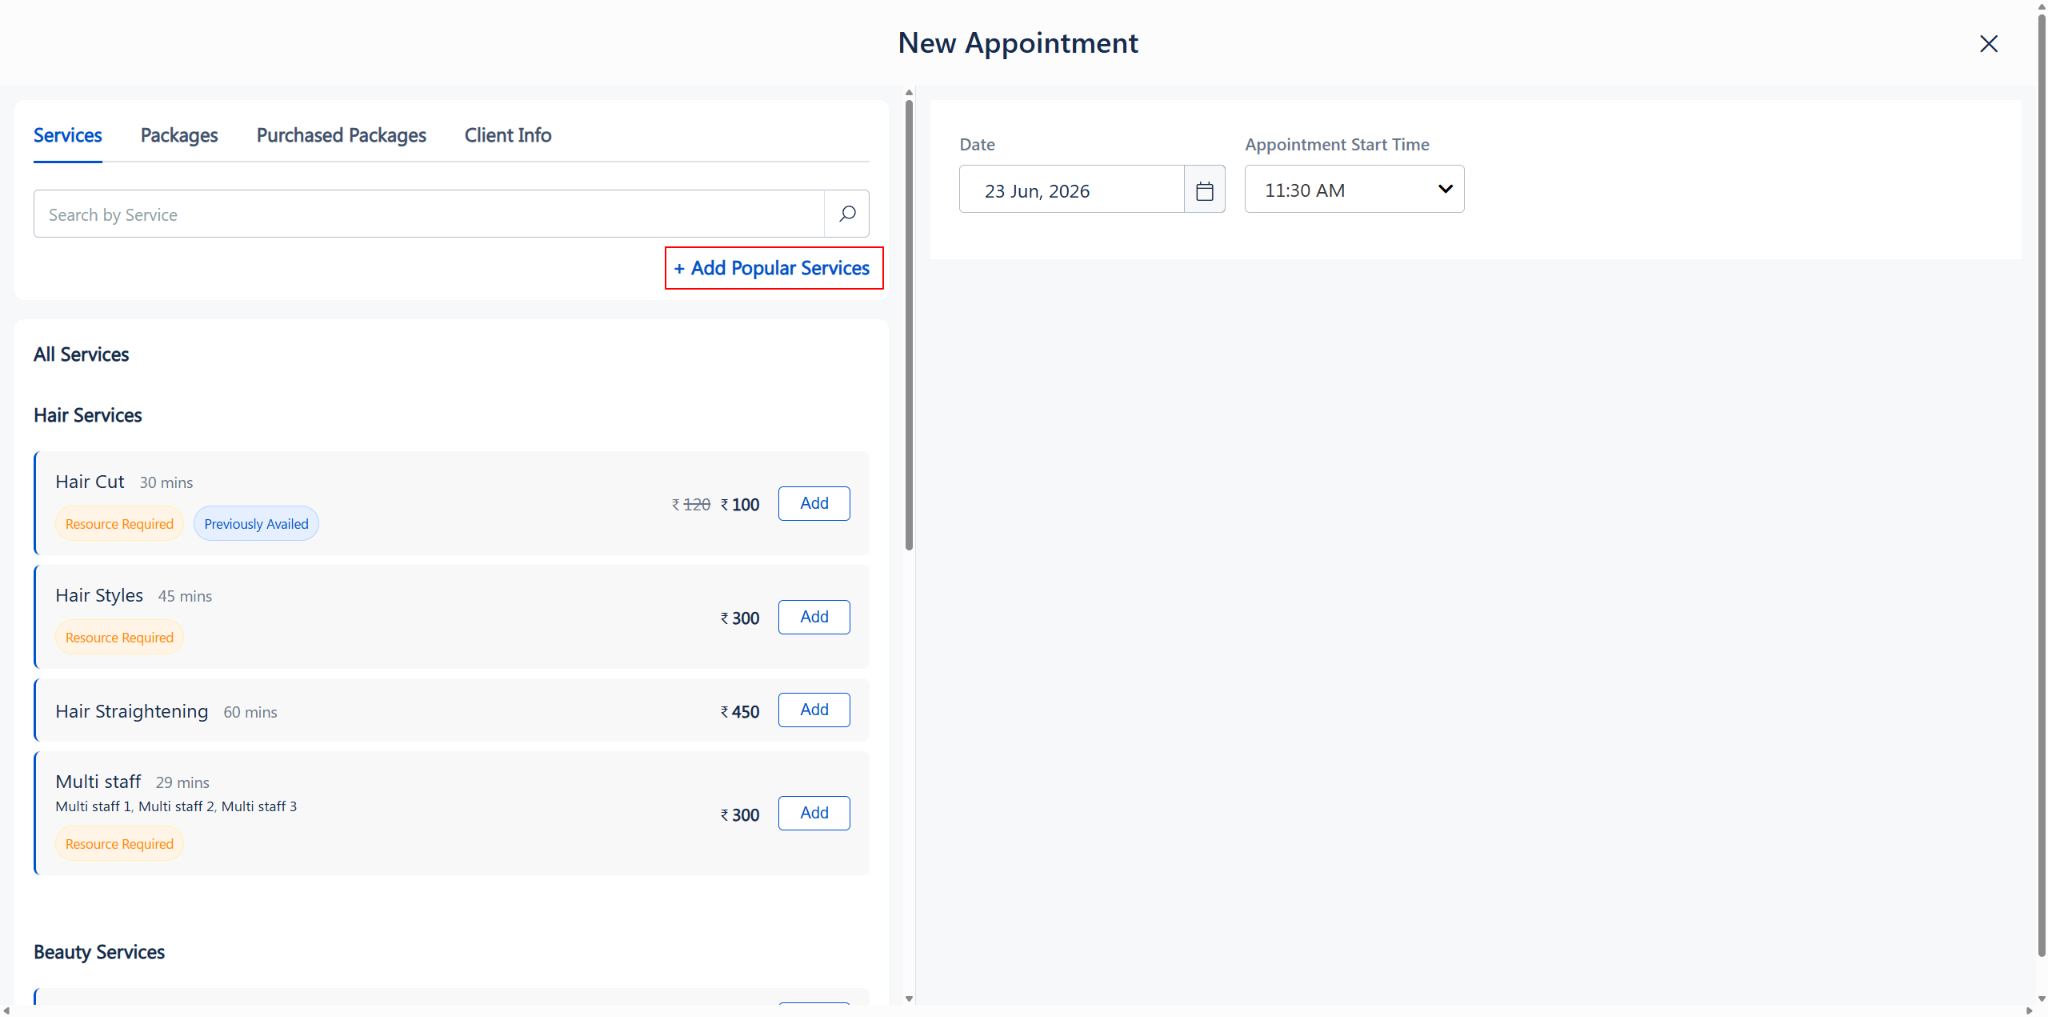
2. A “Manage Popular Services” popup appears, listing all services grouped by category with checkboxes.
3. Select the services you want to mark as popular for quick access during future bookings.
4. The counter at the bottom shows “Services Selected : X”.
5. Click “Save” to confirm, or “Cancel” to discard.
Popular services will appear at the top of the service list for faster selection.
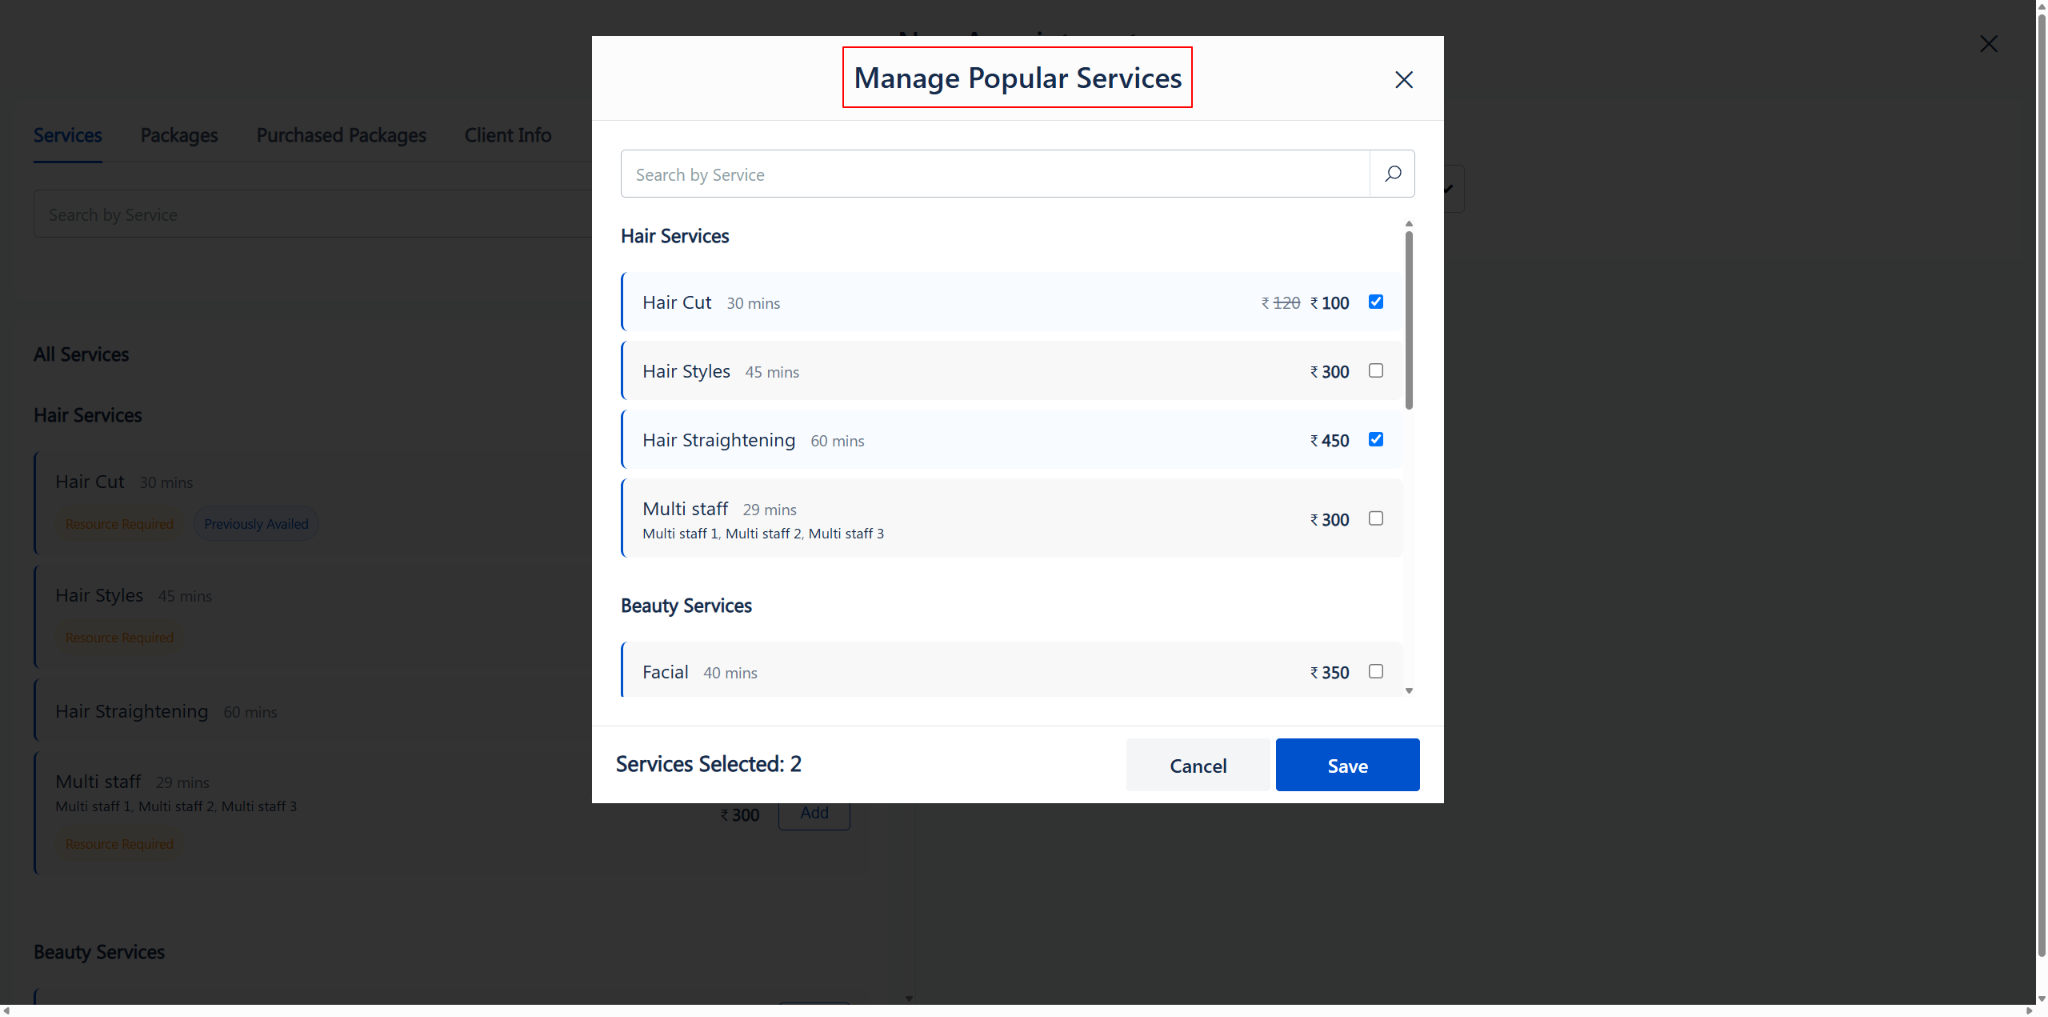
Manage Popular Services popup with checkboxes, search, and save/cancel
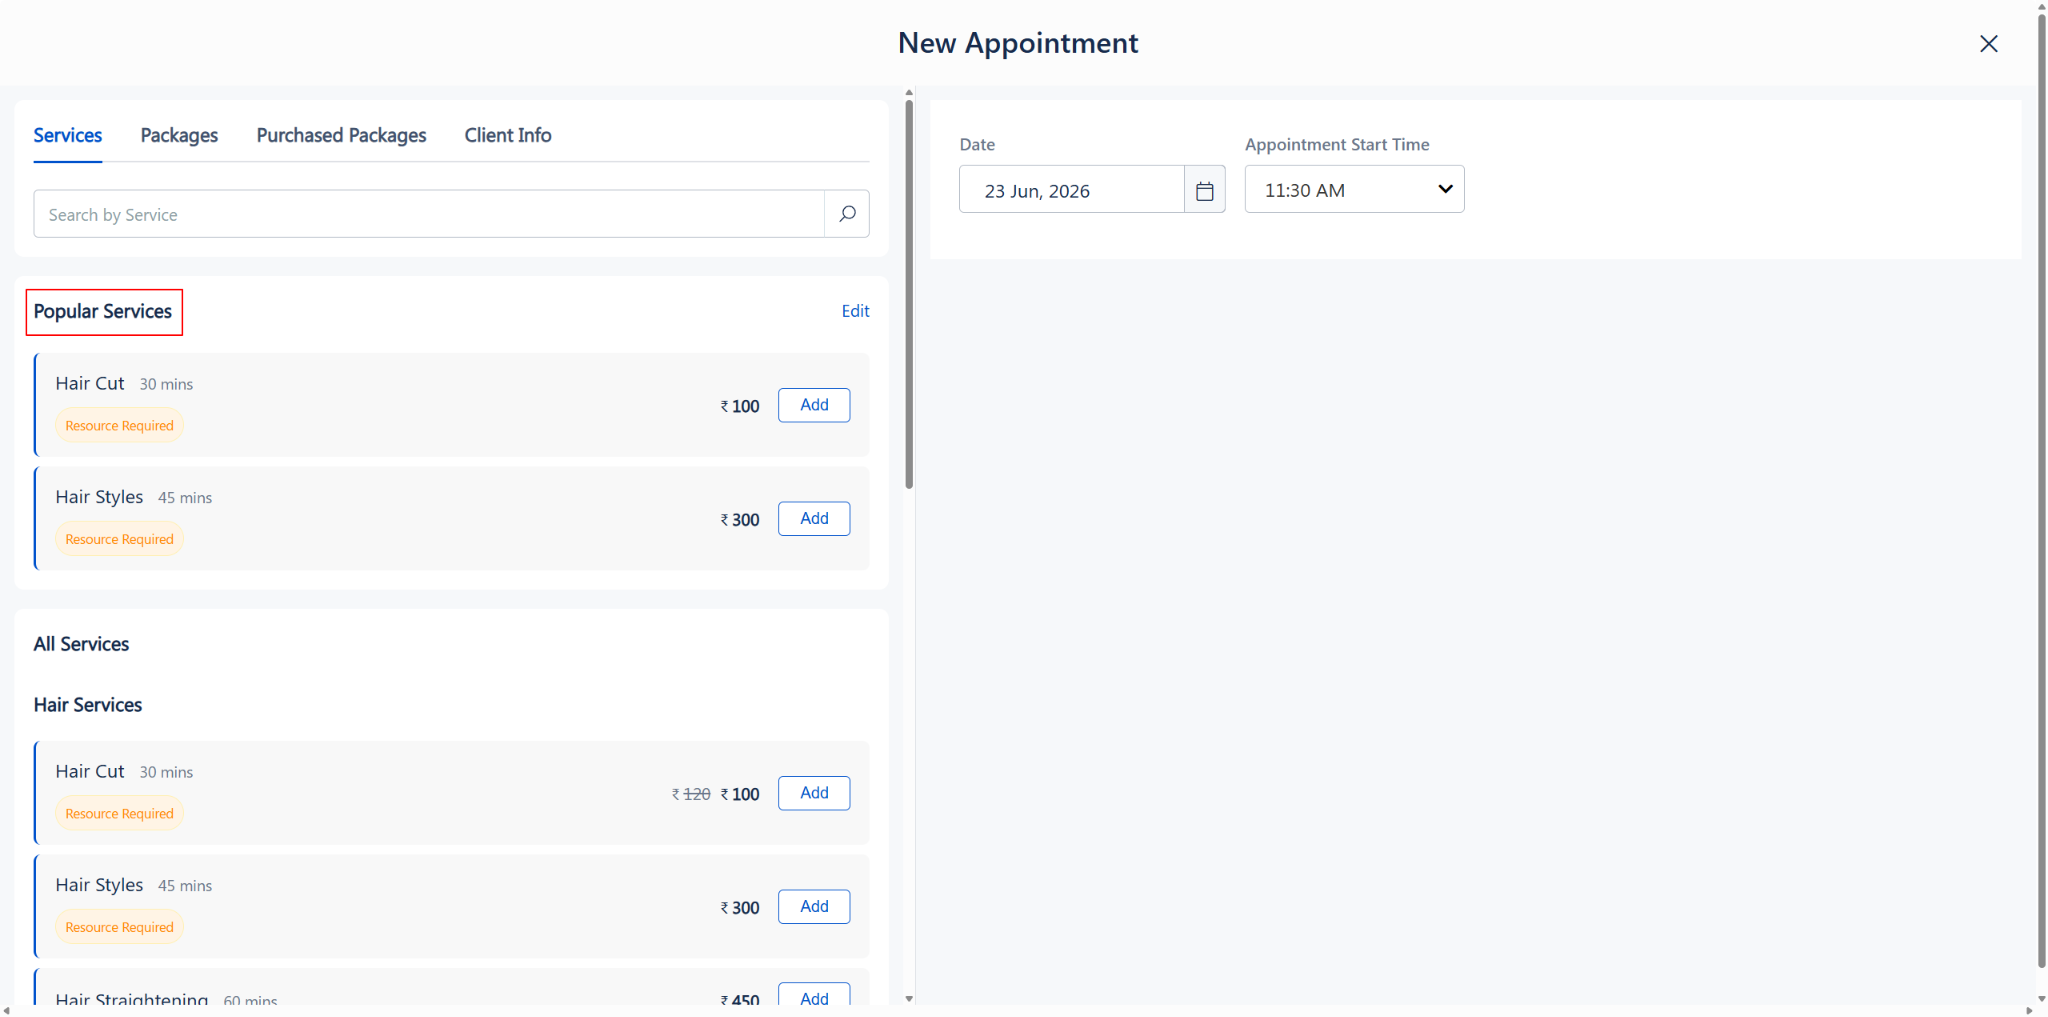
Step 7: Assign Staff, Resource, and Time Slot
Once a service is added, it appears on the right panel with the following configuration fields:
1. Staff Dropdown — Select a staff member.
The dropdown includes helpful indicators: -
1. Previously Serviced — Staff who have served this client before.
2. Booked — Staff already occupied at the selected time.
3. Outside work hours — Staff who work on after the store close time.
3. Add Staff — Option to create a new staff member on the spot.
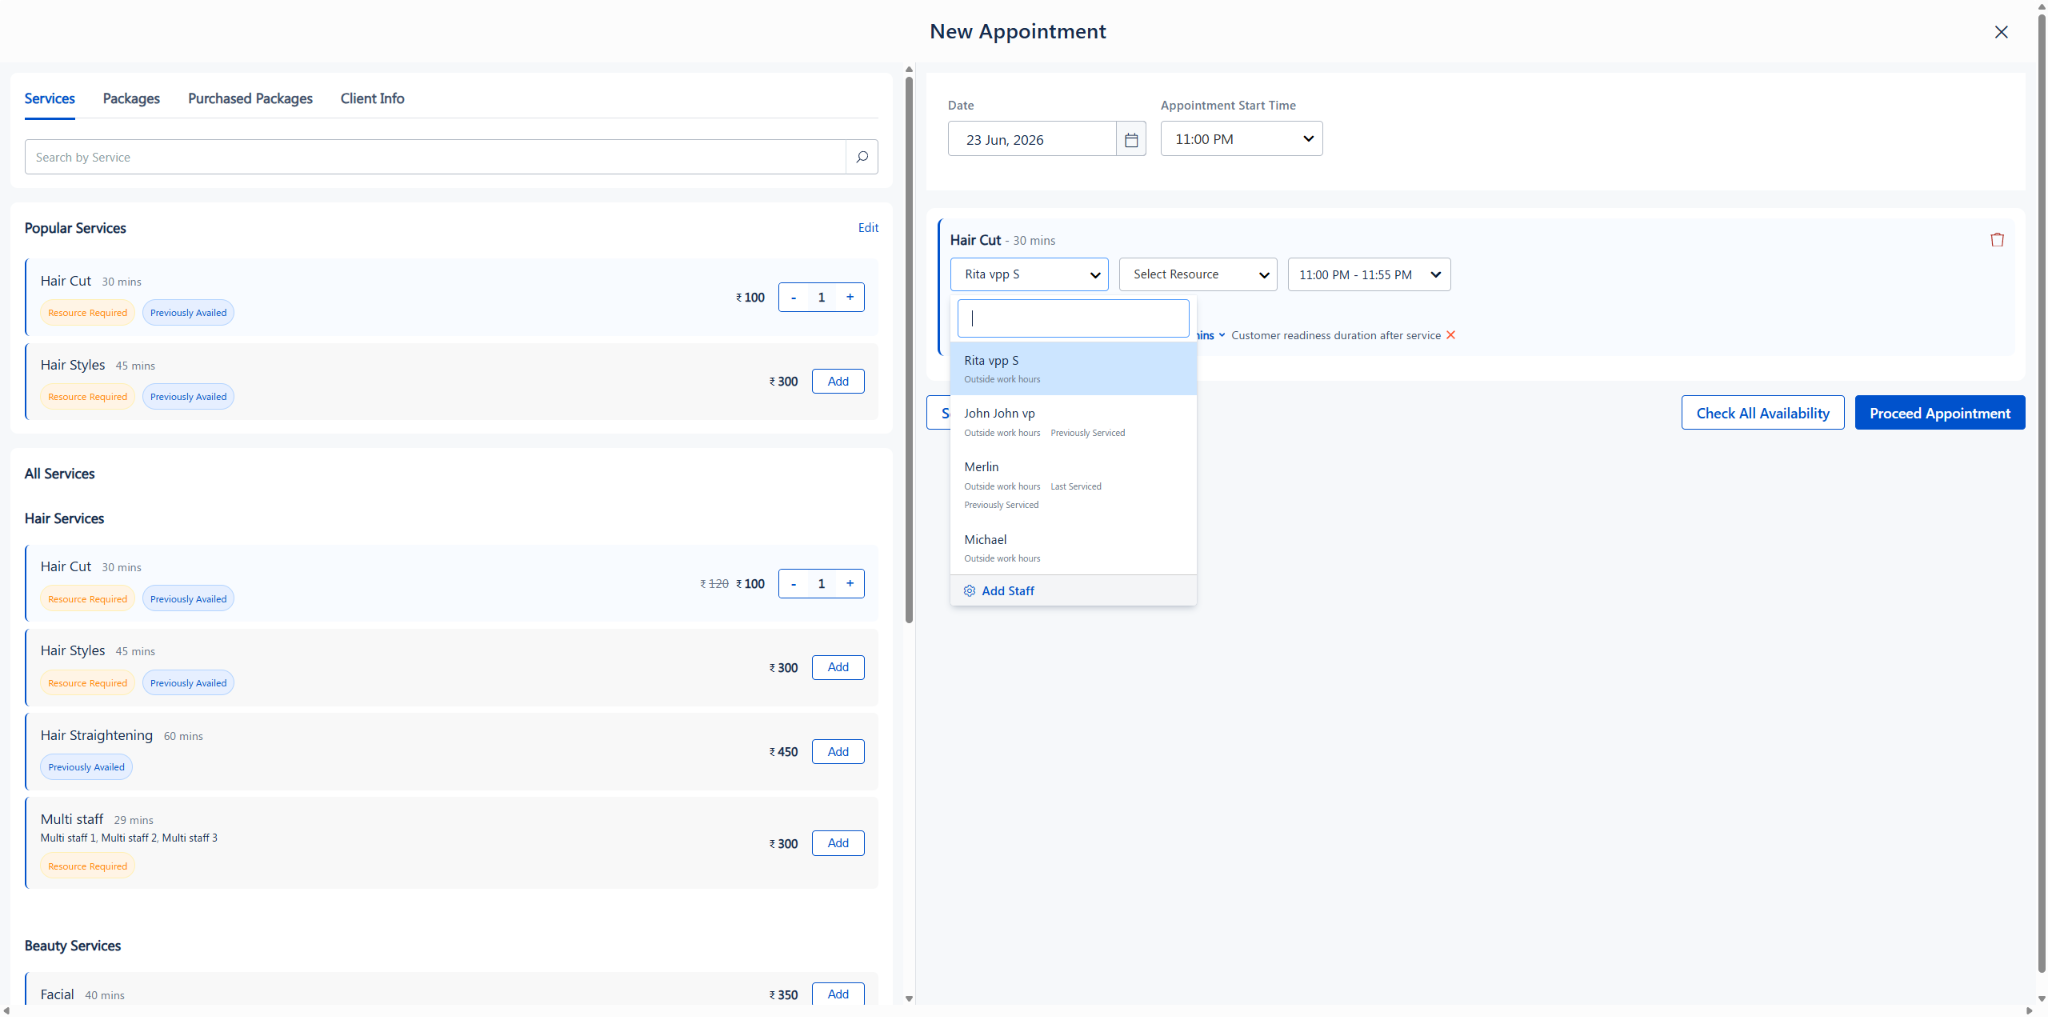
Staff dropdown showing Previously Serviced, Booked, and Add Staff options
Outside Work Hours Warning:
If the selected time slot is outside the business working hours, you will see an "Outside work hours" warning displayed in below the staff fields.
This means the appointment has been scheduled beyond the salon's configured operating hours.
The booking can still be saved, but this warning helps the front desk be aware that the session is outside regular hours — so they can confirm with the staff or adjust the time if needed.
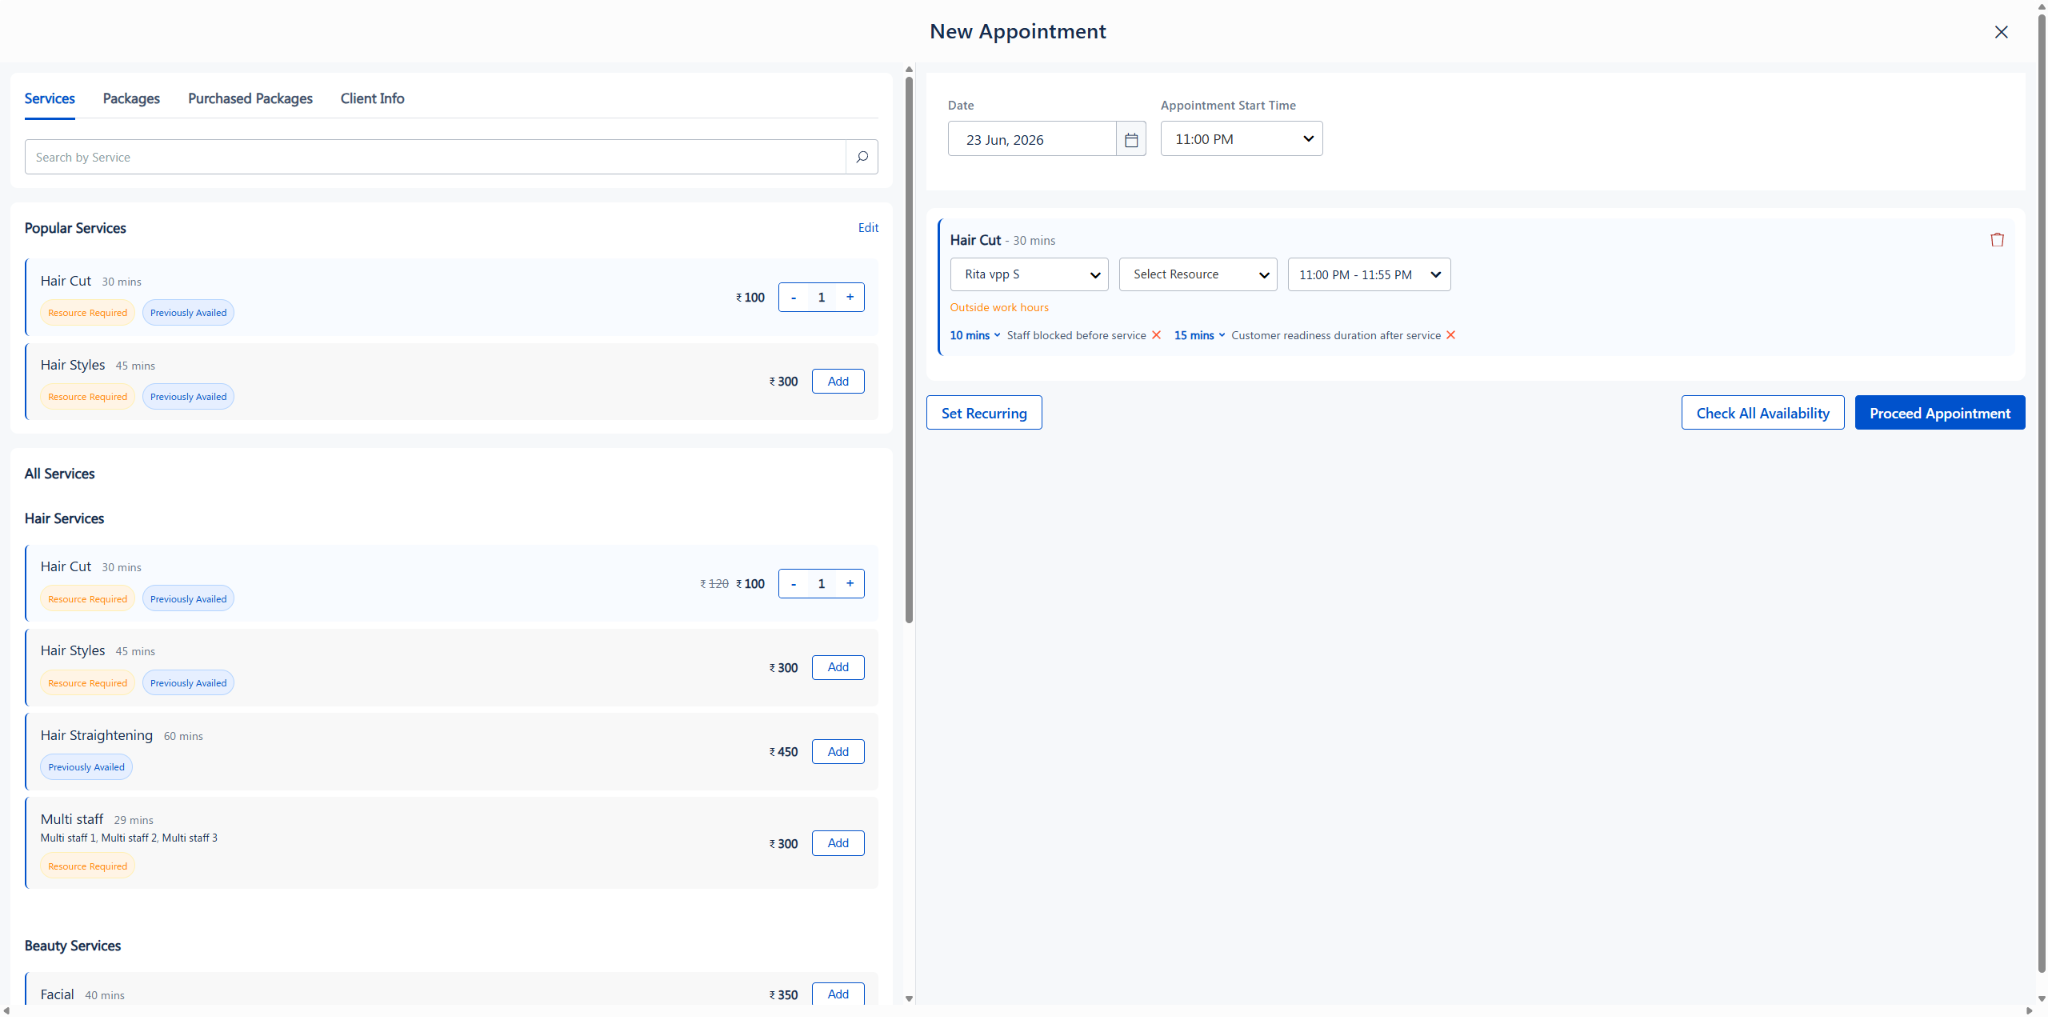
2. Resource Dropdown — Select a resource (e.g., Room 1, Room 2)
The dropdown includes:
1. Booked — For resources already occupied at the selected time
2. Add Resource — Option to create a new resource on the spot
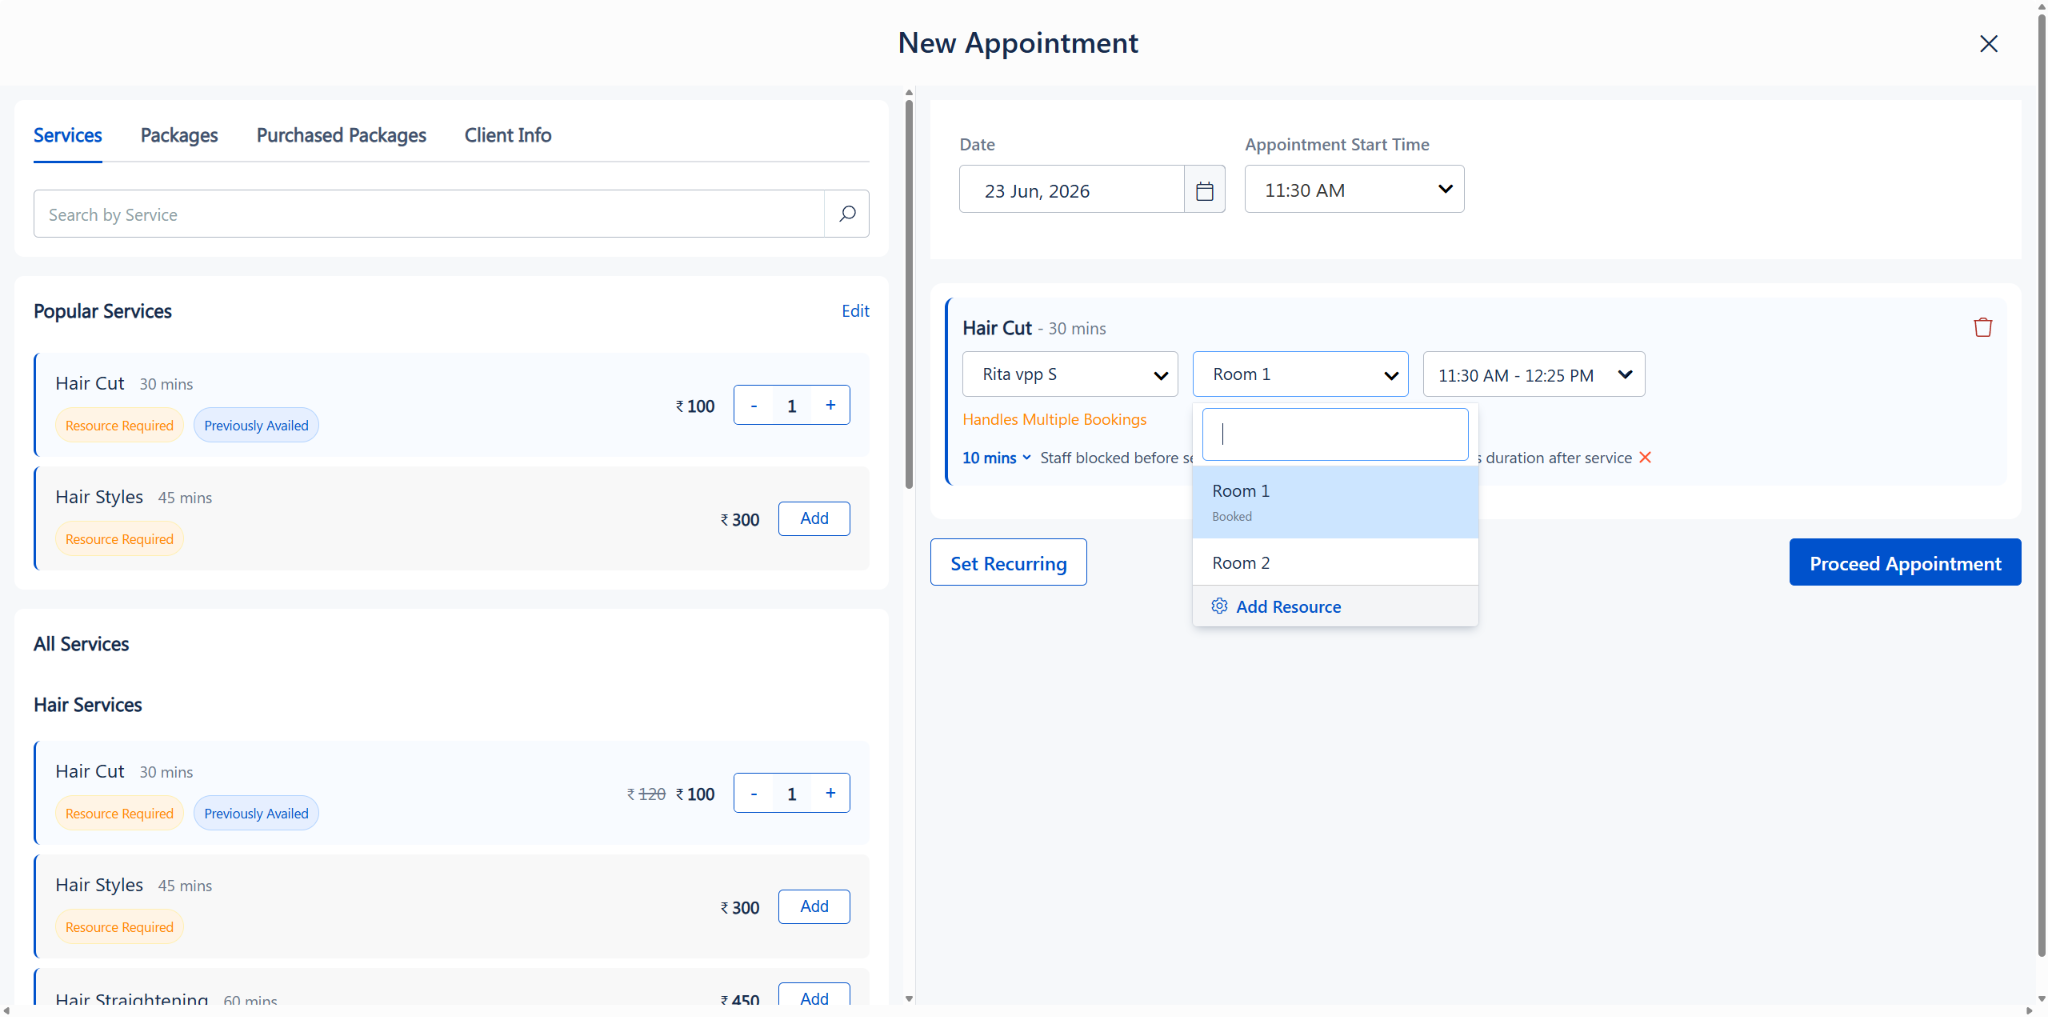
Resource dropdown showing Room 1 (Booked), Room 2 available, and Add Resource option
3. Time Slot — Auto-calculated based on service duration and start time (e.g., 10:20 AM – 11:15 AM). Adjustable via the dropdown.
4. Multiple Bookings Indicators — This feature is controlled by settings in Settings → Appointment → Scheduling Rules:
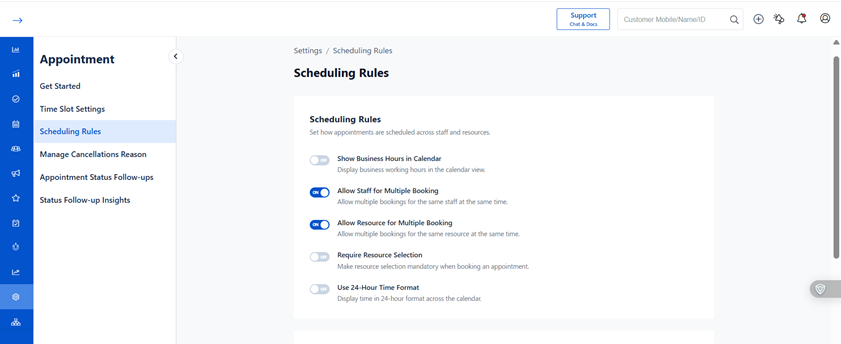
Scheduling Rules Settings showing Allow Staff and Allow Resource for Multiple Booking toggles
· Allow Staff for Multiple Booking — “Allow multiple bookings for the same staff at the same time.”
· Allow Resource for Multiple Booking — “Allow multiple bookings for the same resource at the same time.”
When these settings are enabled:
For Staff:
- The staff and resource can be selected even if they already have an appointment at the same time.
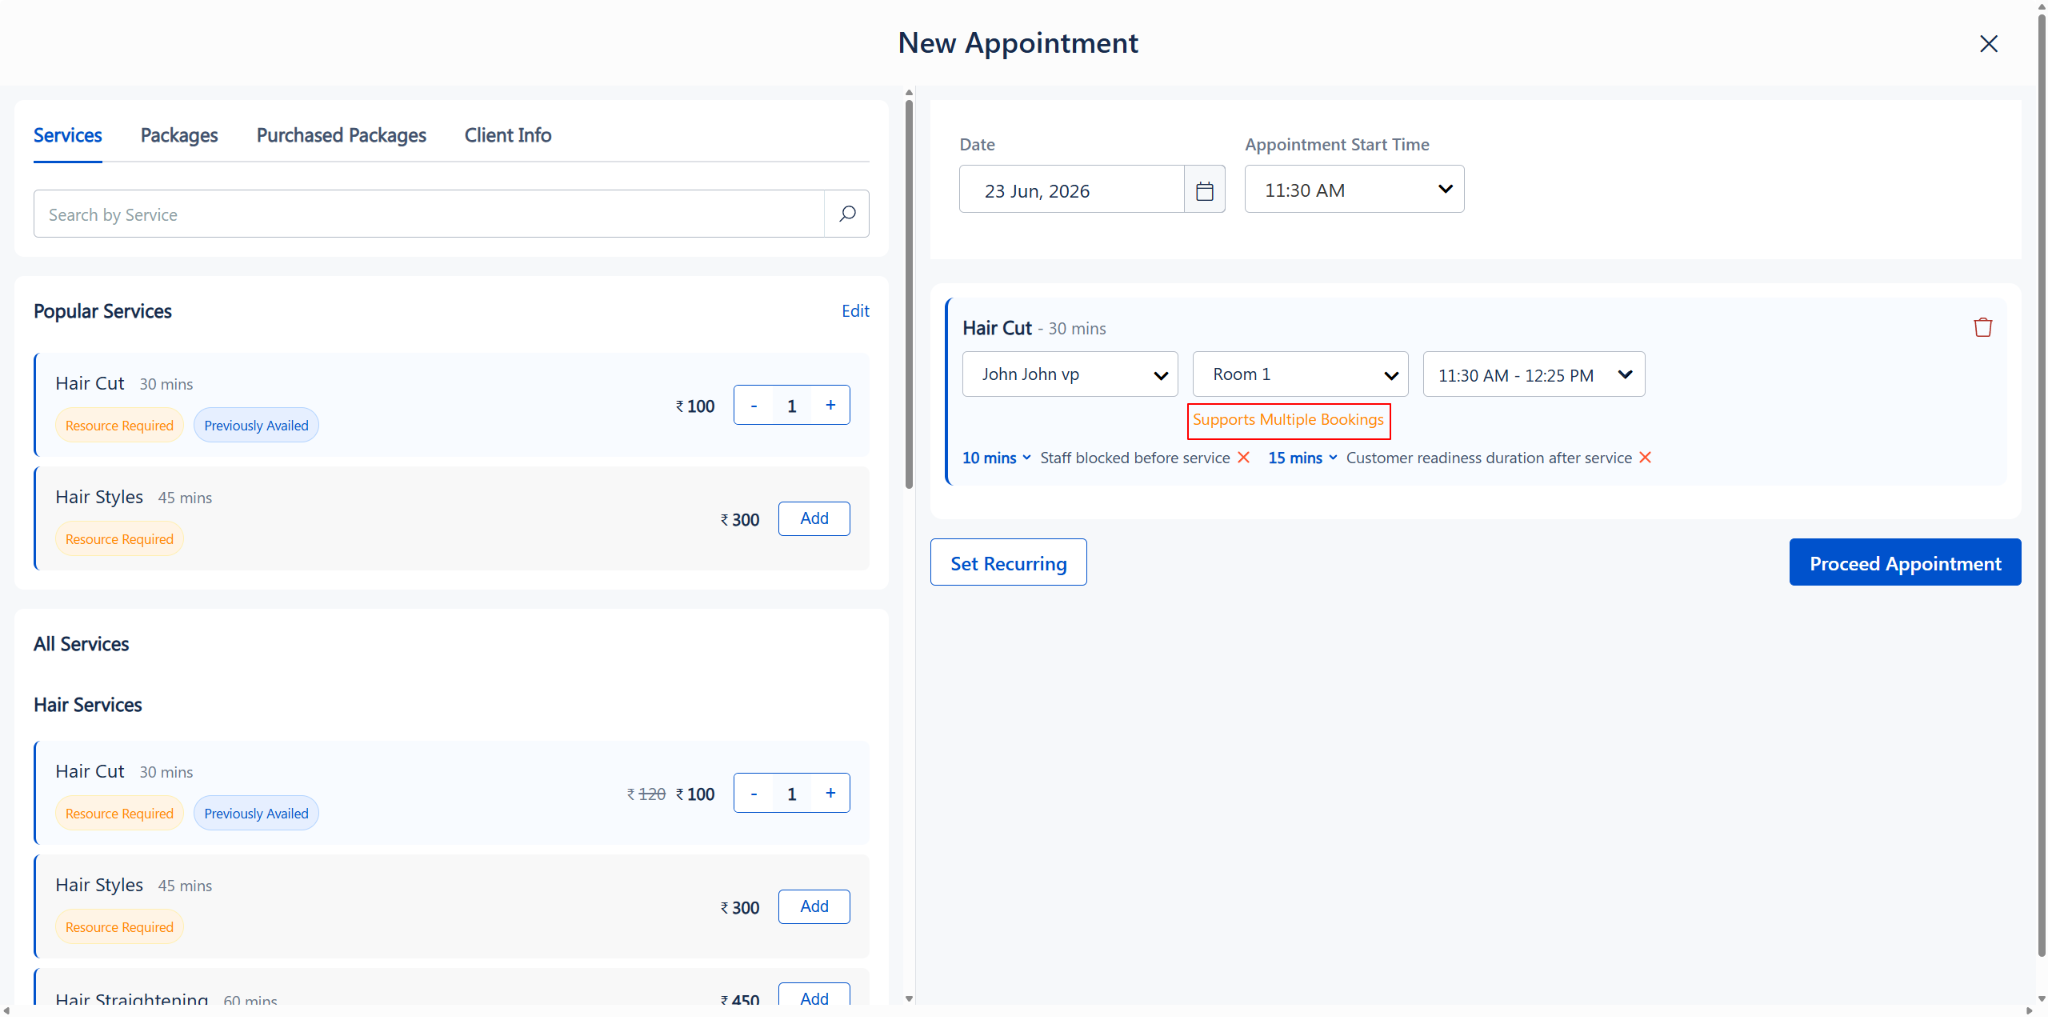
- The system displays indicator labels below the assigned staff and resource:3 - “Handles Multiple Bookings” (below staff) — Indicates the selected staff member supports multiple appointments at the same time.
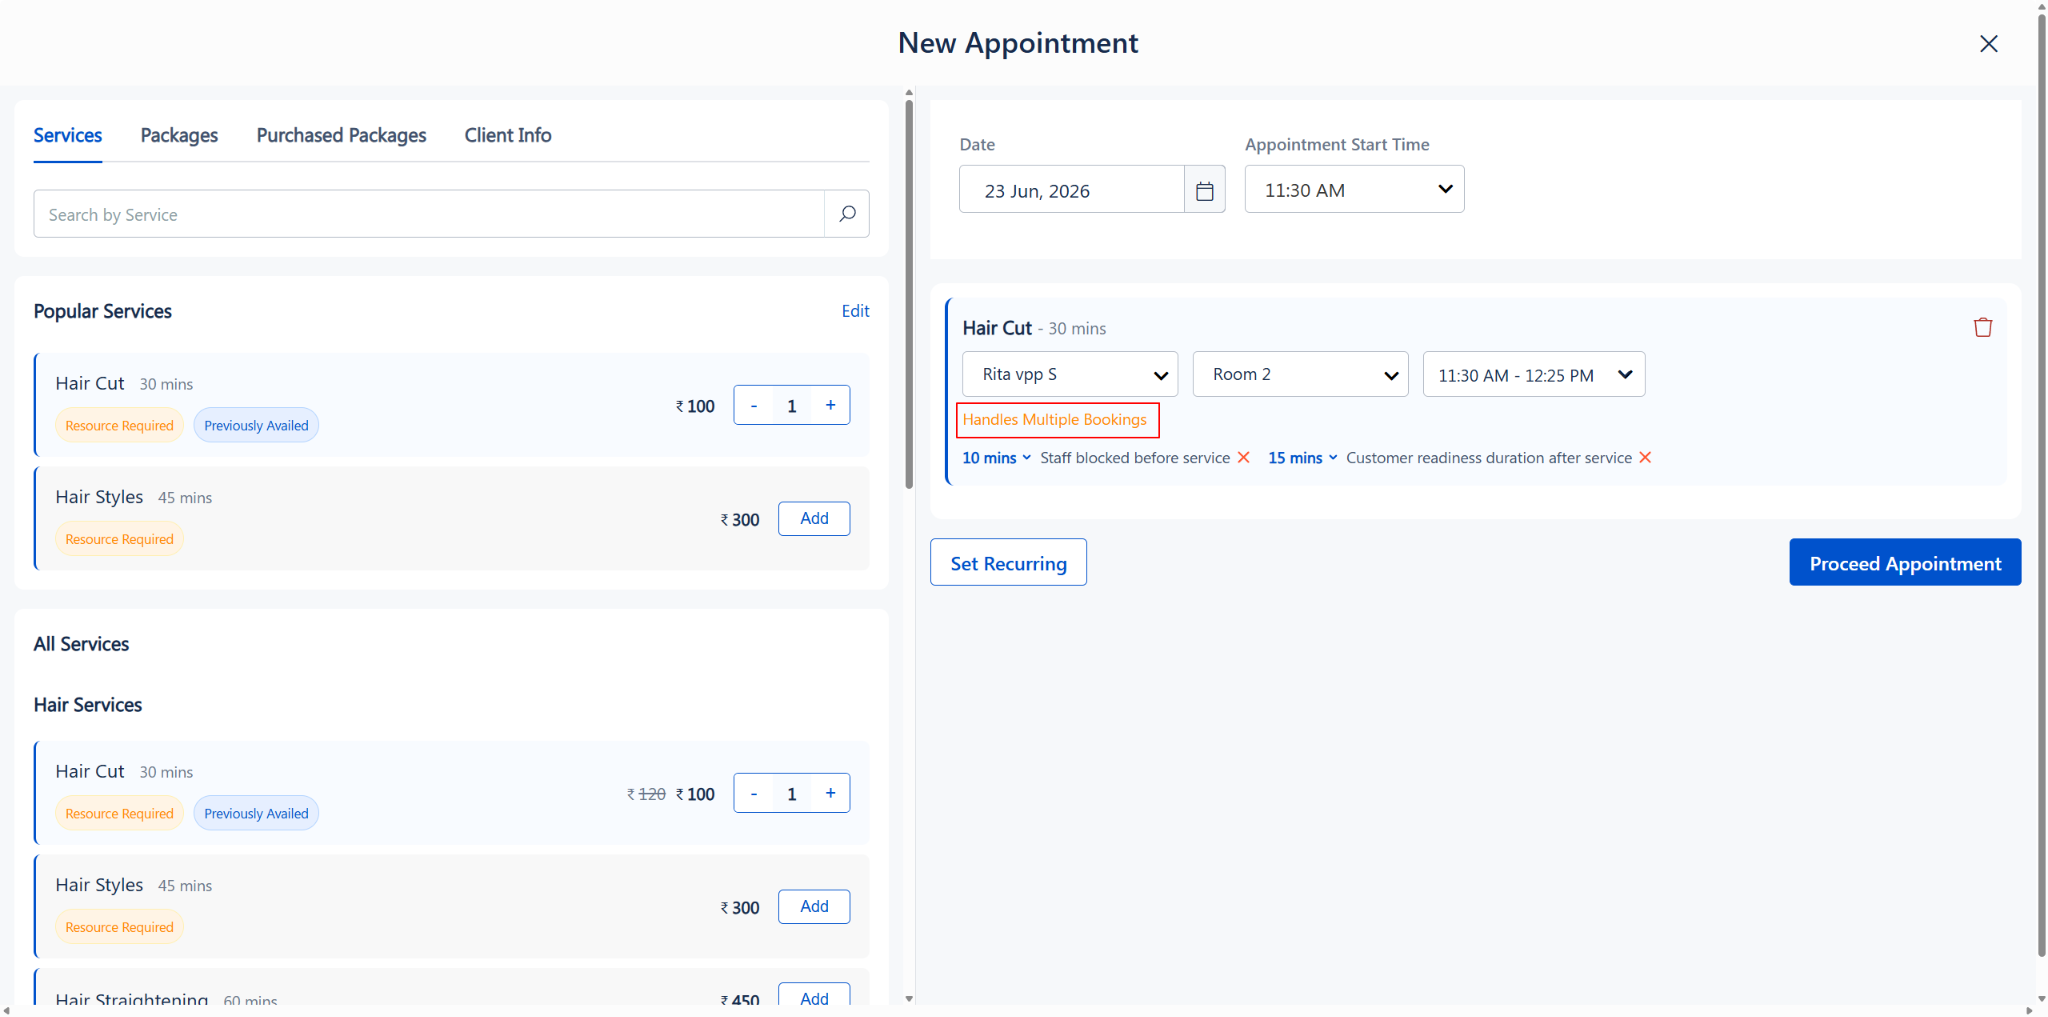
For Resource:
Supports Multiple Bookings (below resource) — Indicates the selected resource (e.g., a room) supports multiple bookings at the same time.
When these settings are disabled:
Staff and resources that are already booked at the selected time will show the appropriate Booked label.
The system will not allow you to select a staff member or resource that is already occupied at the chosen time slot.
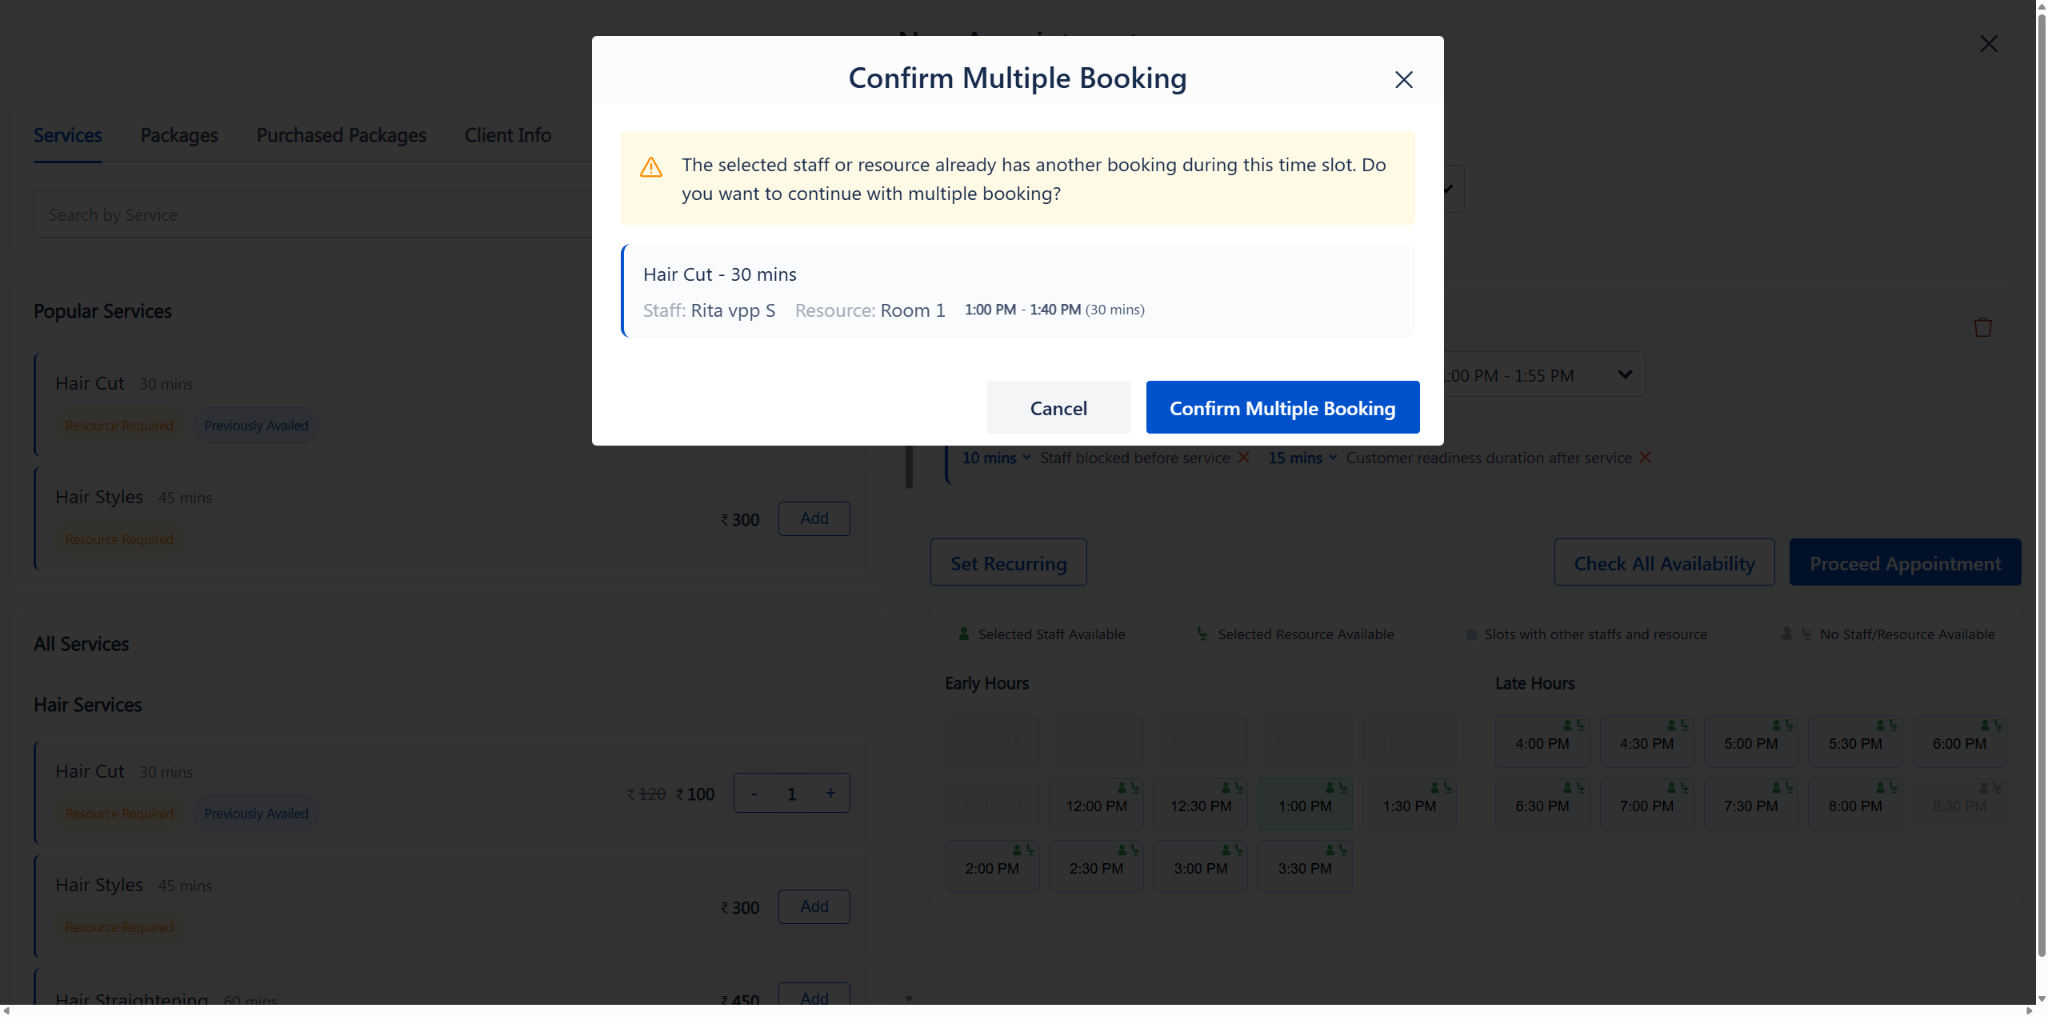
Confirm Multiple Booking Popup:
When you select a staff member or resource that is already booked at the same time slot, a "Confirm Multiple Booking" popup will appear. This popup shows a warning message:
"The selected staff or resource already has another booking during this time slot. Do you want to continue with multiple booking?"
Below the warning, the service details are displayed — including the service name, duration, resource, and time slot.
You have two options:
Click "Confirm Multiple Booking" to go ahead and allow the staff or resource to handle both bookings at the same time.
Click "Cancel" to go back and choose a different staff, resource, or time slot instead.
Note:
This popup only appears when the Allow Staff for Multiple Booking or Allow Resource for Multiple Booking settings are enabled under Settings → Appointment → Scheduling Rules. If these settings are turned off, you will not be able to book the same staff or resource for overlapping time slots.
Step 8: Configure Buffer Times (Optional)
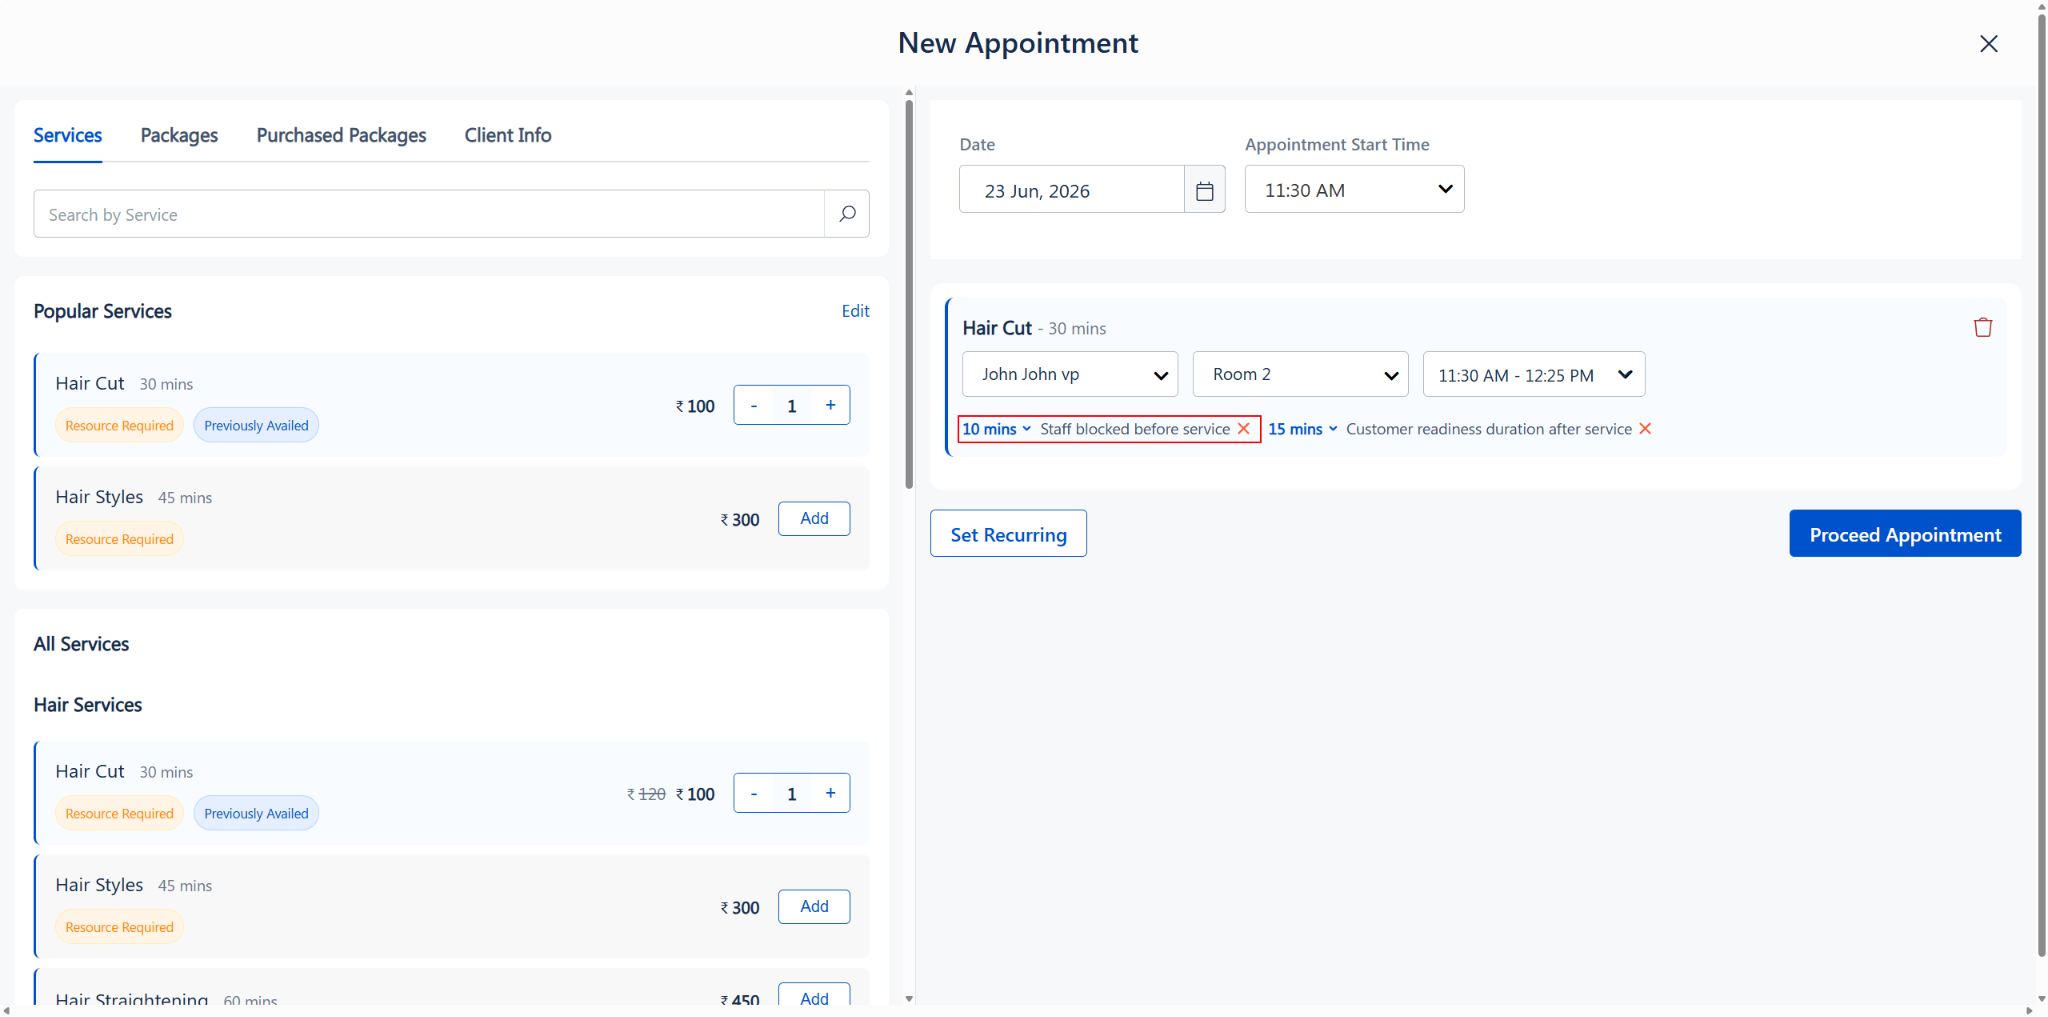
Below the staff and resource row, two optional buffer time settings appear:
· Staff blocked before service (e.g., 10 mins) — Time reserved for staff preparation before the service begins. Click the ✕ icon to remove.
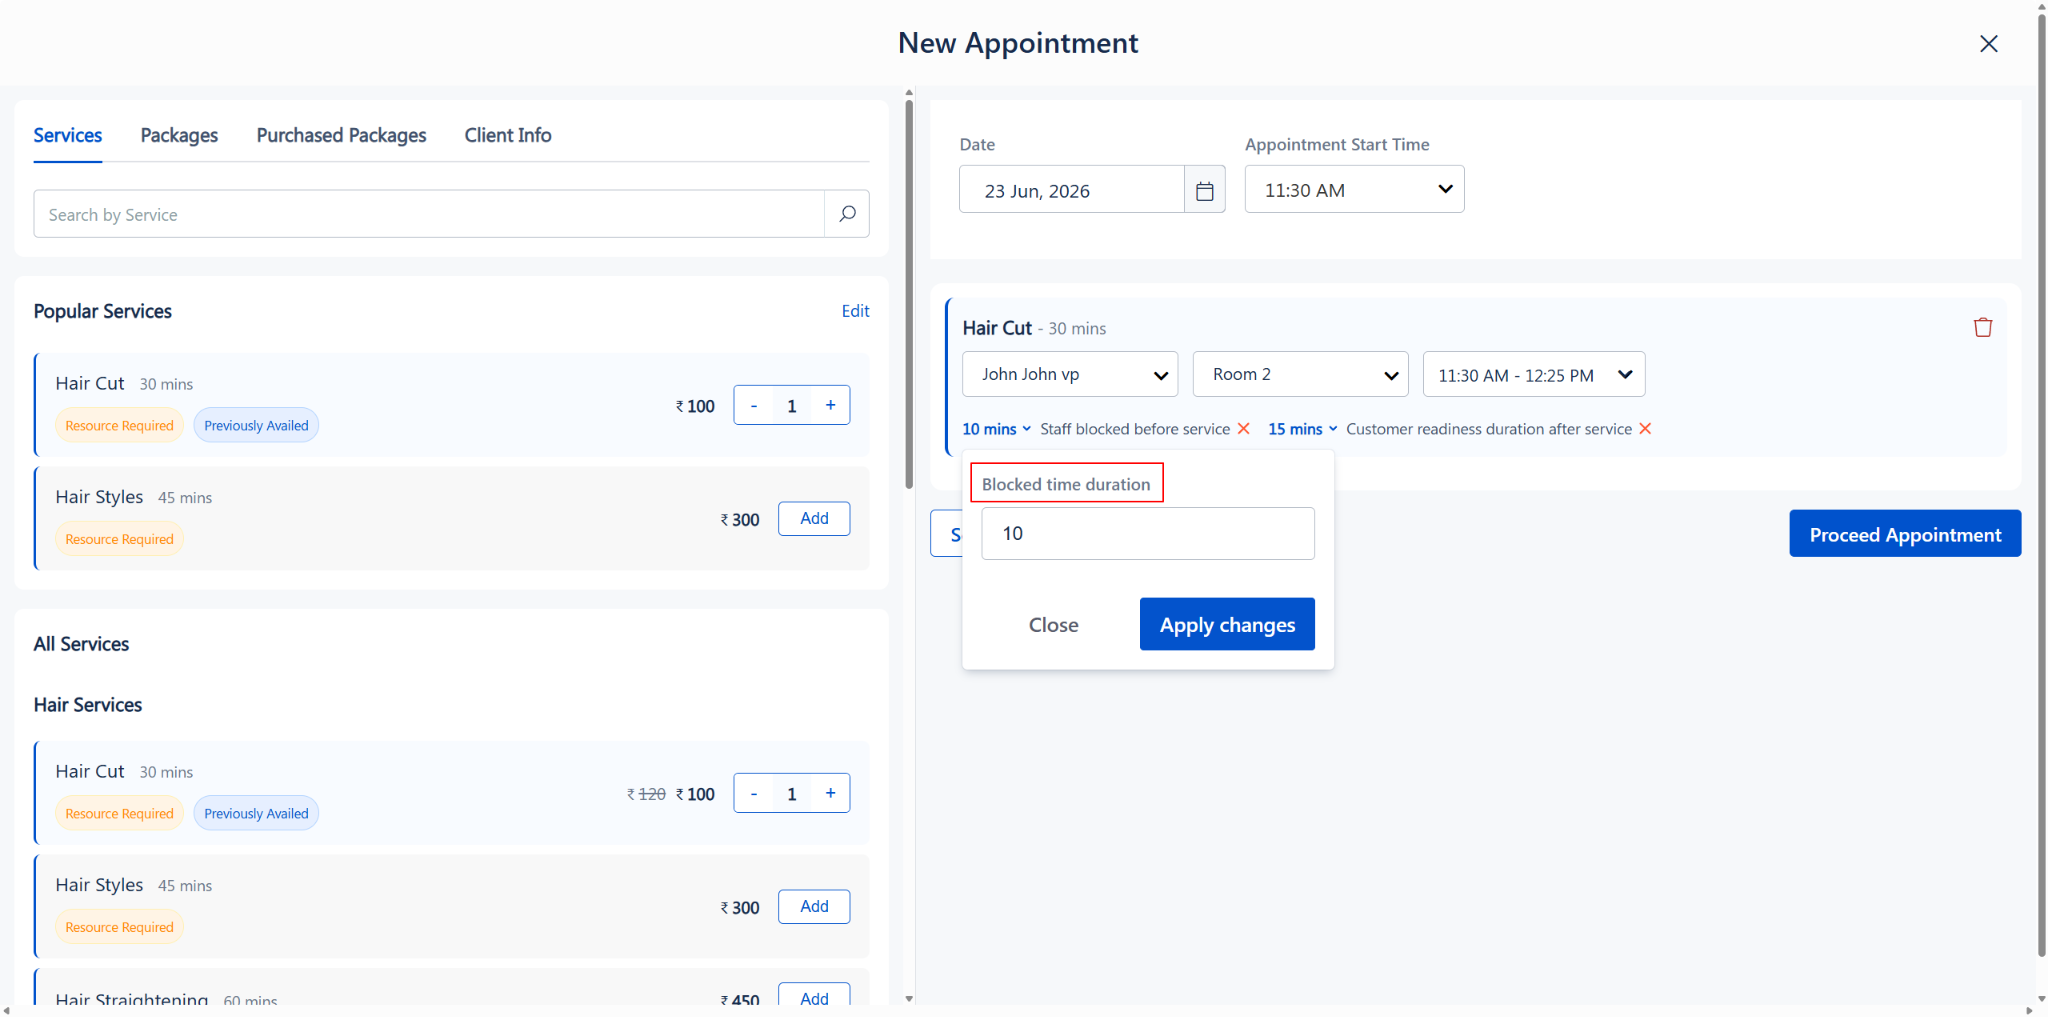
· Customer readiness duration after service (e.g., 15 mins) — Buffer time for the client after the service ends. Click the ✕ icon to remove.
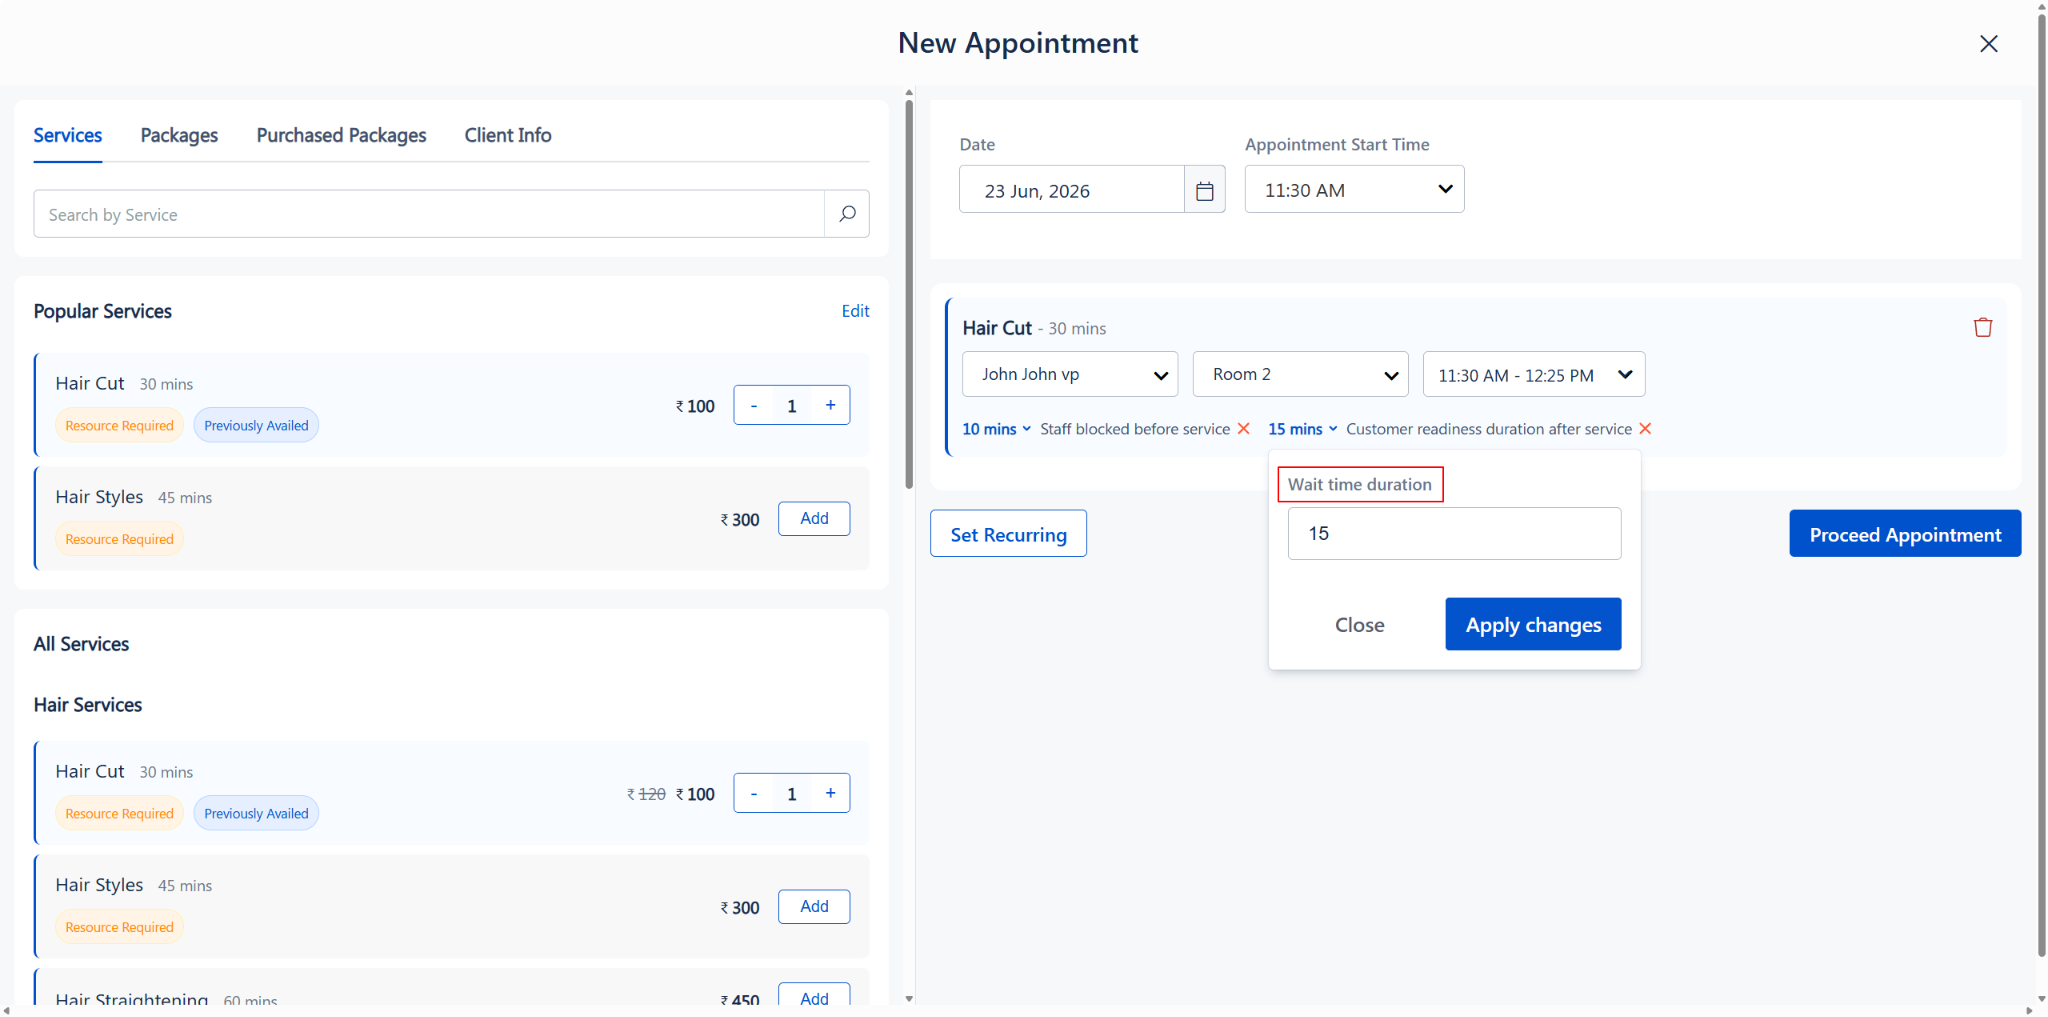
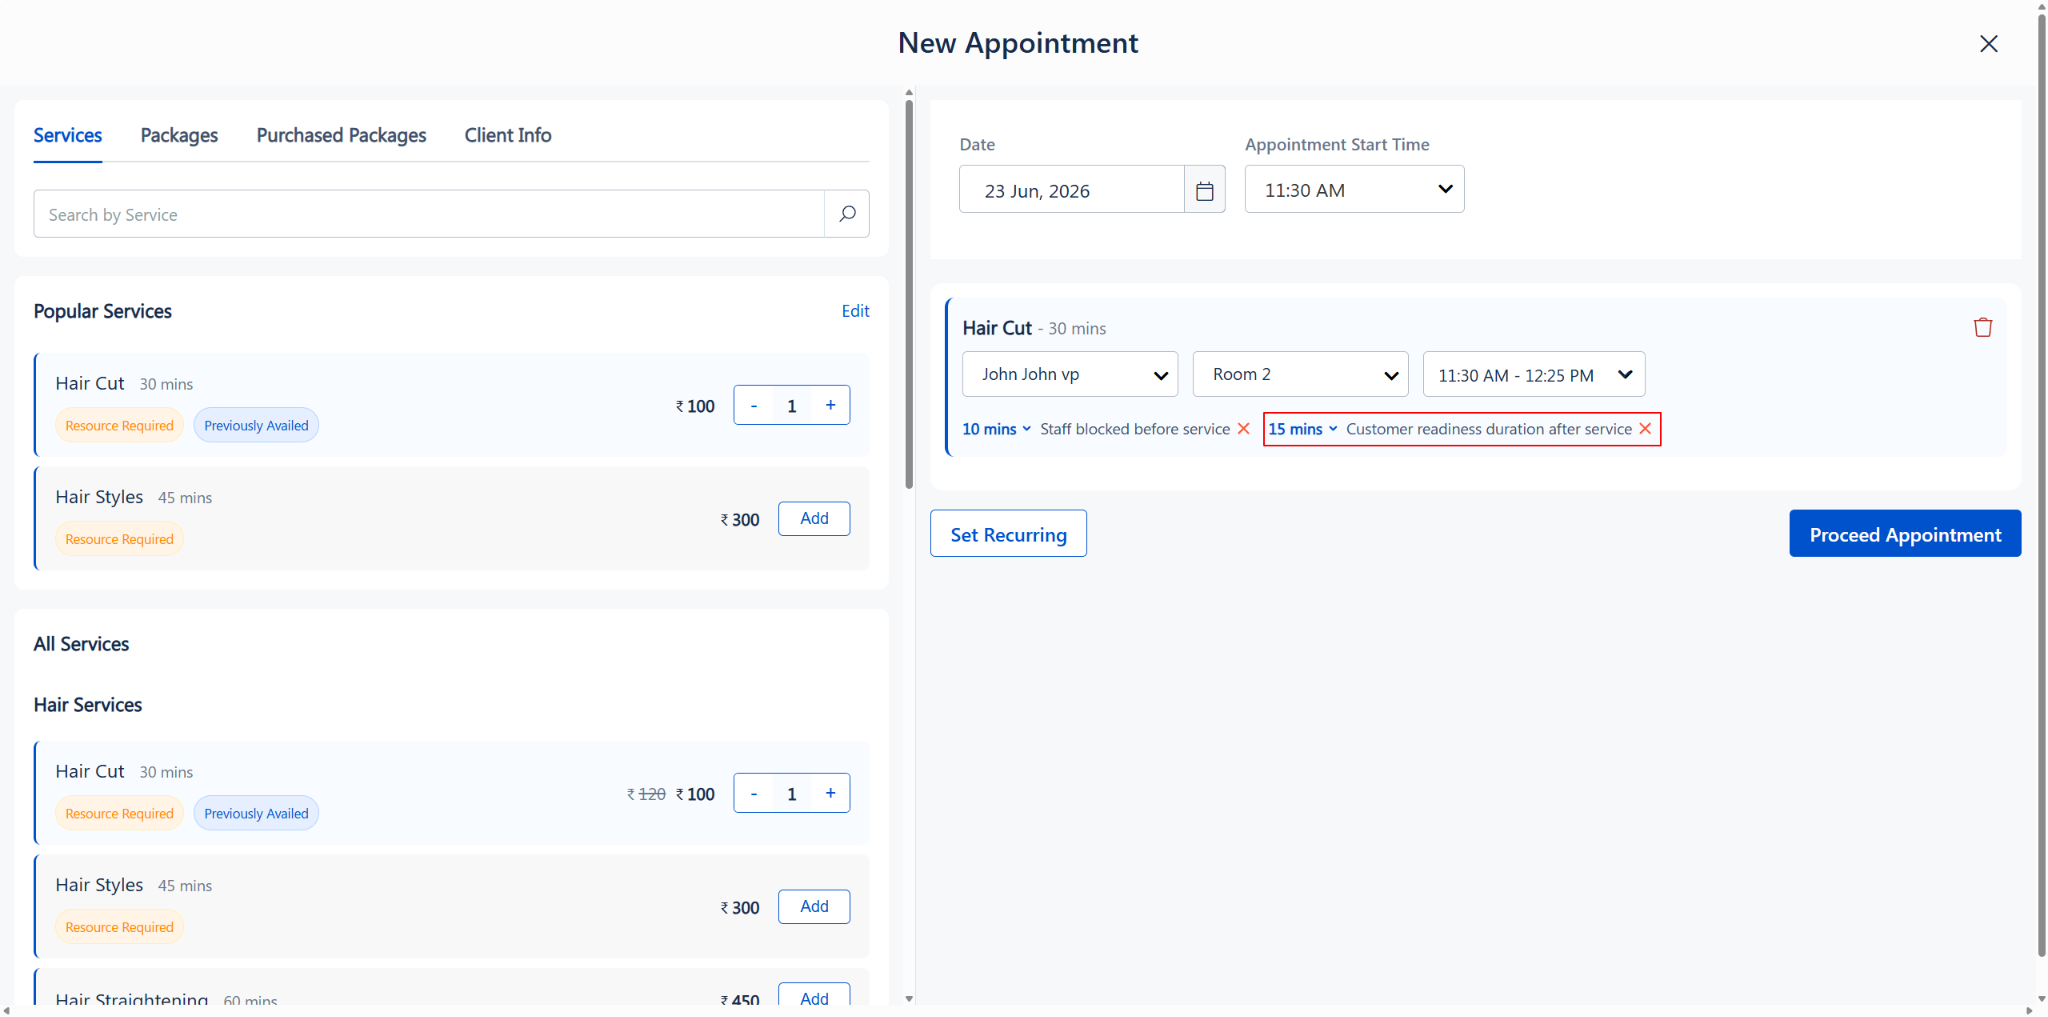
These durations are automatically added to the total appointment time calculation.
For example, a 30-minute service with 10 mins before and 15 mins after results in a total of 55 minutes blocked.
To delete the added service, click the delete icon on the far right.
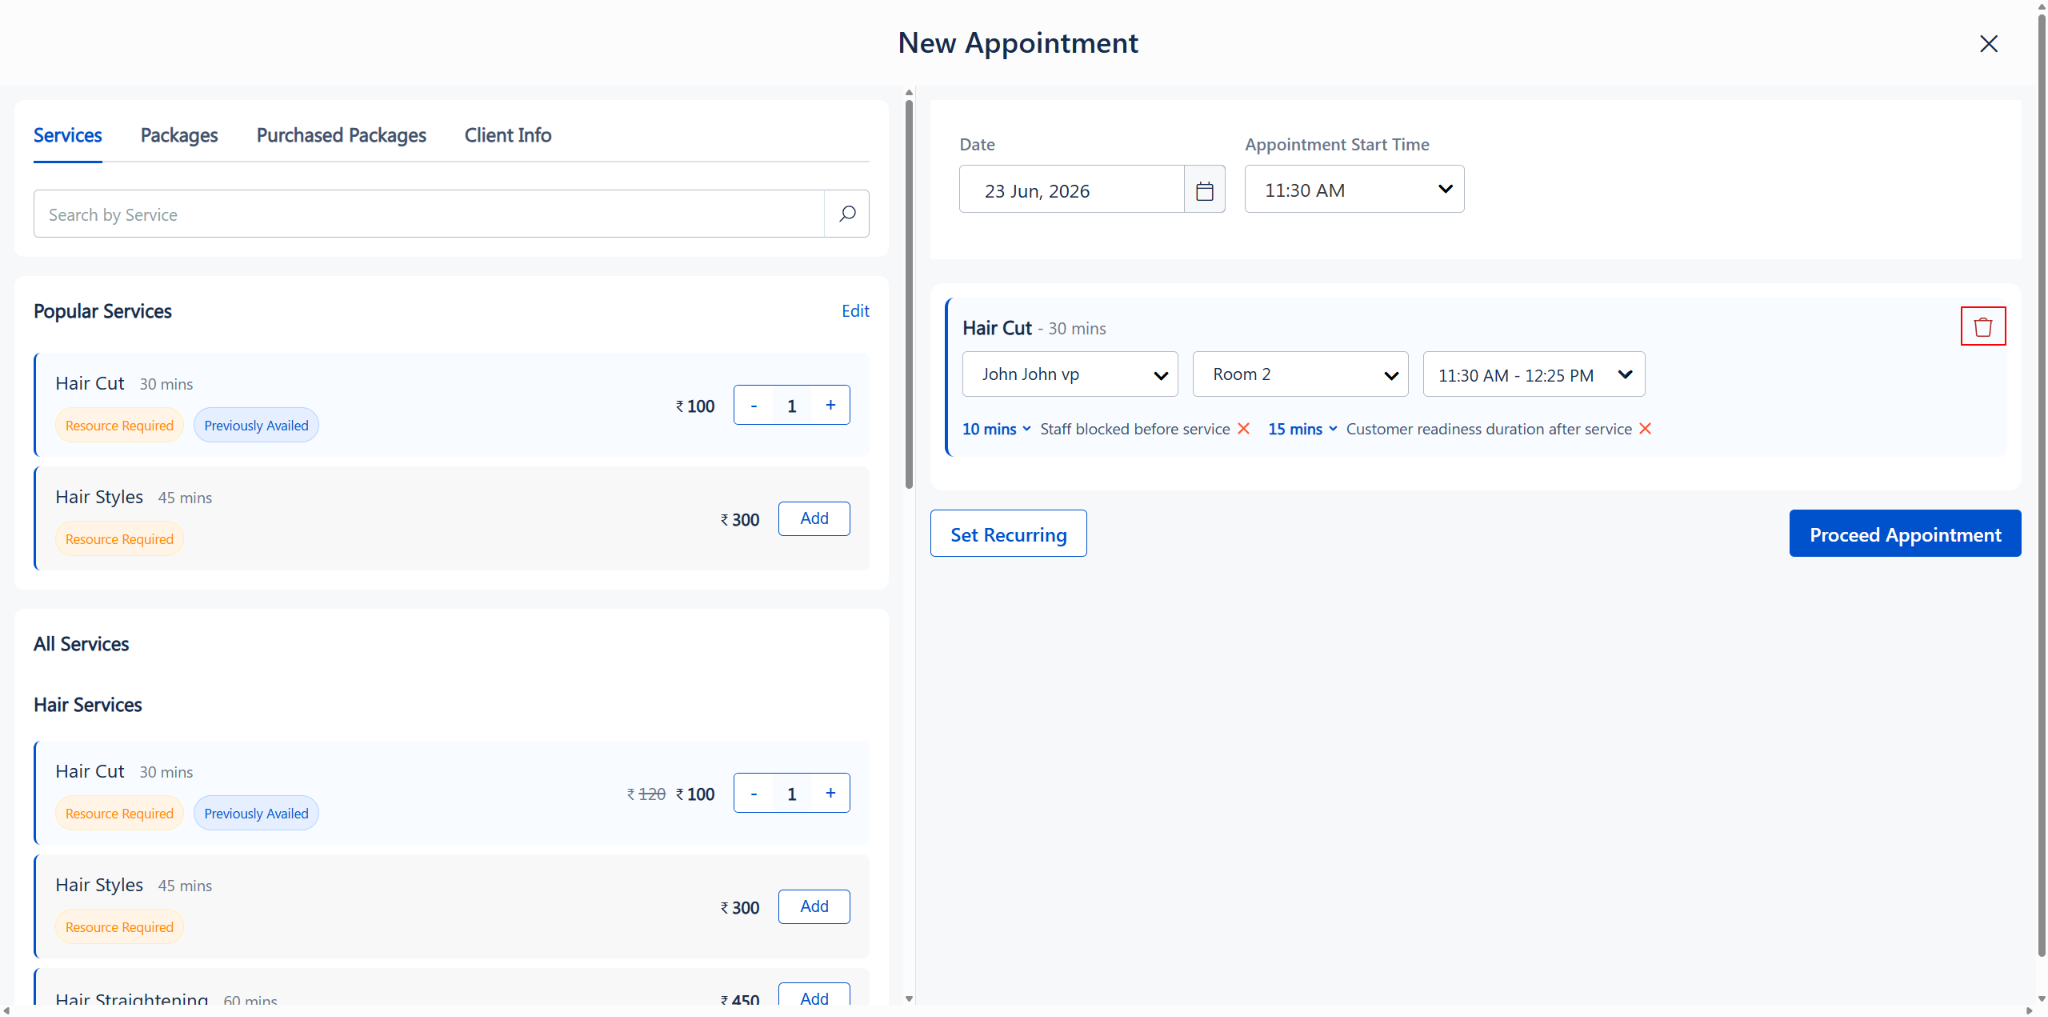
Service added on the right panel with staff, resource, time slot, and buffer time configuration
Step 9: Check Staff & Resource Availability
Click the “Check All Availability” button to open the availability grid. This grid helps you visually verify staff and resource availability before confirming the appointment.
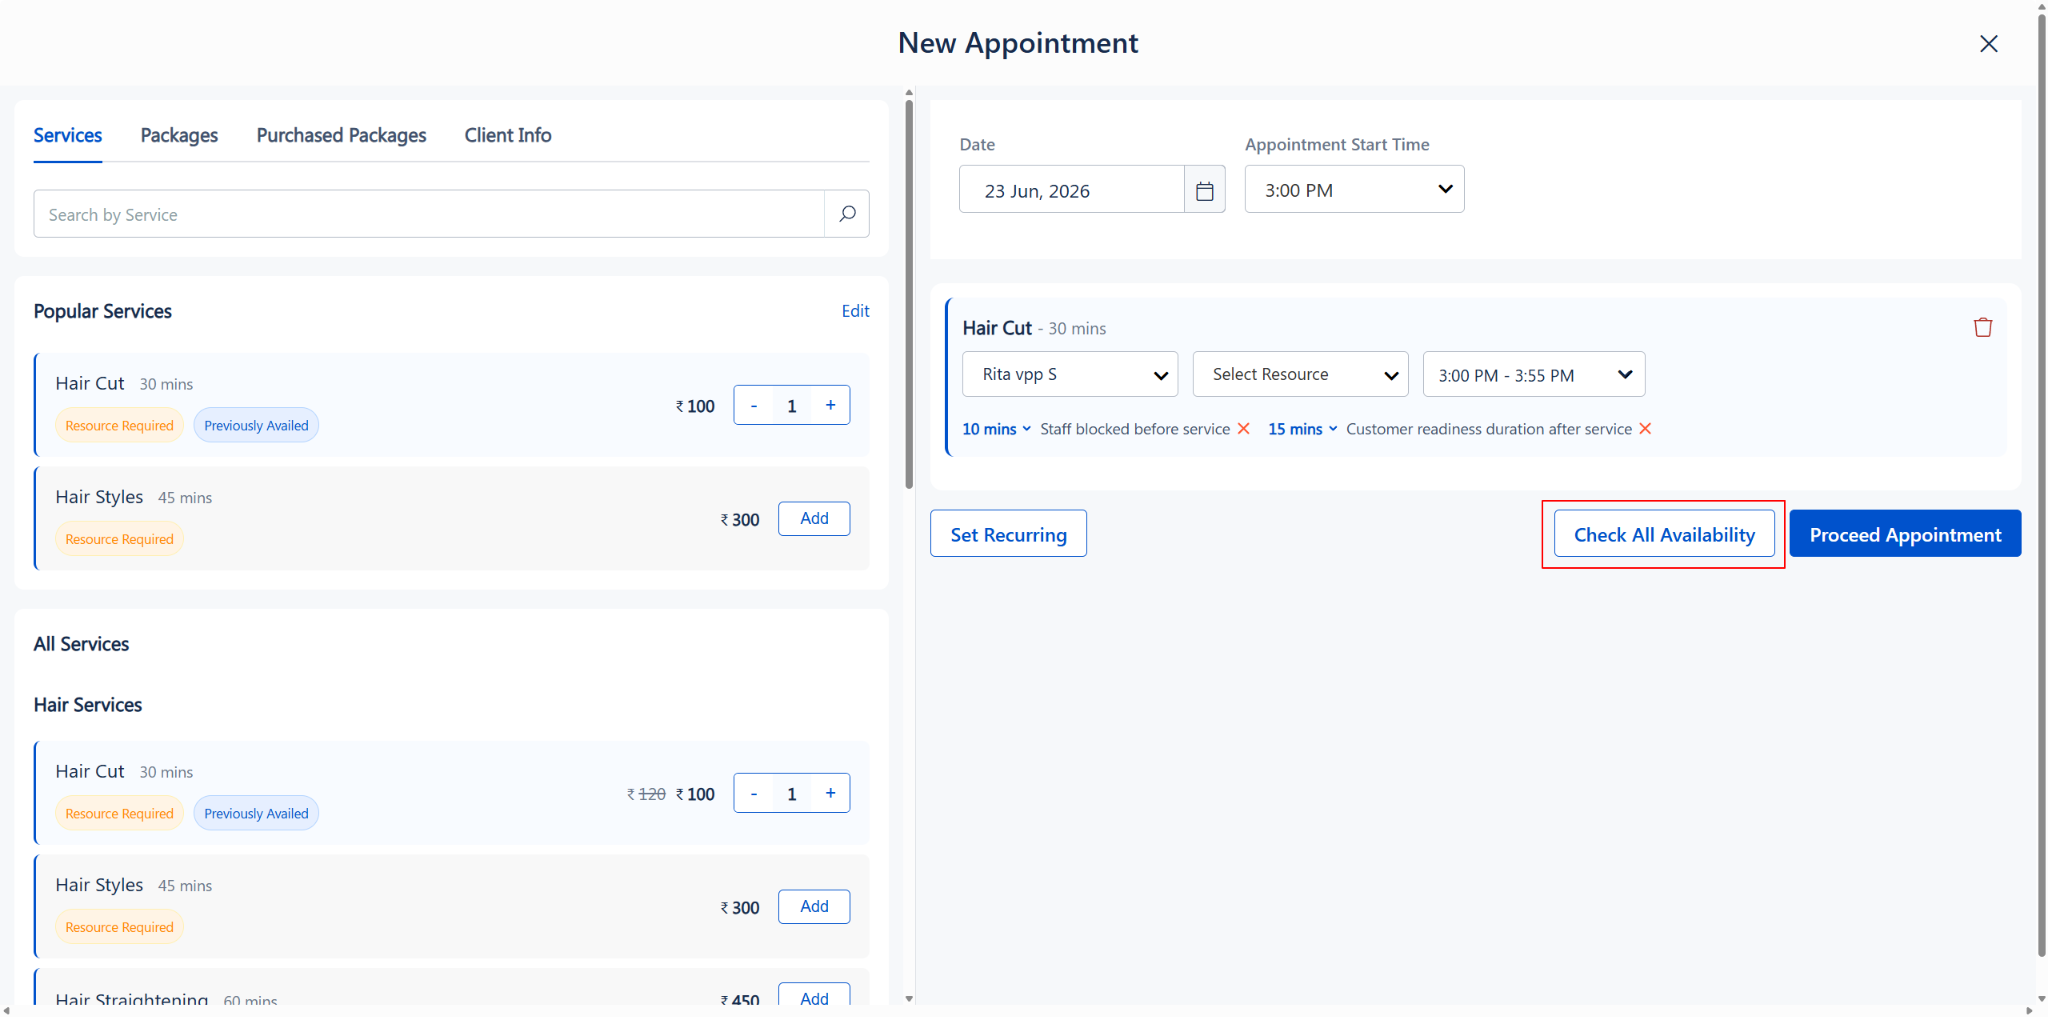
The grid is divided into:
· Early Hours — Morning and afternoon time slots
· Late Hours — Evening time slots
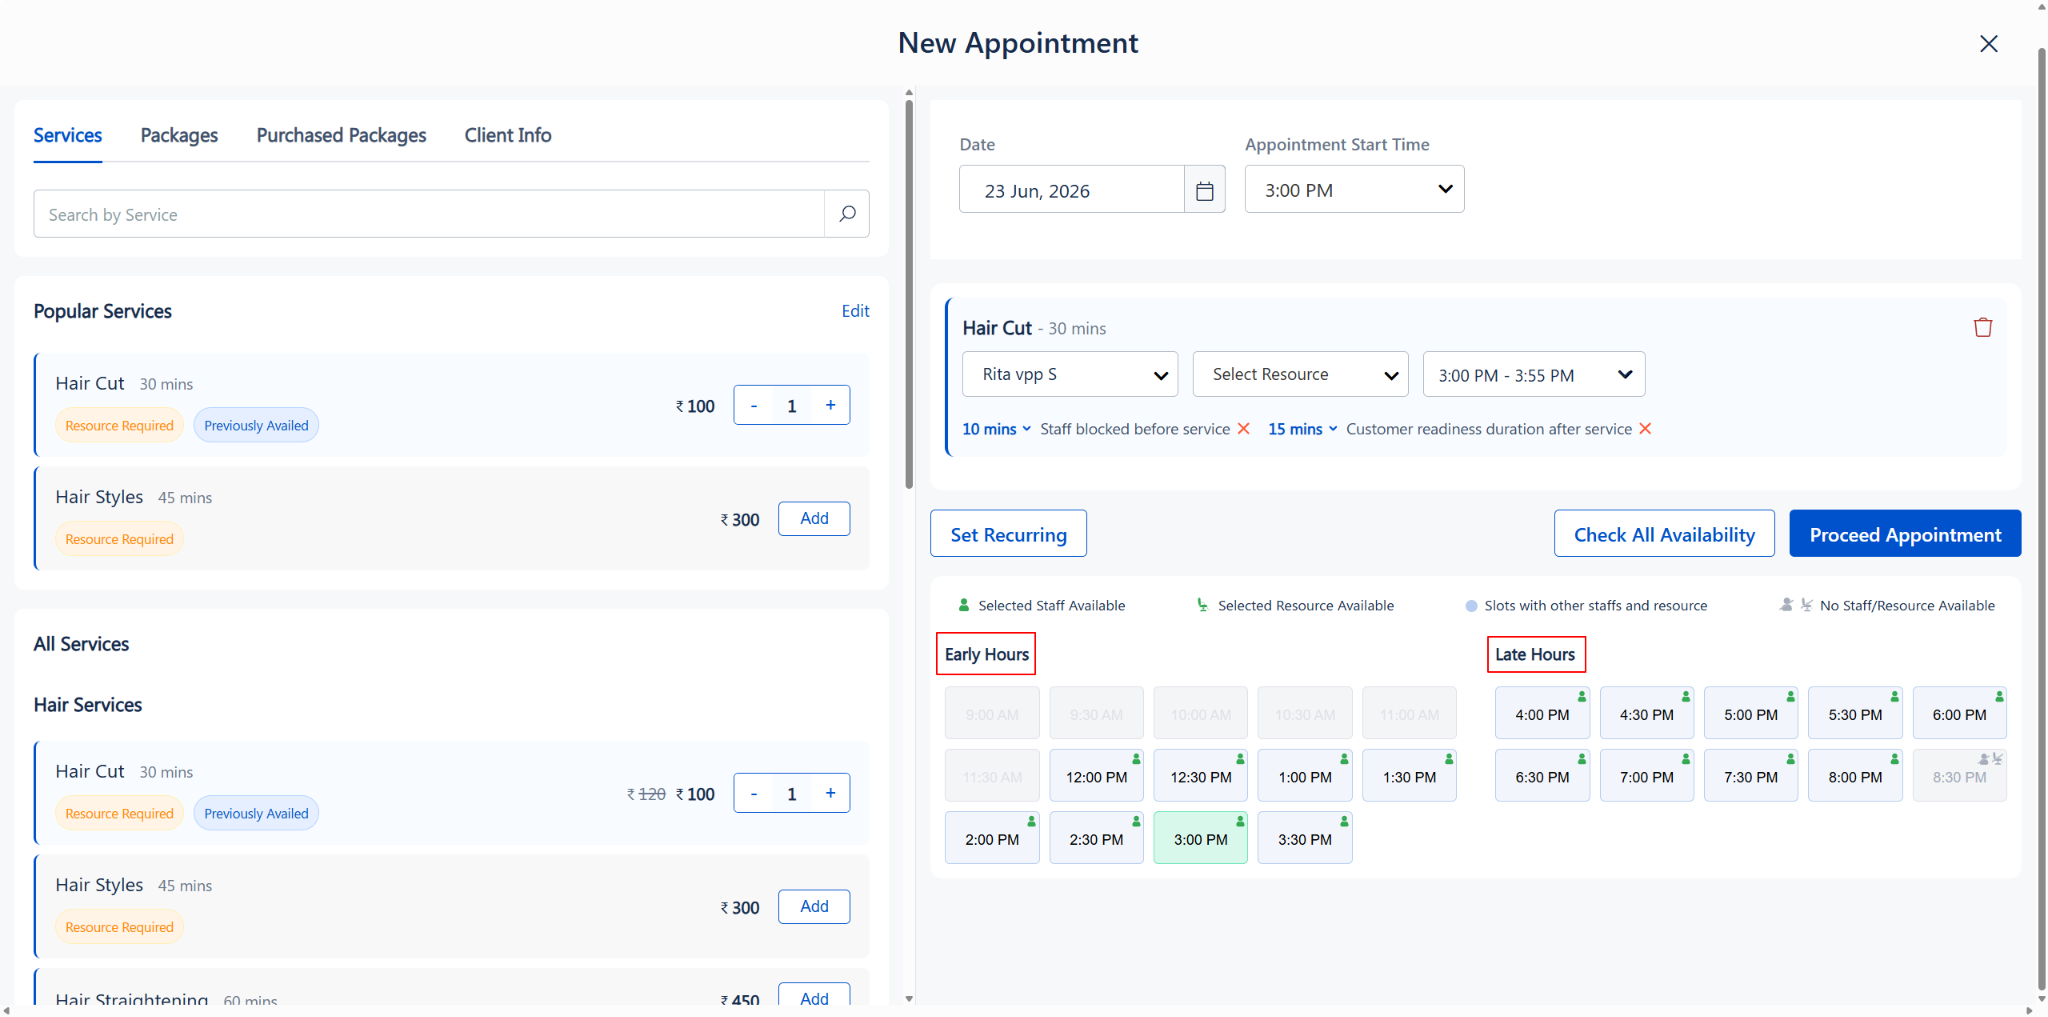
Important rules for the availability grid:
Business Working Hours only — The time slots displayed in the grid correspond to your business’s configured working hours (e.g., 9:00 AM – 9:00 PM). Slots outside working hours are not shown.
Past time slots are disabled — Time slots that have already passed for the current day are greyed out and cannot be selected.
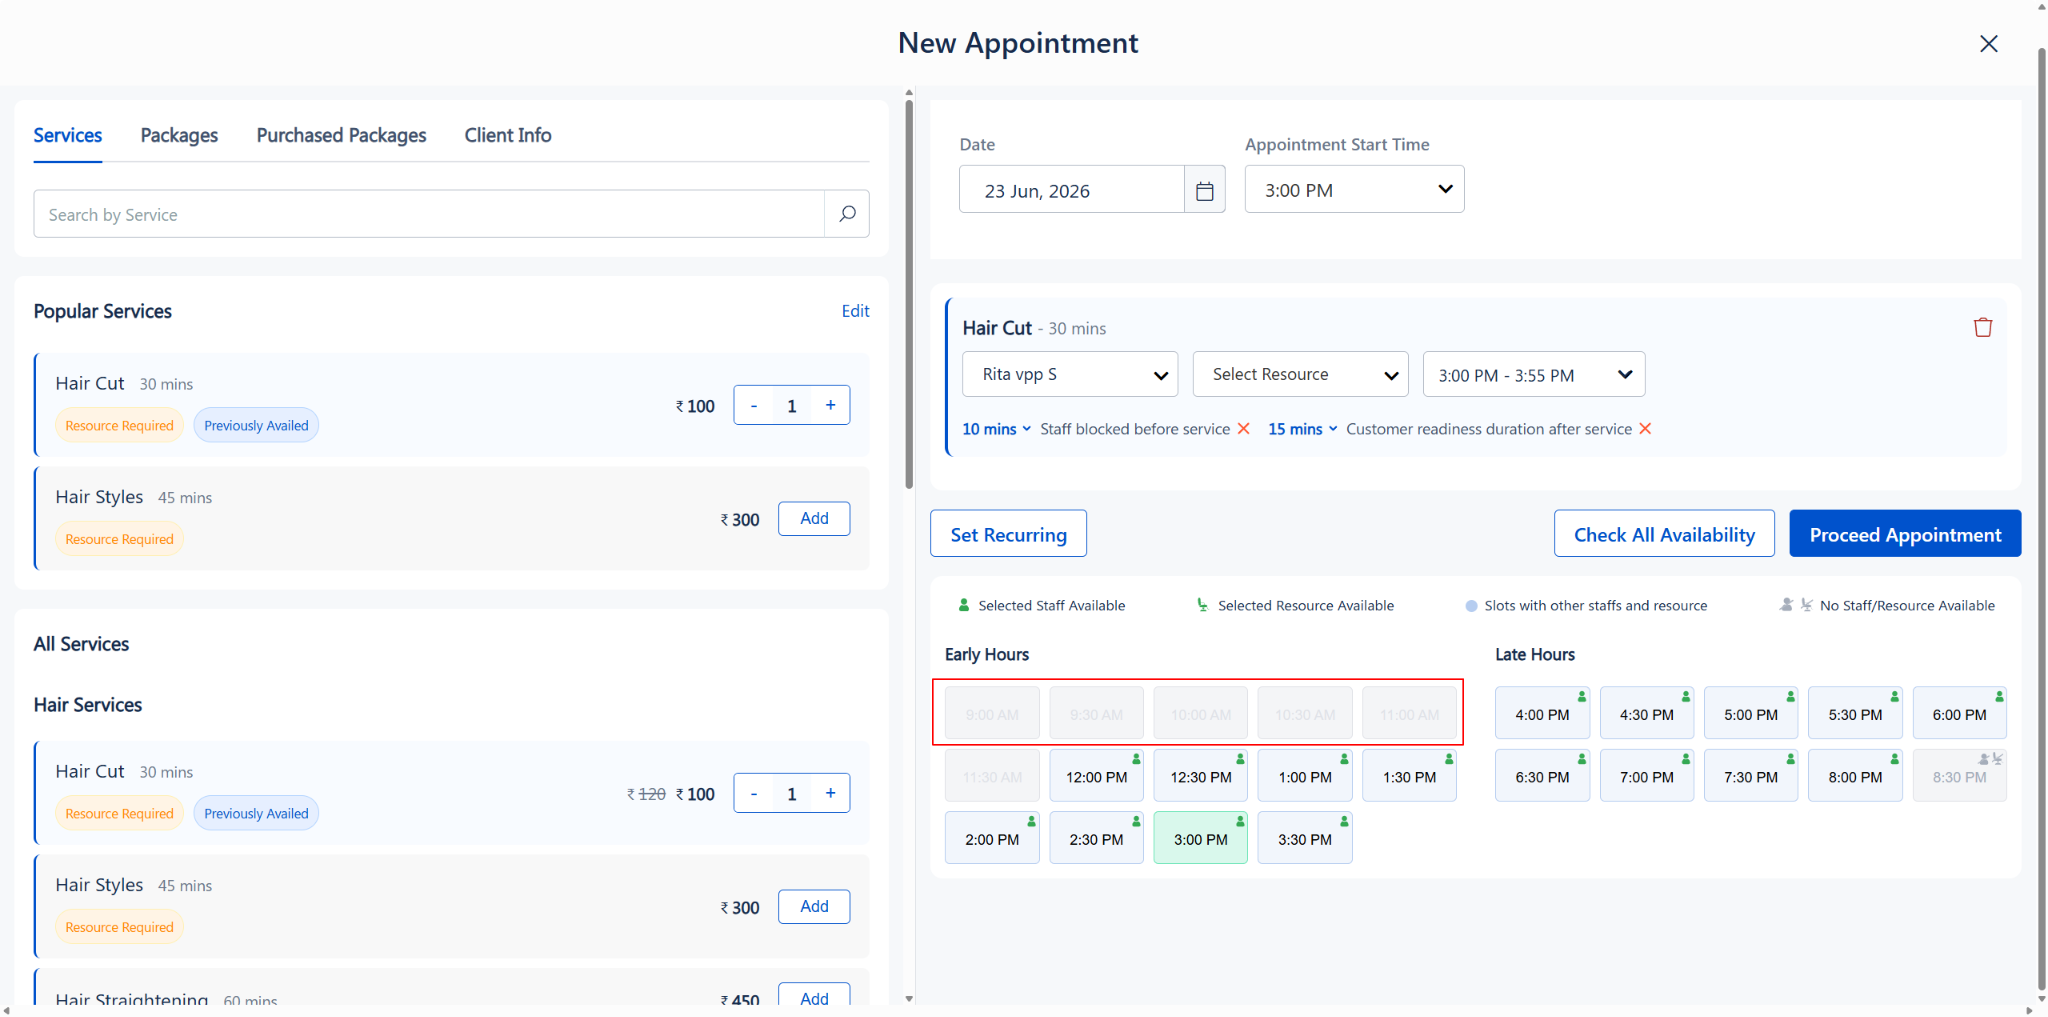
No time slots for past times — If you attempt to book an appointment at a time that has already passed, the availability grid will not display any selectable time slots.
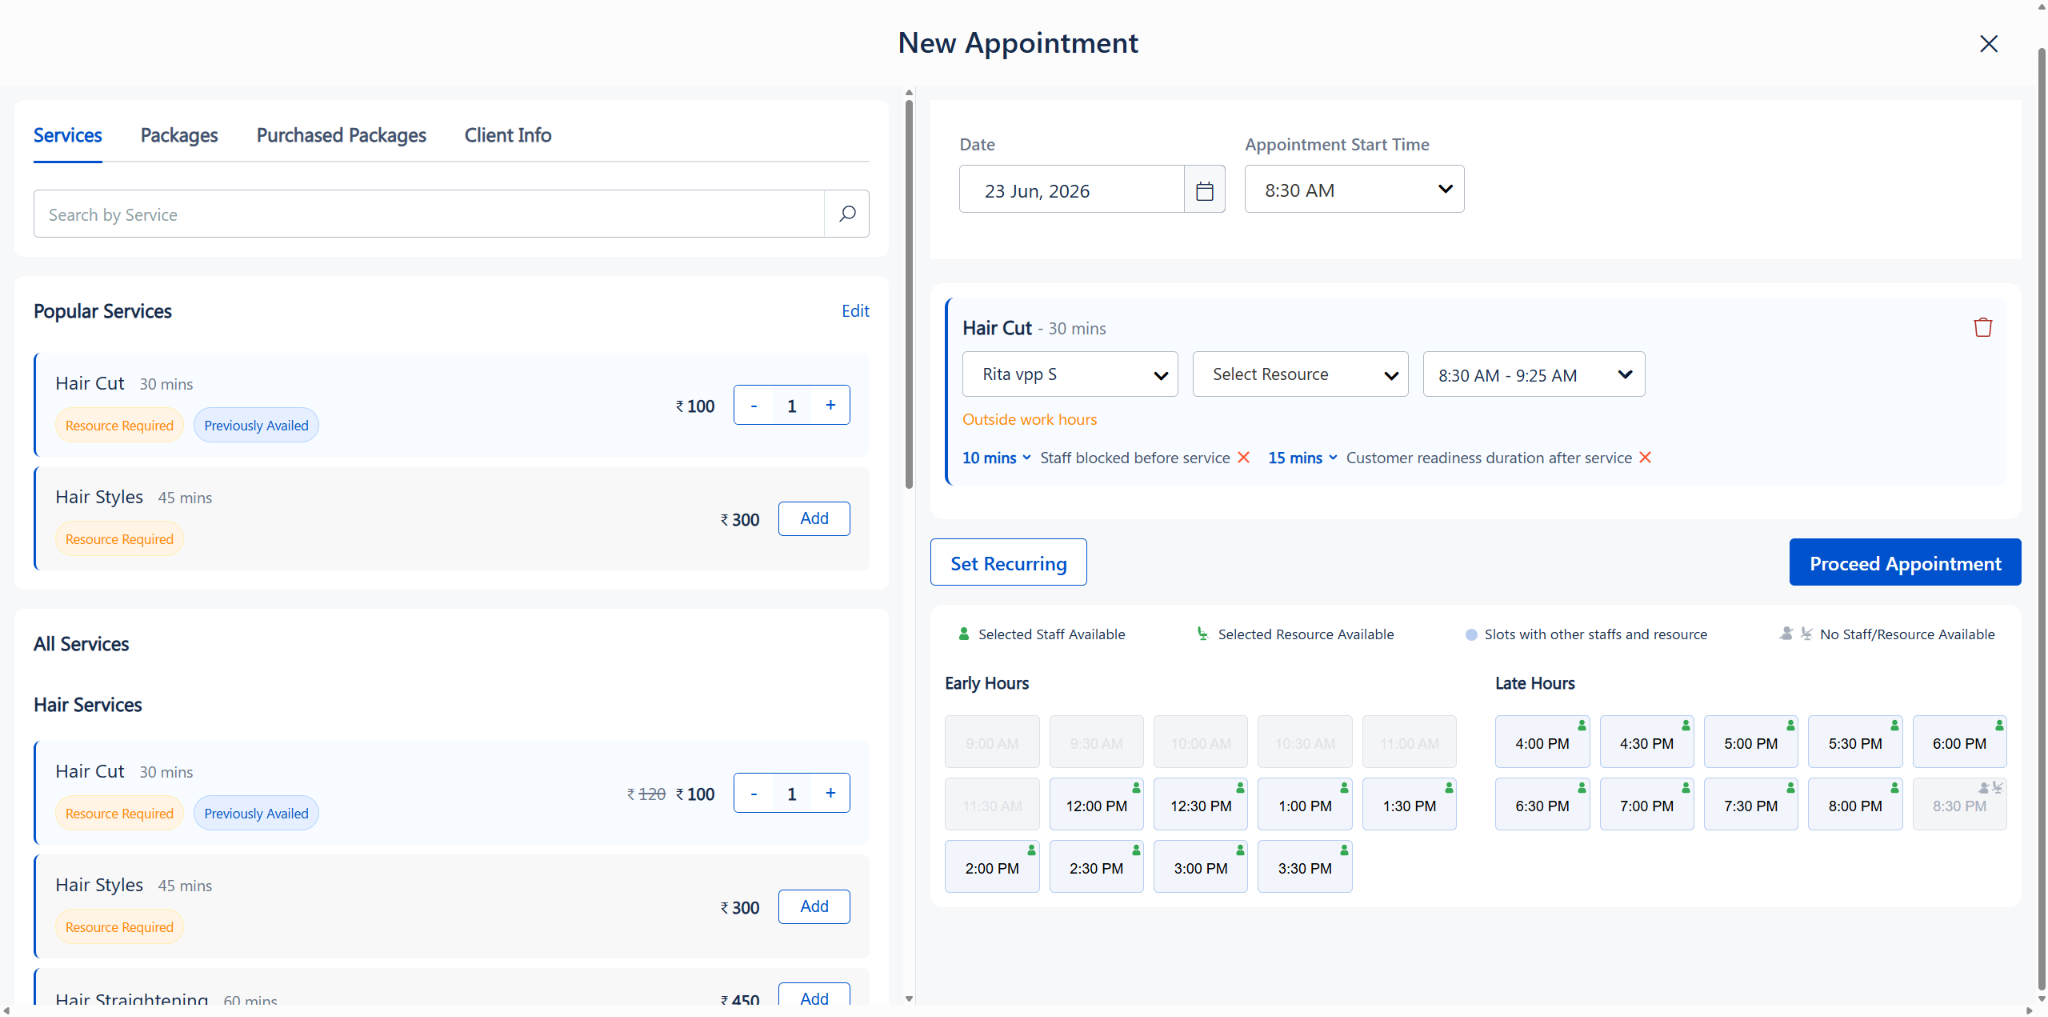
End-of-day blur behavior — Based on the total service duration (including buffer times), time slots near the end of business hours may appear blurred.
For example, if the total service duration is 1 hour and business hours end at 9:00 PM, booking at 8:00 PM is allowed. However, time slots after 8:00 PM will appear in a blurred state.
You can still click on these blurred slots, and the system will display a popup showing the staff and resource availability status for that time.
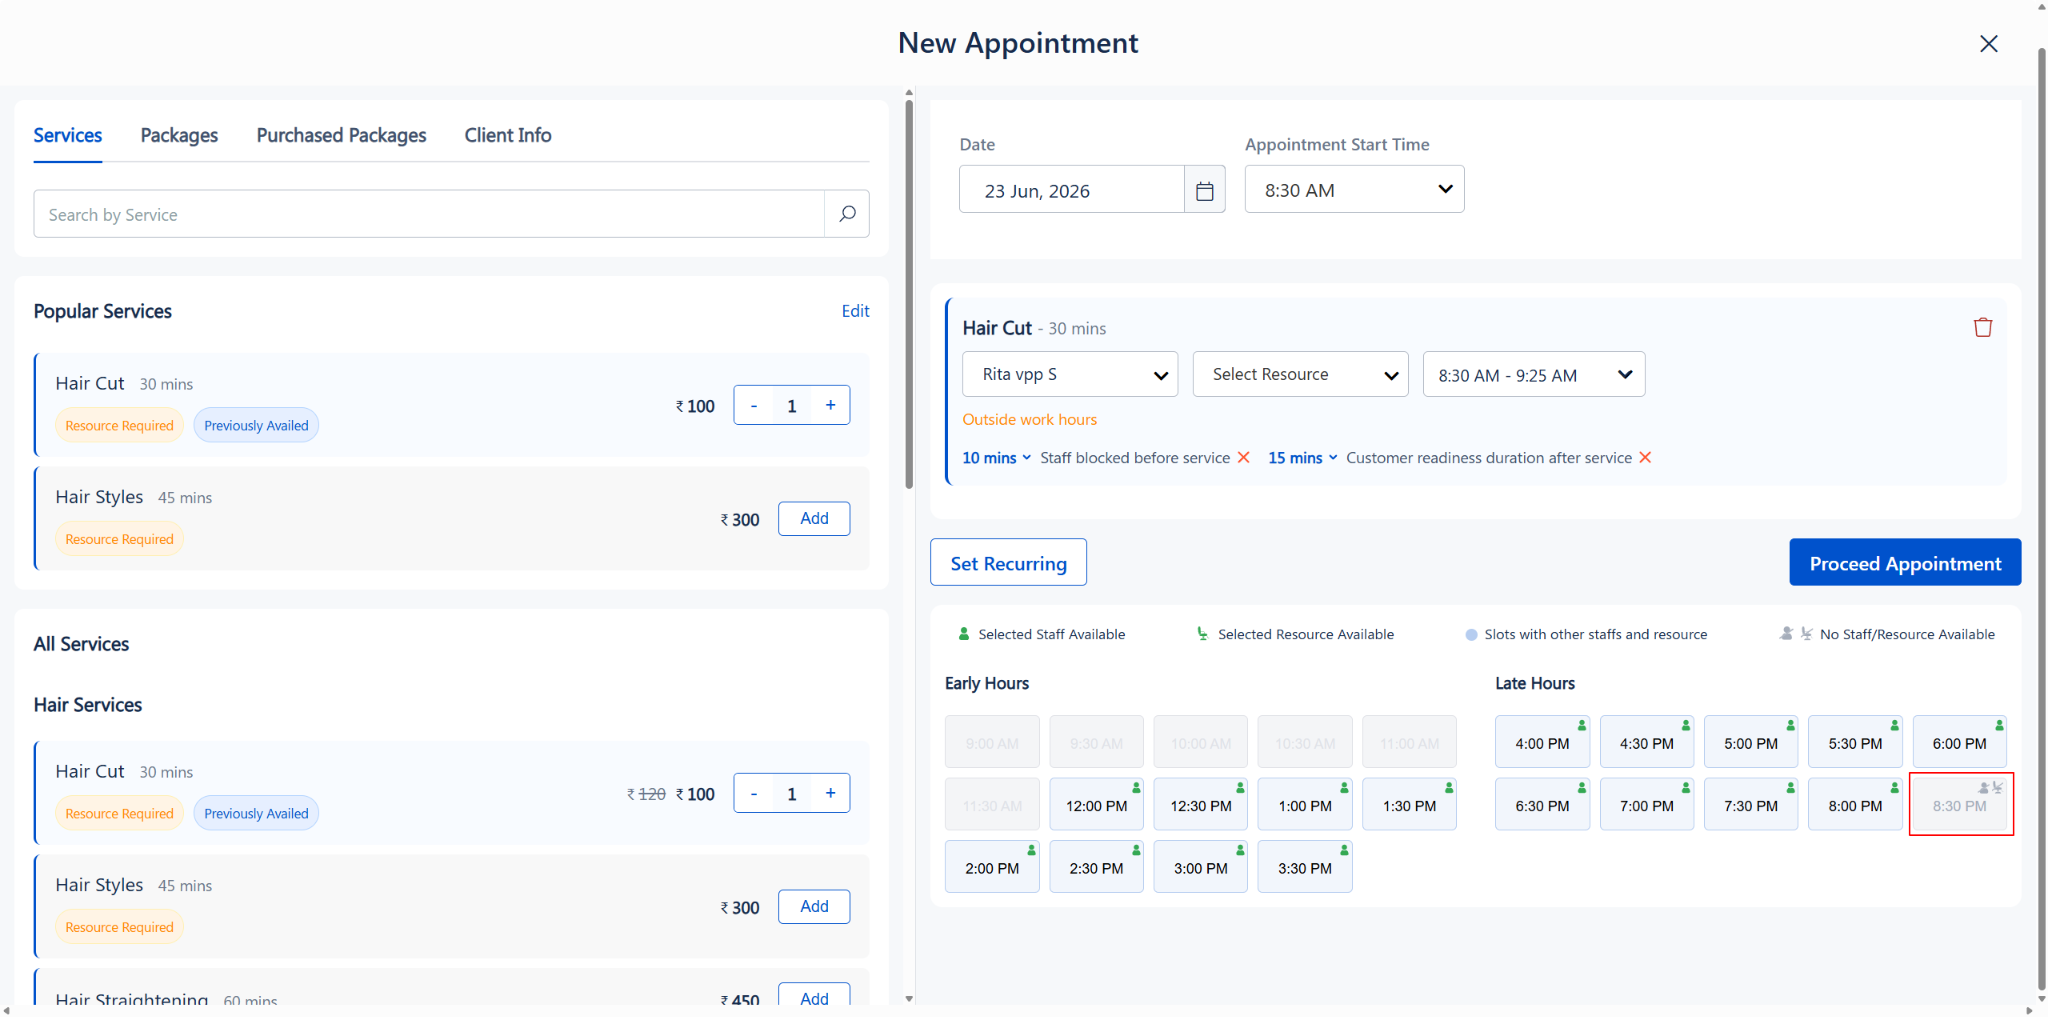
Each slot shows icons indicating availability:
The currently selected time slot is highlighted in blue. Click any available slot to change the appointment time.
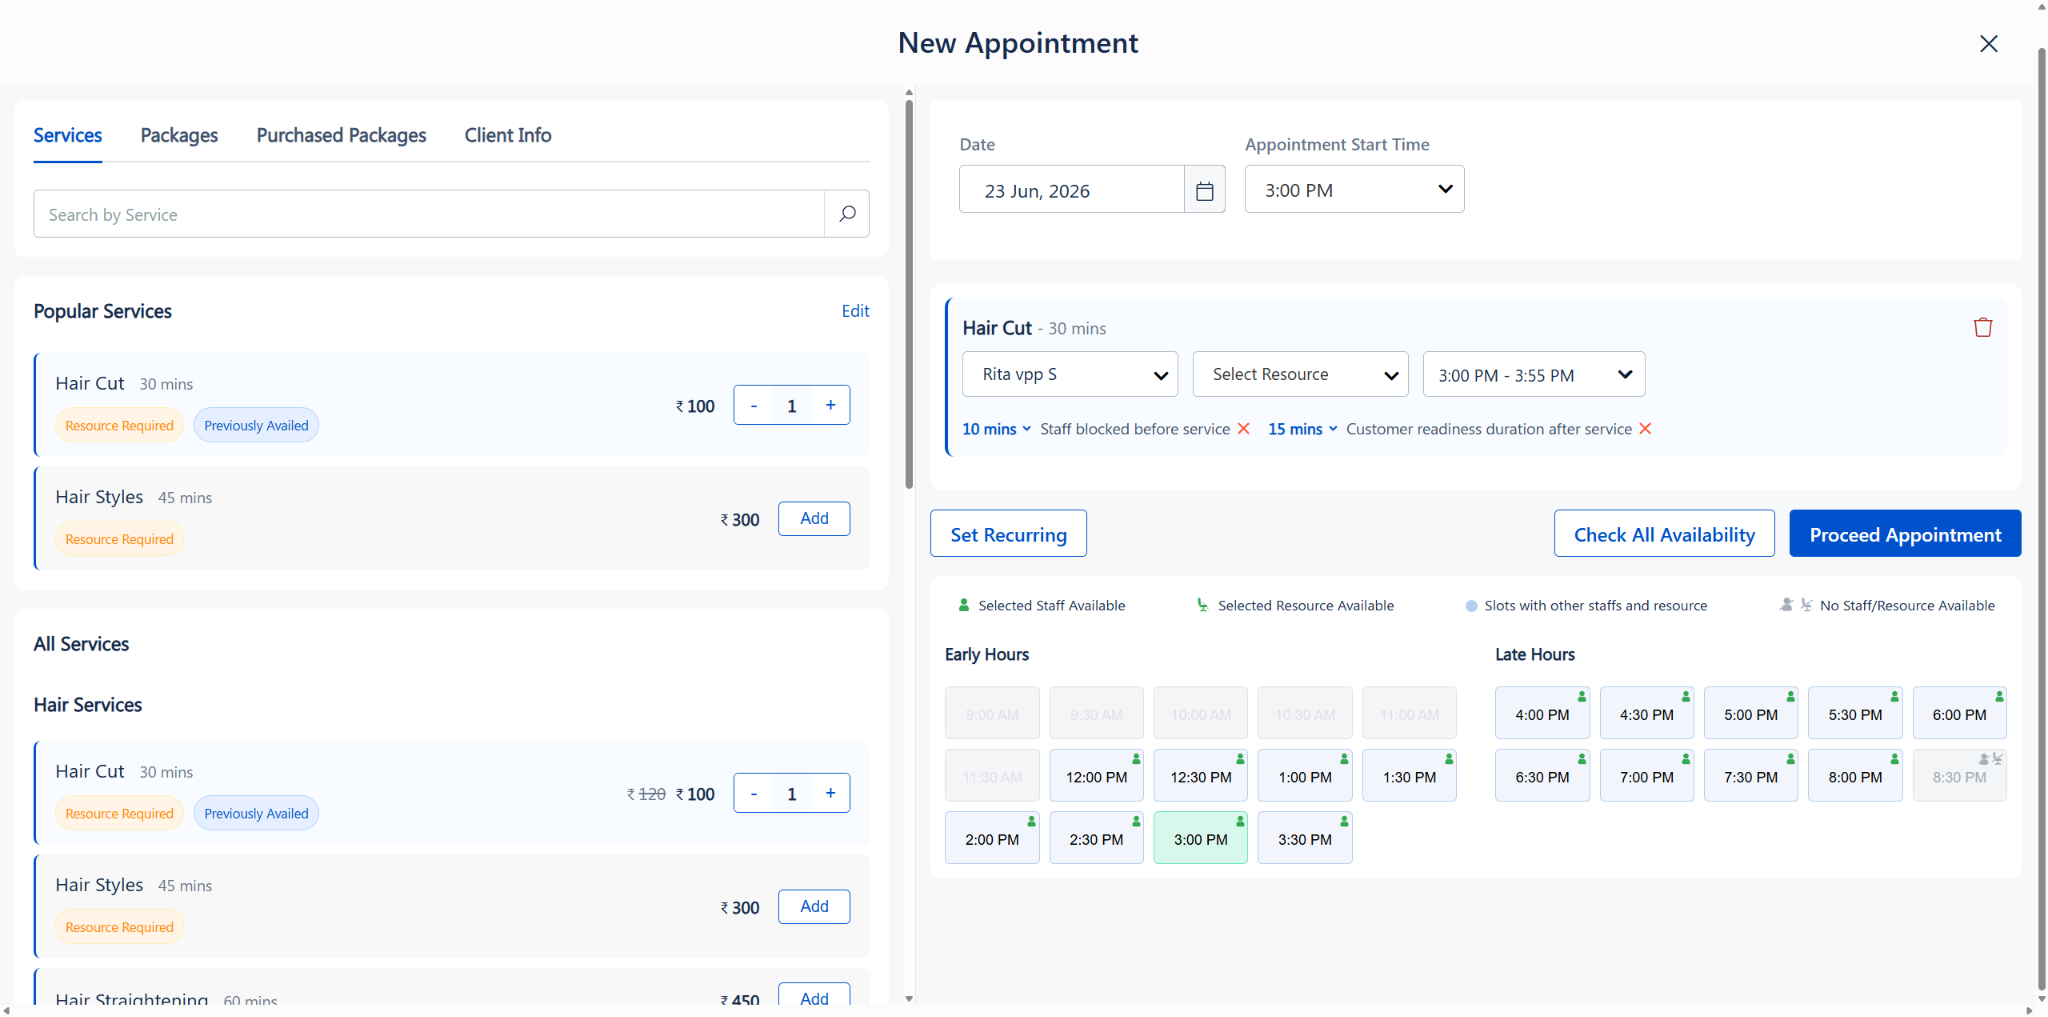
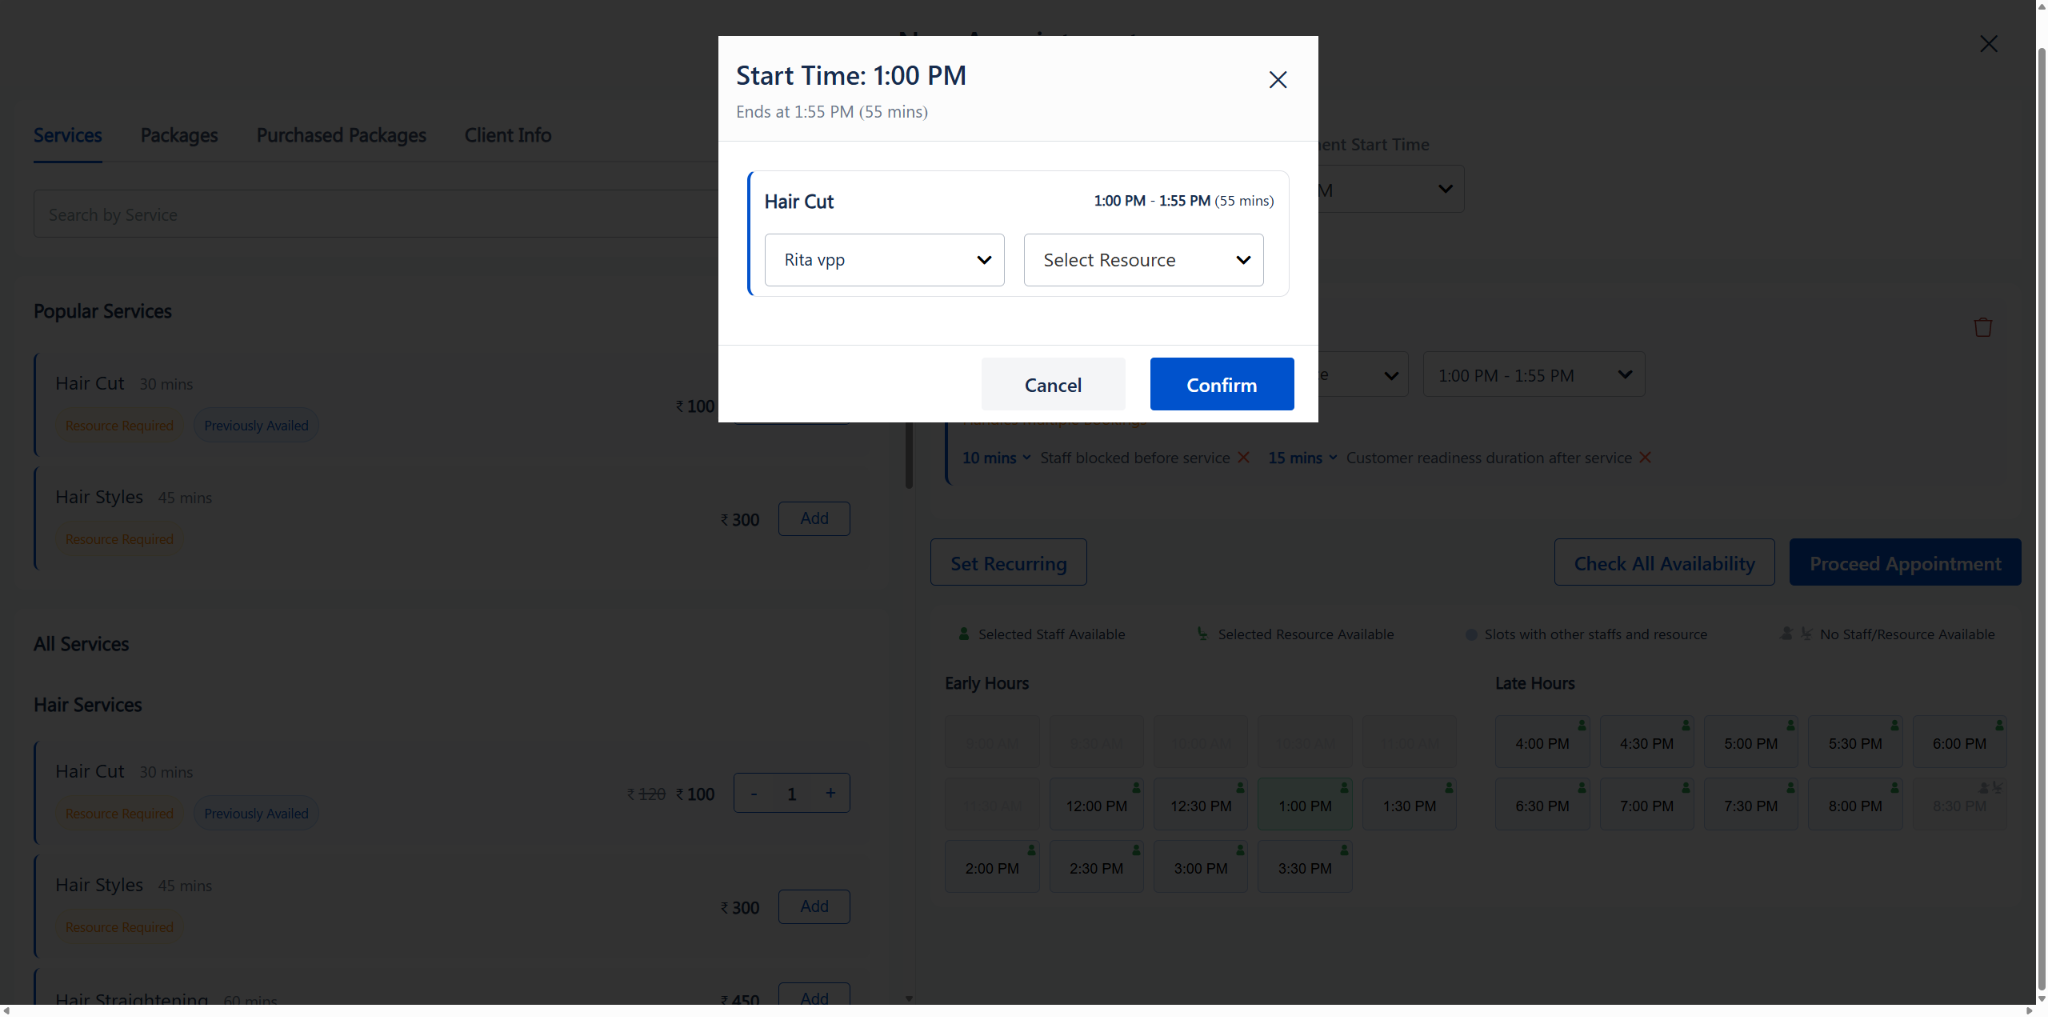
Check All Availability grid with Early Hours and Late Hours, showing staff and resource availability
Step 10: Proceed to Appointment Summary
Click the “Proceed Appointment” button. The popup transitions to the Appointment Summary view, which displays:
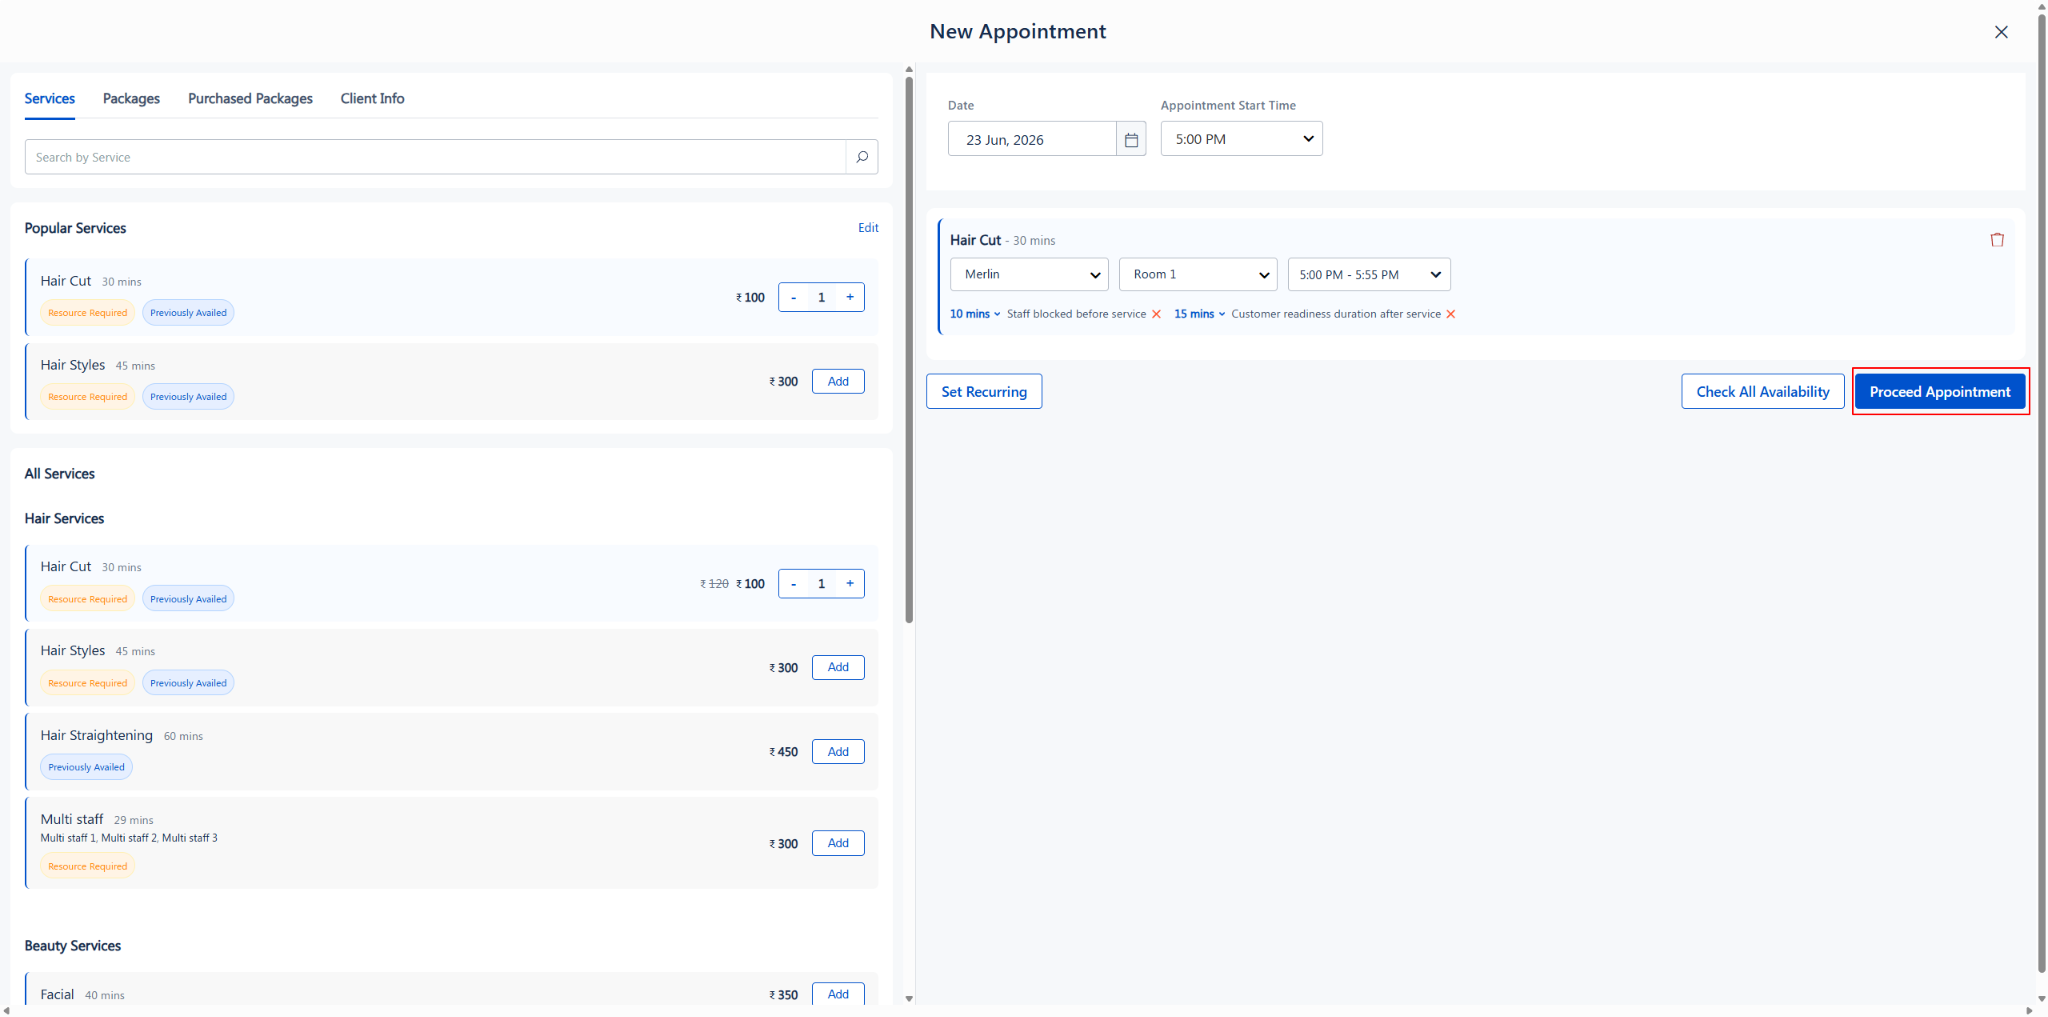
Right panel — Booking Summary:
- Service name with original and discounted pricing (e.g., ₹ 120.00 ₹ 100.00) and an edit icon
- Staff, Resource, and Time slot with total duration breakdown (e.g., 10:30 AM – 11:25 AM — 30+10+15 mins)
- Tabs for Service, Package, and Purchased Package at the top for adding the new items.
Appointment Notes:
- A text field to enter any special instructions or preferences from the client (e.g., “Light trim only” or “Allergic to certain products”).
Appointment Status: - Select one of the following statuses:
- ✅ New In-App Booking (default)
- ? Arrived
- ? Started
- ? No Show
- ? Completed
Pricing Summary: - Item Total and Tax are displayed at the bottom.
Left panel continues to show the client’s full profile, wallet and Unpaid details, upcoming appointments, and visit history.
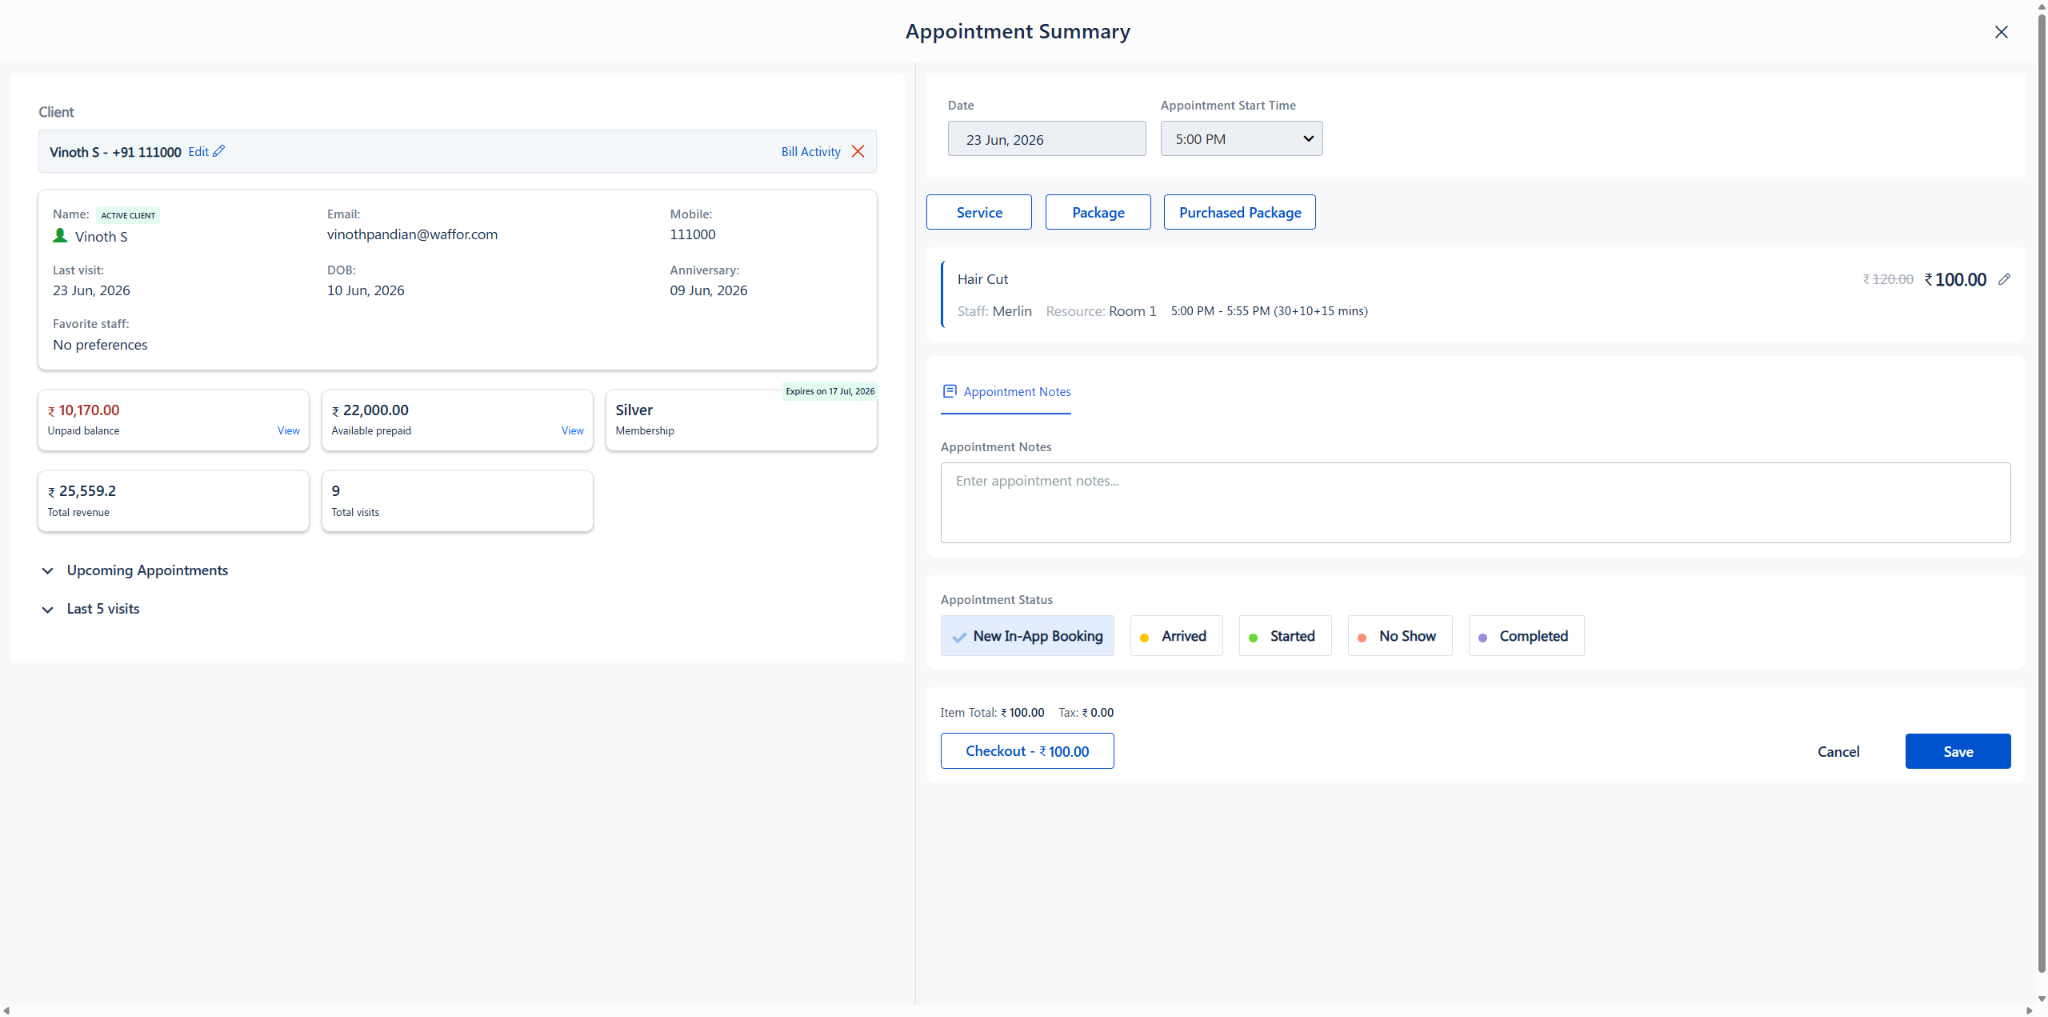
Appointment Summary showing service details, notes field, status options, and pricing
Step 11: Save or Checkout
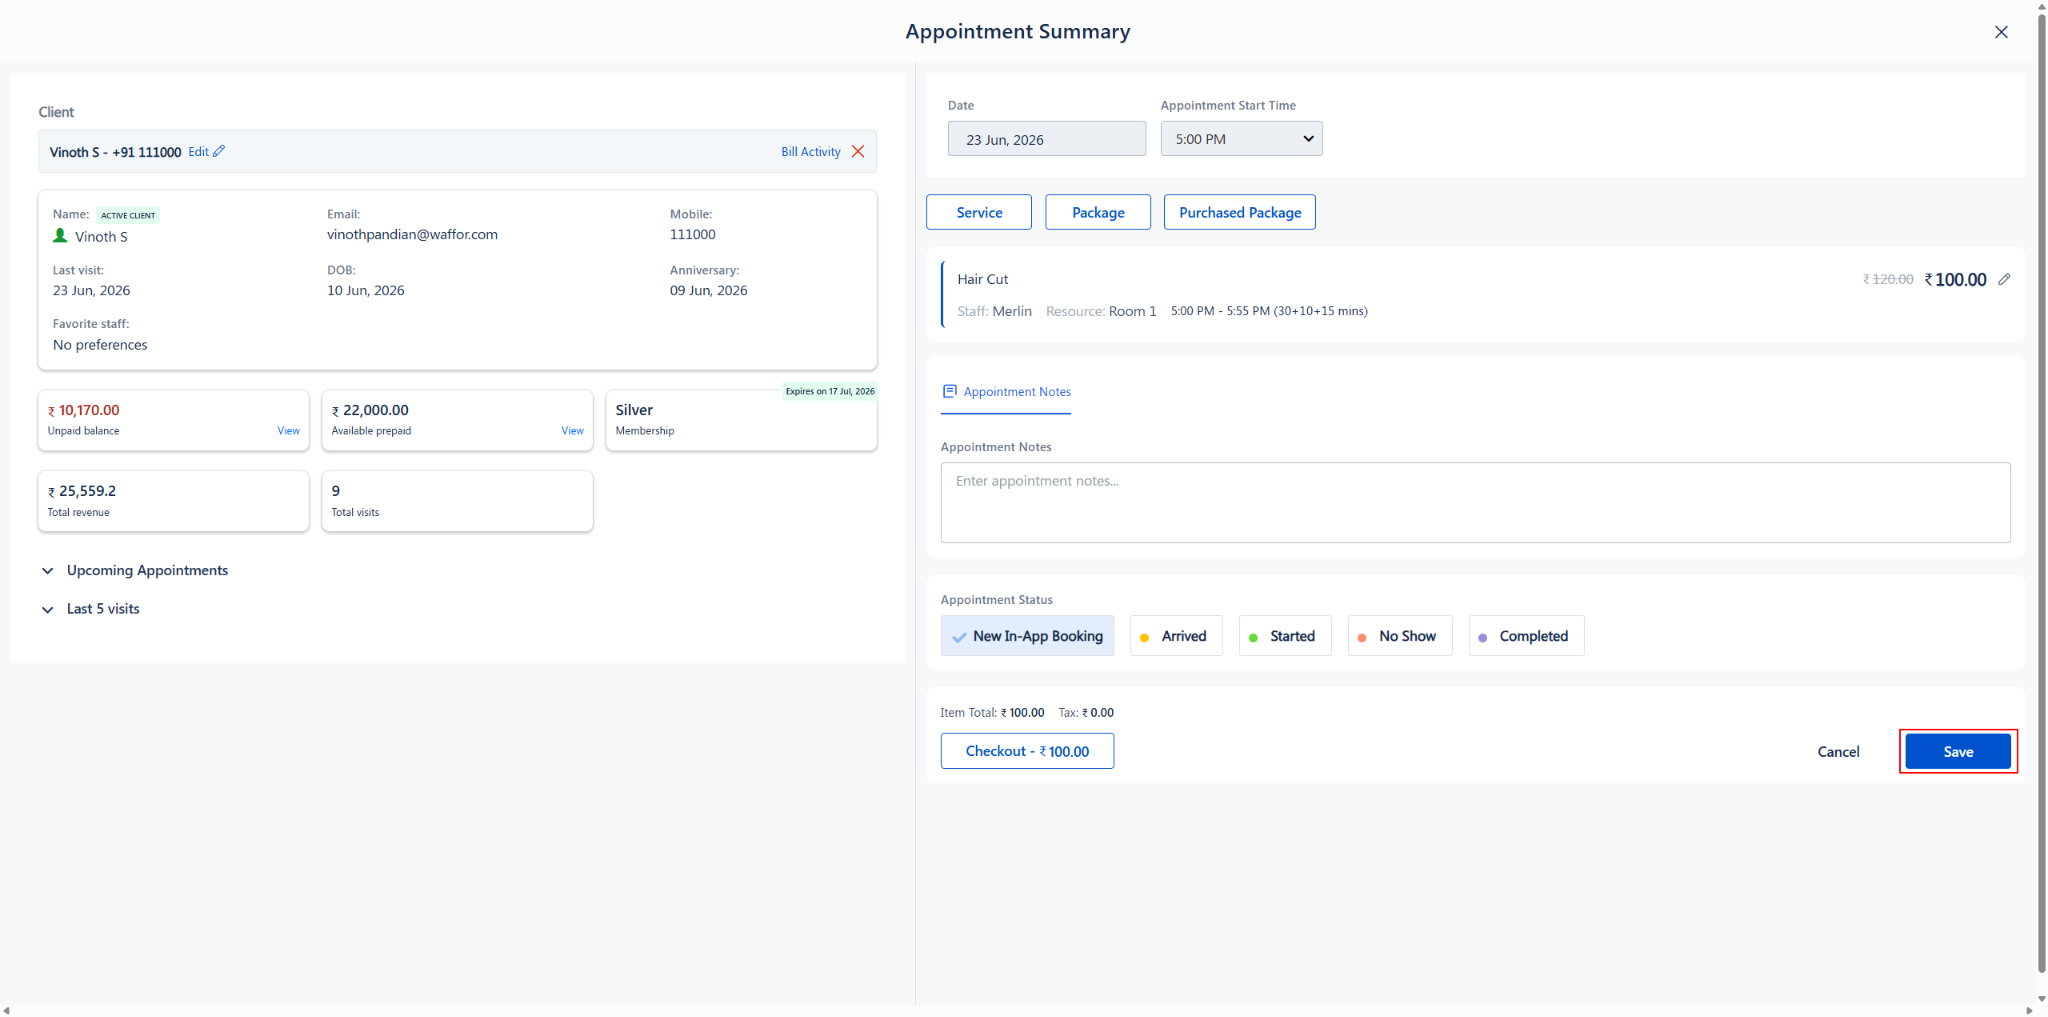
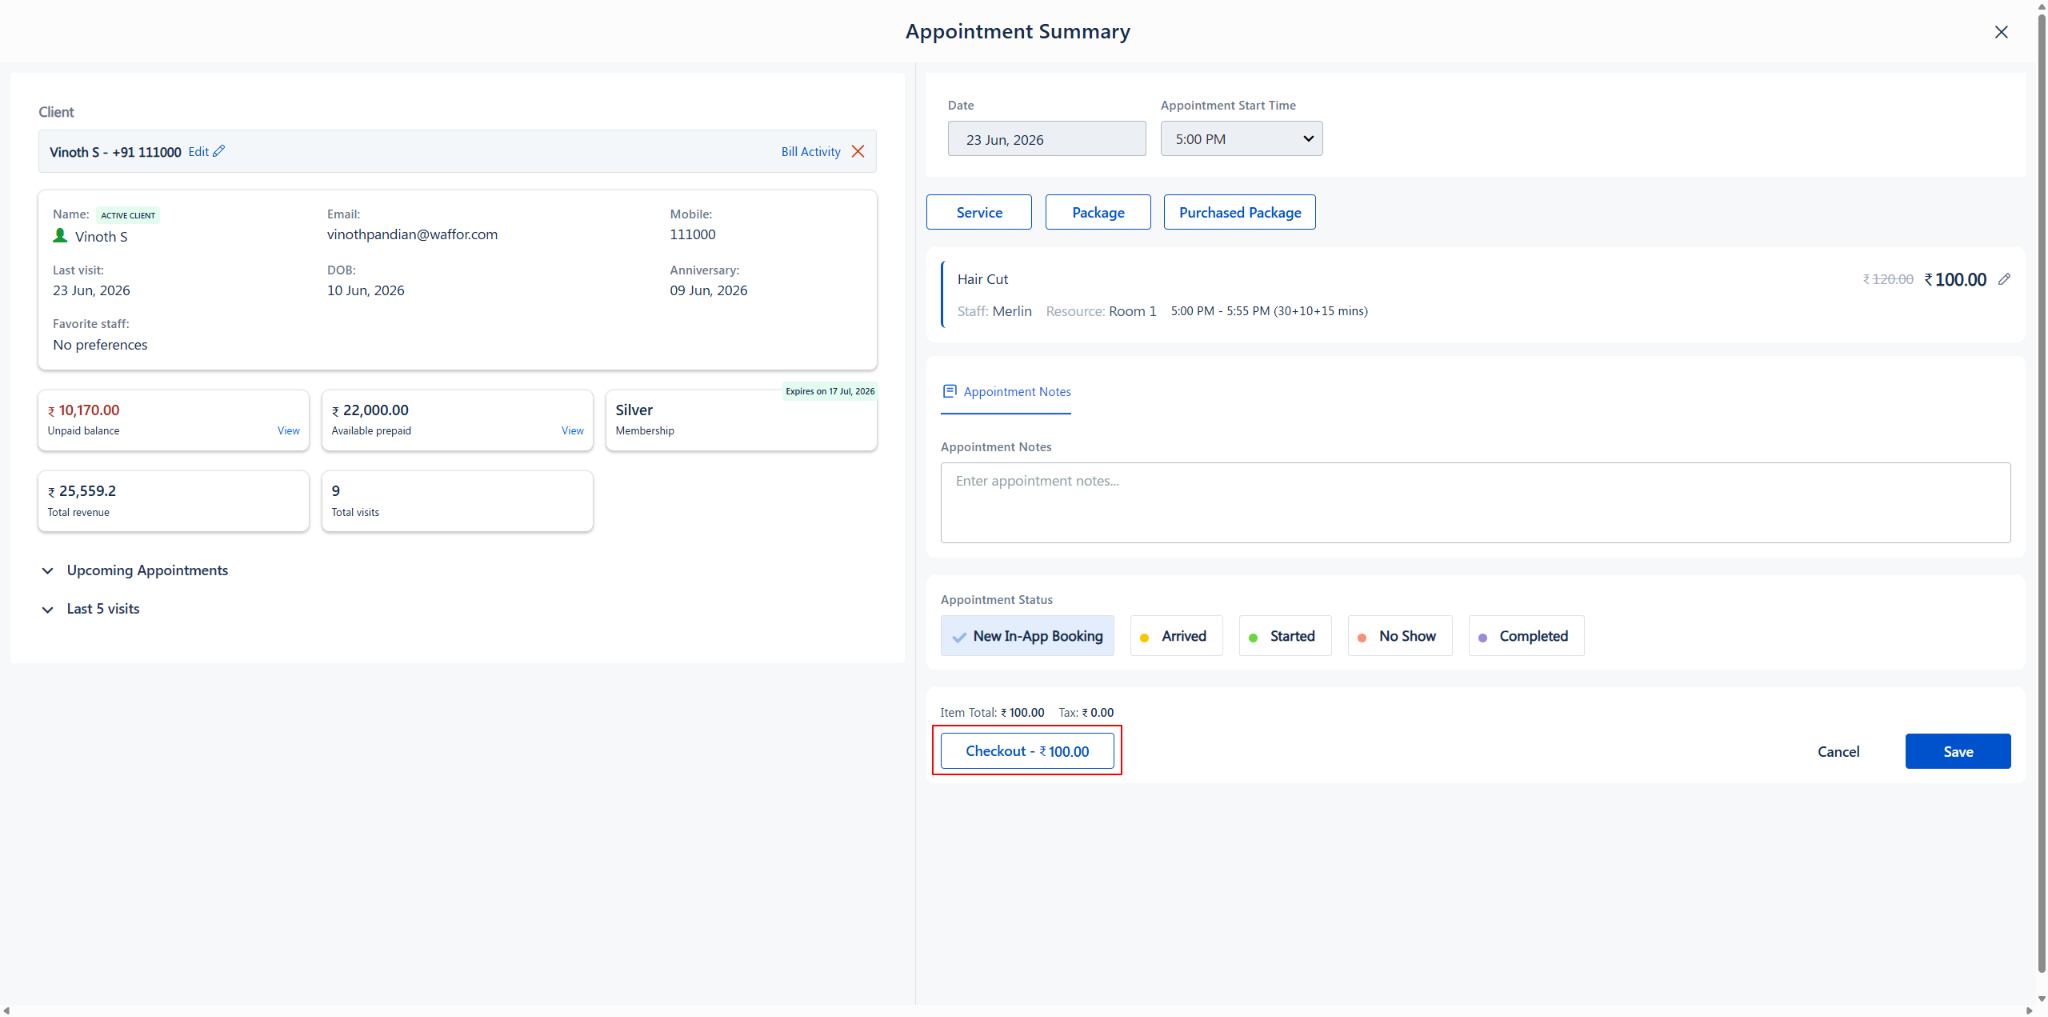
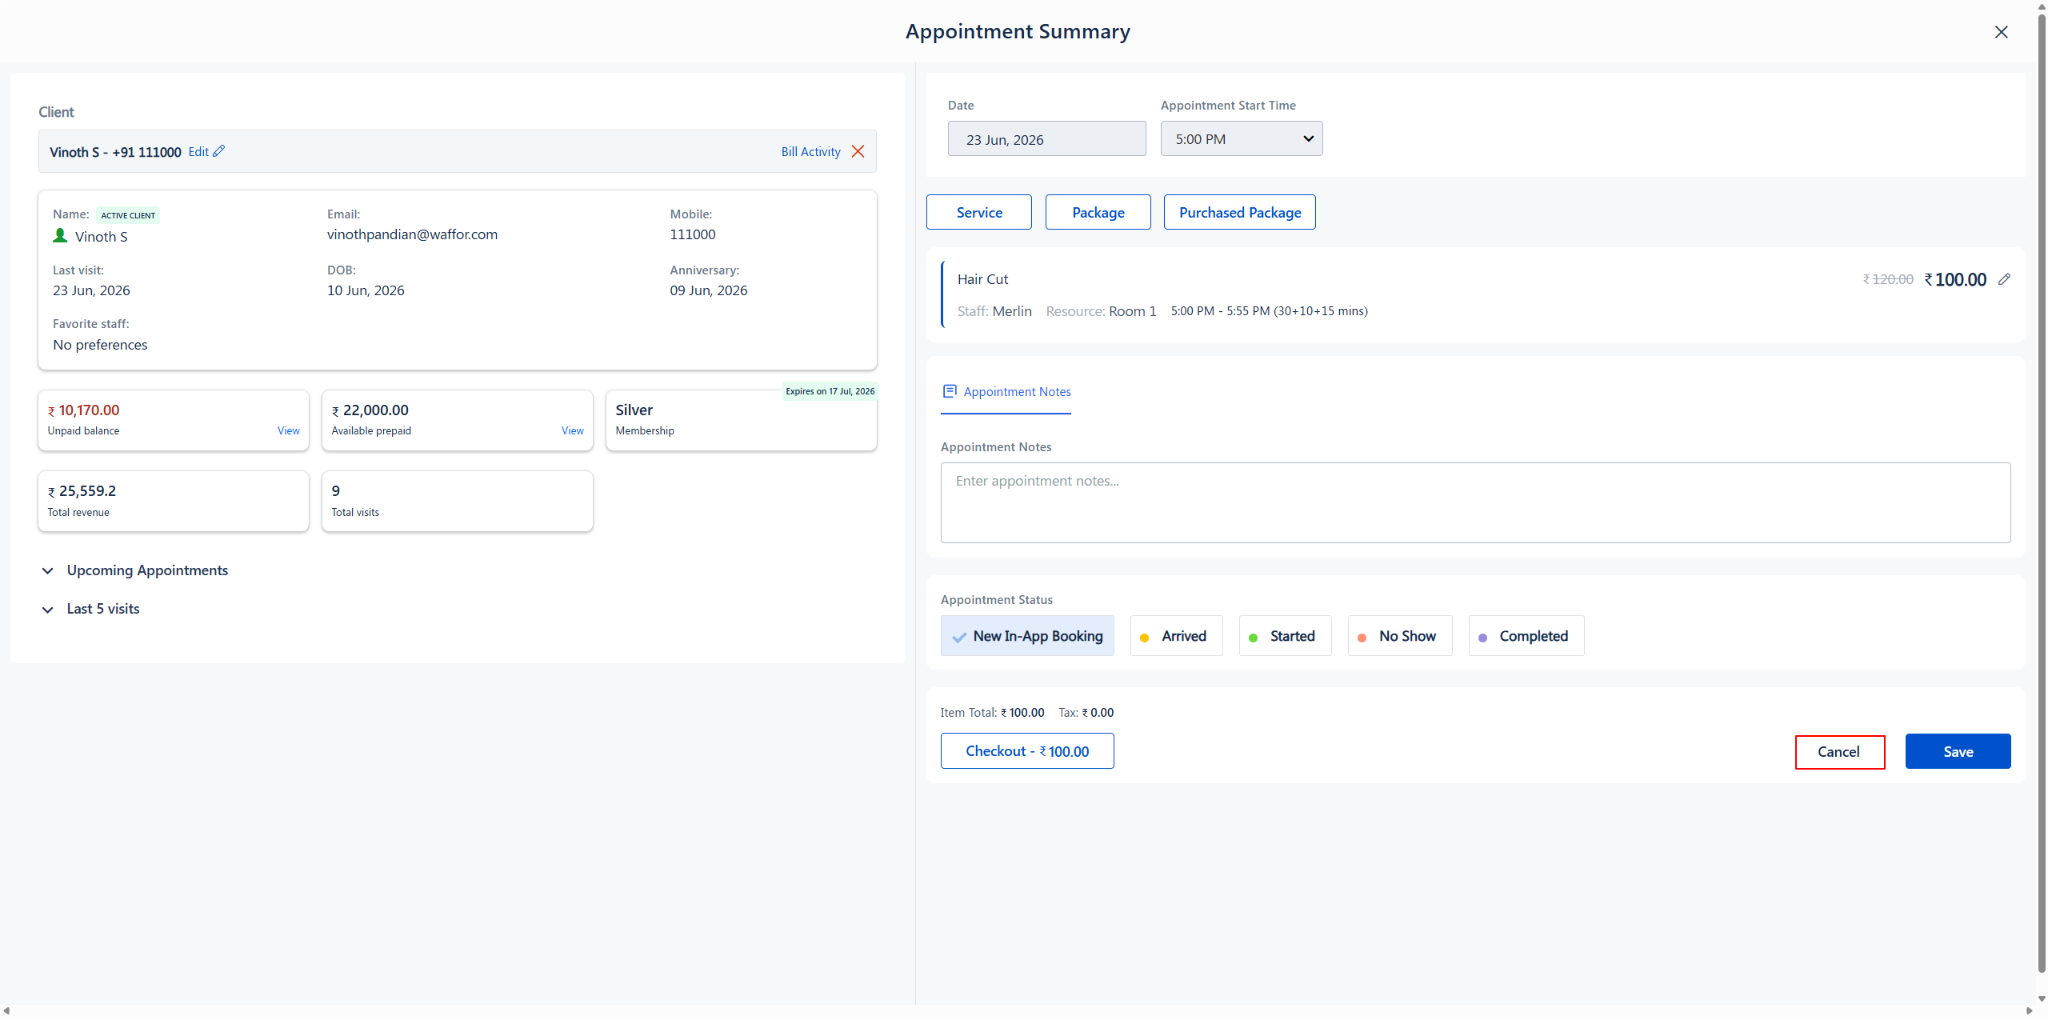
At the bottom of the summary screen, three action buttons are available:
Save, Checkout, and Cancel buttons at the bottom of the Appointment Summary
Use Cases
· Walk-in clients — Quickly search the client, pick a service, assign the next available staff, and book instantly.
· Phone or advance bookings — Schedule future appointments while reviewing the client’s visit history and preferences.
· Multi-service appointments — Add multiple services (e.g., haircut + facial) with different staff assignments in a single booking.
· Resource-dependent services — Assign specific rooms or equipment for services like hair straightening or spa treatments. Use the resource dropdown to check availability and add new resources.
· Multiple bookings scenarios — When staff or resources support multiple appointments, the “Handles Multiple Bookings” and “Supports Multiple Bookings” indicators confirm that multiple bookings are allowed at the same time.
· Repeat client bookings — Use “Previously Availed” and “Previously Serviced” indicators to quickly replicate a client’s preferred setup.
· Upselling opportunities — Review unpaid balances, membership status, and past services to recommend add-ons or package upgrades.
Benefits
· Faster bookings — The two-panel layout keeps client data and booking controls on the same screen, eliminating back-and-forth navigation.
· Complete client visibility — Financial summaries, visit history, membership details, and upcoming appointments are all visible during booking.
· Smart service badges — “Previously Availed” and “Resource Required” tags provide instant context for better booking decisions.
· Popular Services management — Frequently booked services can be pinned for one-click access.
· Staff availability indicators — “Previously Serviced” and “Booked” labels help assign the right staff without conflicts.
· Resource availability at a glance — The resource dropdown clearly marks booked resources and lets you add new ones instantly.
· Multiple bookings transparency — Clear indicators show when staff or resources can handle multiple appointments, preventing unnecessary rescheduling.
· Buffer time controls — Realistic scheduling with configurable preparation and cooldown periods.
· Smart availability grid — Time slots based on business working hours, with past-time restrictions and end-of-day blur logic for accurate scheduling.
· Flexible checkout — Option to save the appointment for later billing or proceed directly to checkout.
Was this article helpful?
That’s Great!
Thank you for your feedback
Sorry! We couldn't be helpful
Thank you for your feedback
Feedback sent
We appreciate your effort and will try to fix the article