Introduction
Online Booking allows your clients to book appointments directly from Google, social media, or your website.
You can customise booking rules, payment collection, client login, confirmation flow, and more — all from one place.
Navigation Path
Settings → Modules Settings → Online Booking
Or
Side Bar → Online Booking
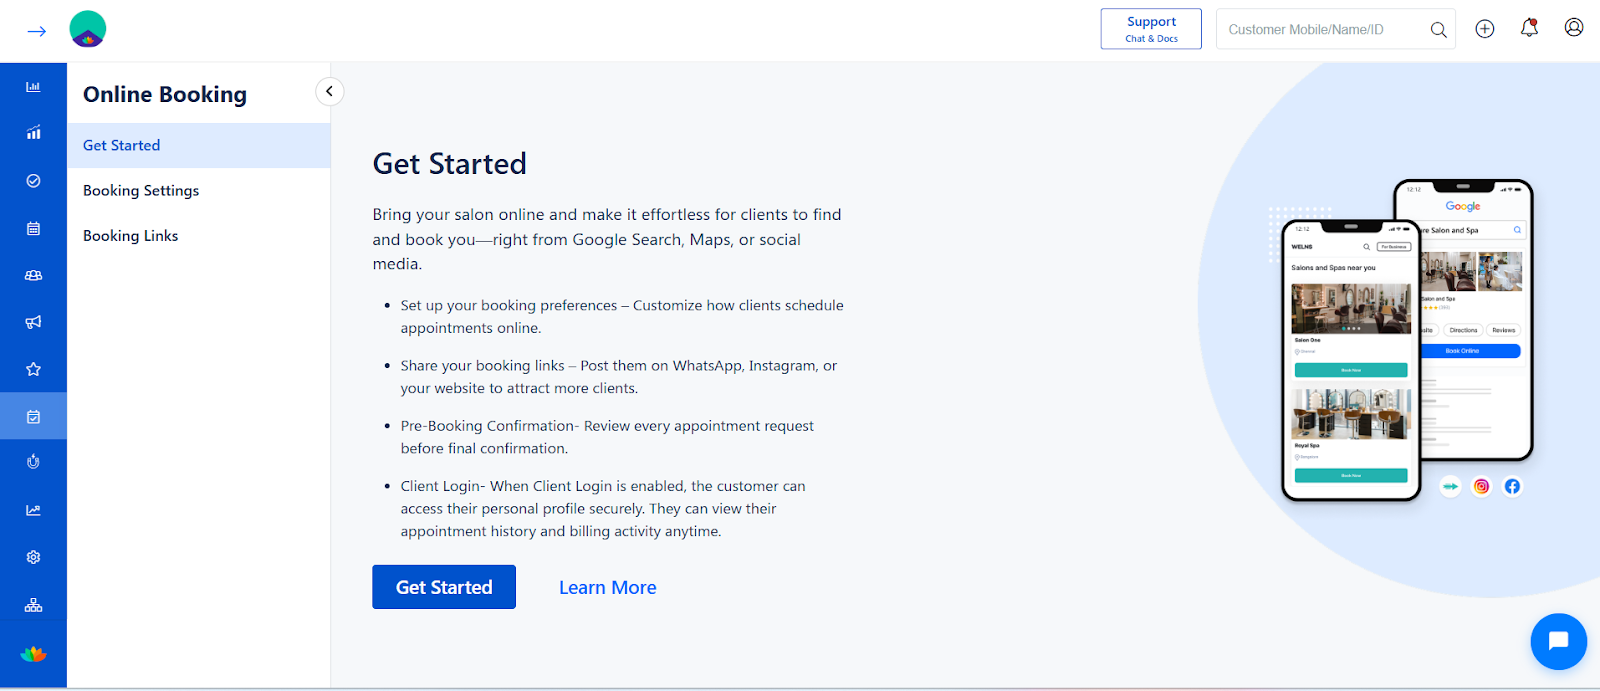
1️⃣ Get Started
The Get Started section gives an overview of how Online Booking works and what you can configure.
What You Can Do:
Set booking preferences
Share booking links
Enable pre-booking confirmation
Enable client login
Click Get Started to begin setup.
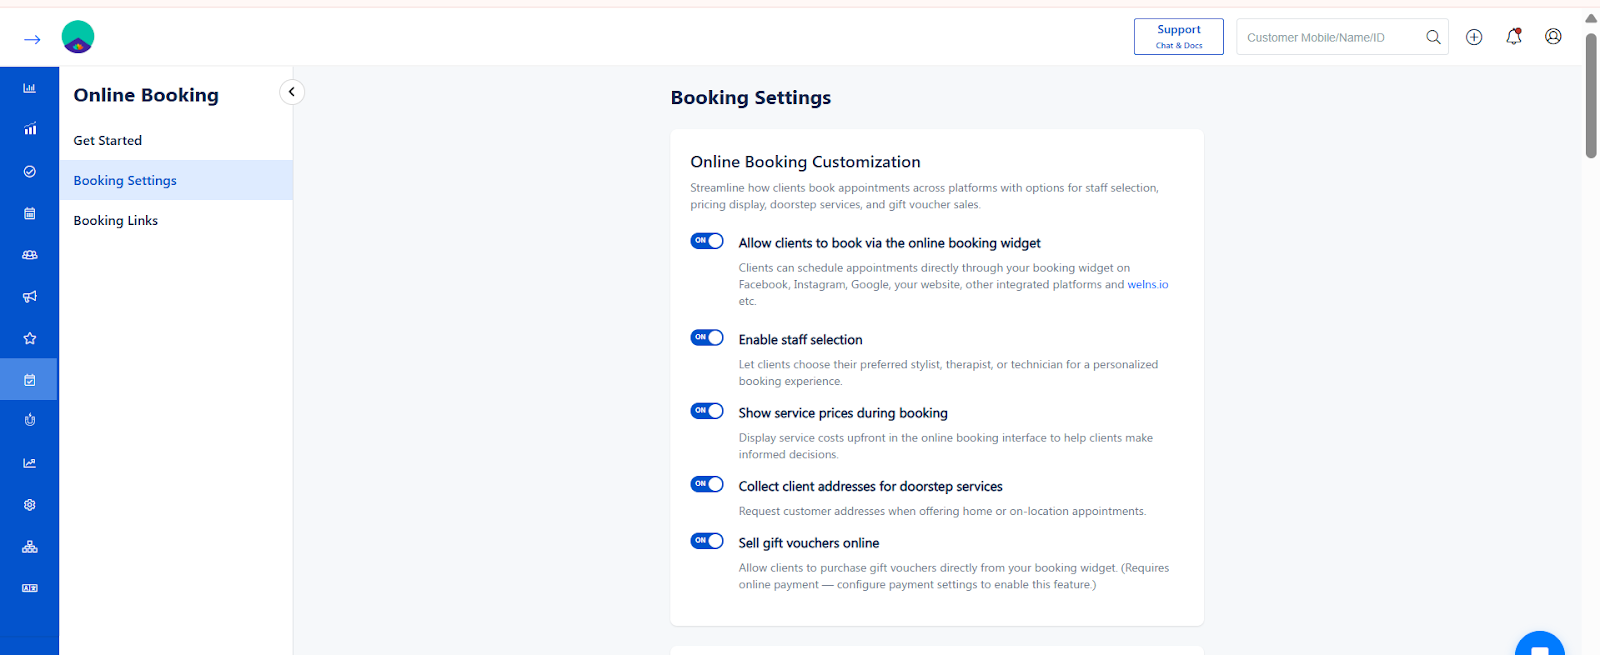
2️⃣ Booking Settings
This section allows you to fully customize how online booking behaves.
A) Online Booking Customization
Step 1: Allow clients to book via the widget
Toggle ON to enable booking from:
Website
Facebook
Instagram
Google
Clients can directly schedule appointments online.
Toggle OFF:
Online booking is disabled, and clients cannot schedule appointments through the booking widget.
Step 2: Enable staff selection
Toggle ON to allow customers to choose:
Preferred stylist
Therapist
Technician
Helpful for personalised service booking.
Toggle OFF:
Customers cannot select a specific staff member.
Step 3: Show service prices during booking
Toggle ON to display pricing upfront.
Helps customers make informed decisions.
Toggle OFF:
Service prices are hidden, and customers will not see the cost while booking.
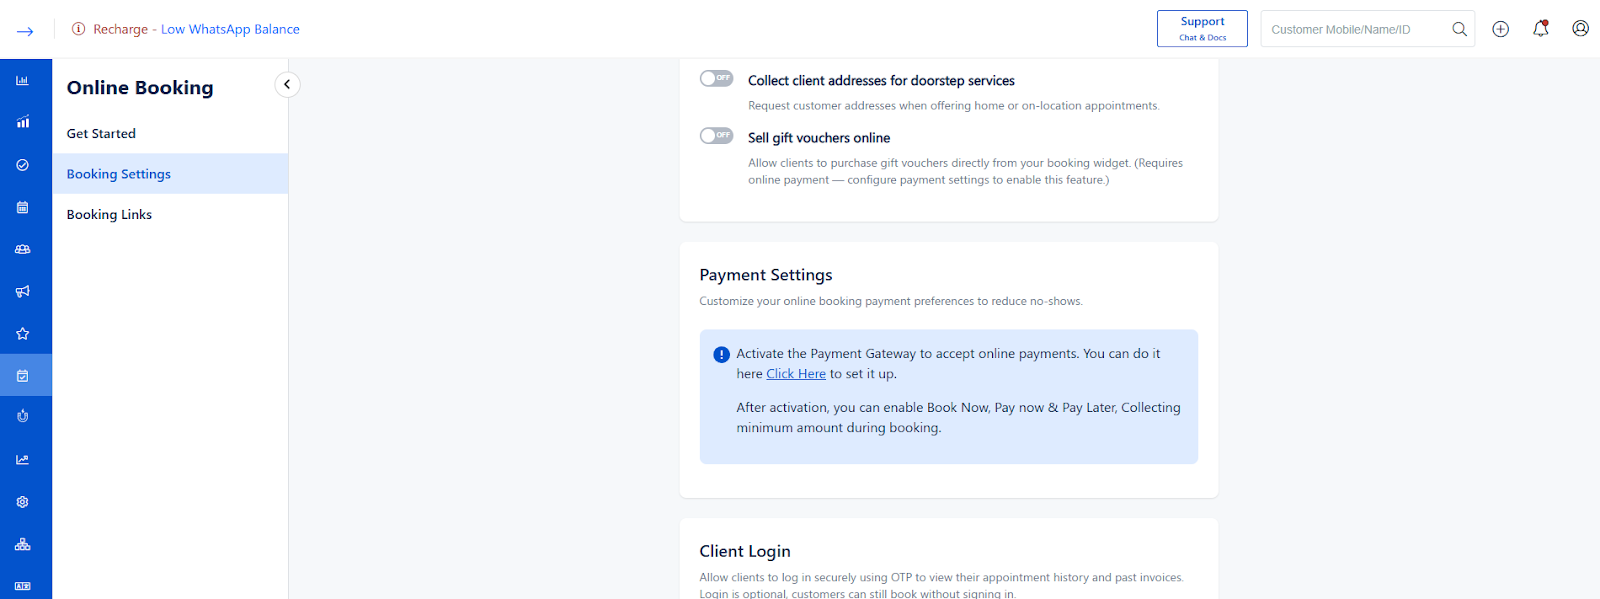
Step 4: Collect client's address for doorstep services
Toggle ON if you provide home services.
The address field will appear during booking.
Toggle OFF:
Address details will not be collected during the booking process.
Step 5: Sell gift vouchers online
Toggle ON
The customers allow voucher purchases.
Requires online payment setup.
Toggle OFF:
The gift voucher purchase option will not be available online.
(Note: if the payment mode was not enabled, the gift voucher purchase option will not be available online.)
B) Payment Settings
Payment Gateway Not Activated – Online Booking Payment Settings
If the Payment Gateway is not configured, online payment options in Online Booking will remain disabled.
You must activate and configure the Payment Gateway before enabling “Pay Now”, “Pay Later”, or advance payment collection.
⚠️ Why This Message Appears
You will see the message:
“Activate the Payment Gateway to accept online payments. Click Here to set it up.”
This appears because:
Payment integration is not configured.
No active payment provider is connected.
Online payment module is not enabled.
Without gateway setup:
Customers cannot pay online.
Advance payment cannot be collected.
“Pay Now / Pay Later” options will not function.
What Is Restricted Until Activation?
If Payment Gateway is not set up:
❌ Pay Now option will not work
❌ Pay Later logic cannot be applied
❌ Minimum booking amount collection is disabled
❌ No-show payment enforcement will not work
❌ Gift voucher online purchase may fail
Online booking will function only as “Book Now without payment”.
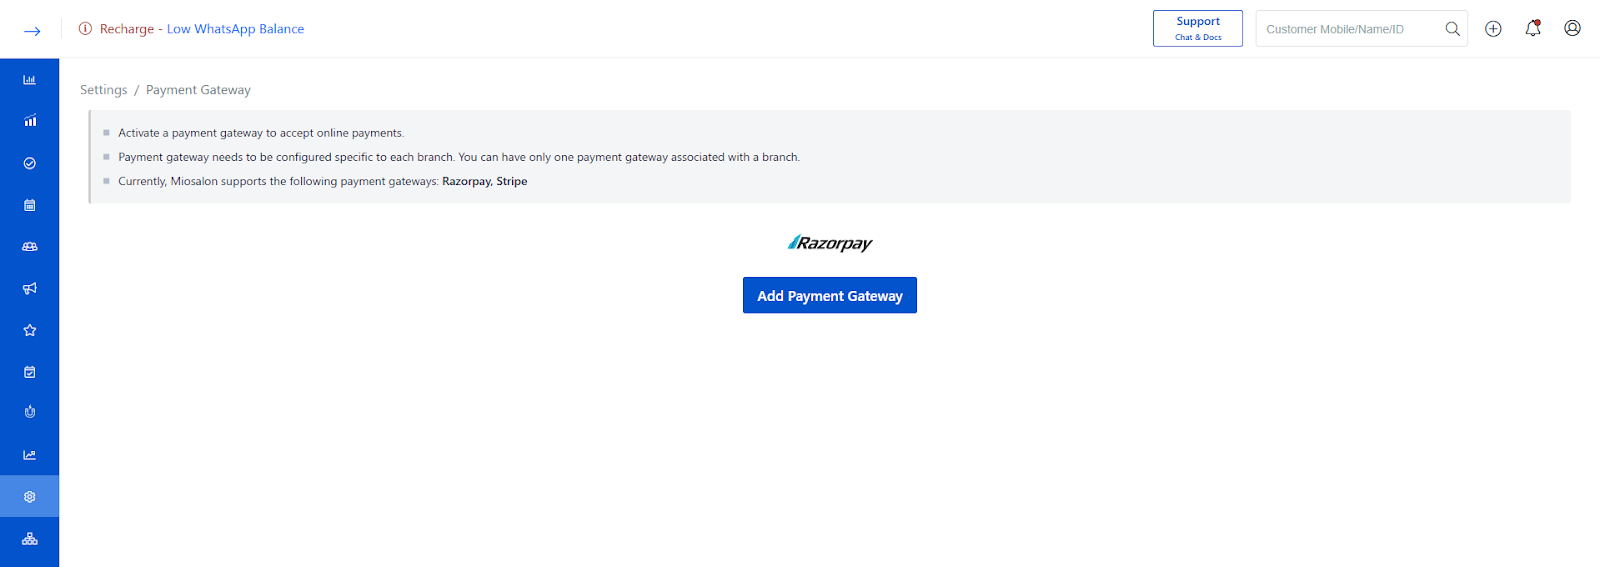
How to Activate the Payment Gateway
Step 1: Open Payment Gateway Setup
Click on “Click Here” in the message.
OR
Go to:
Settings → Payment Gateway Module
Step 2: Choose Your Payment Provider
Select your preferred gateway (Example: Razorpay, Stripe, etc.).
Payment Gateway Activated – Online Booking Payment Settings
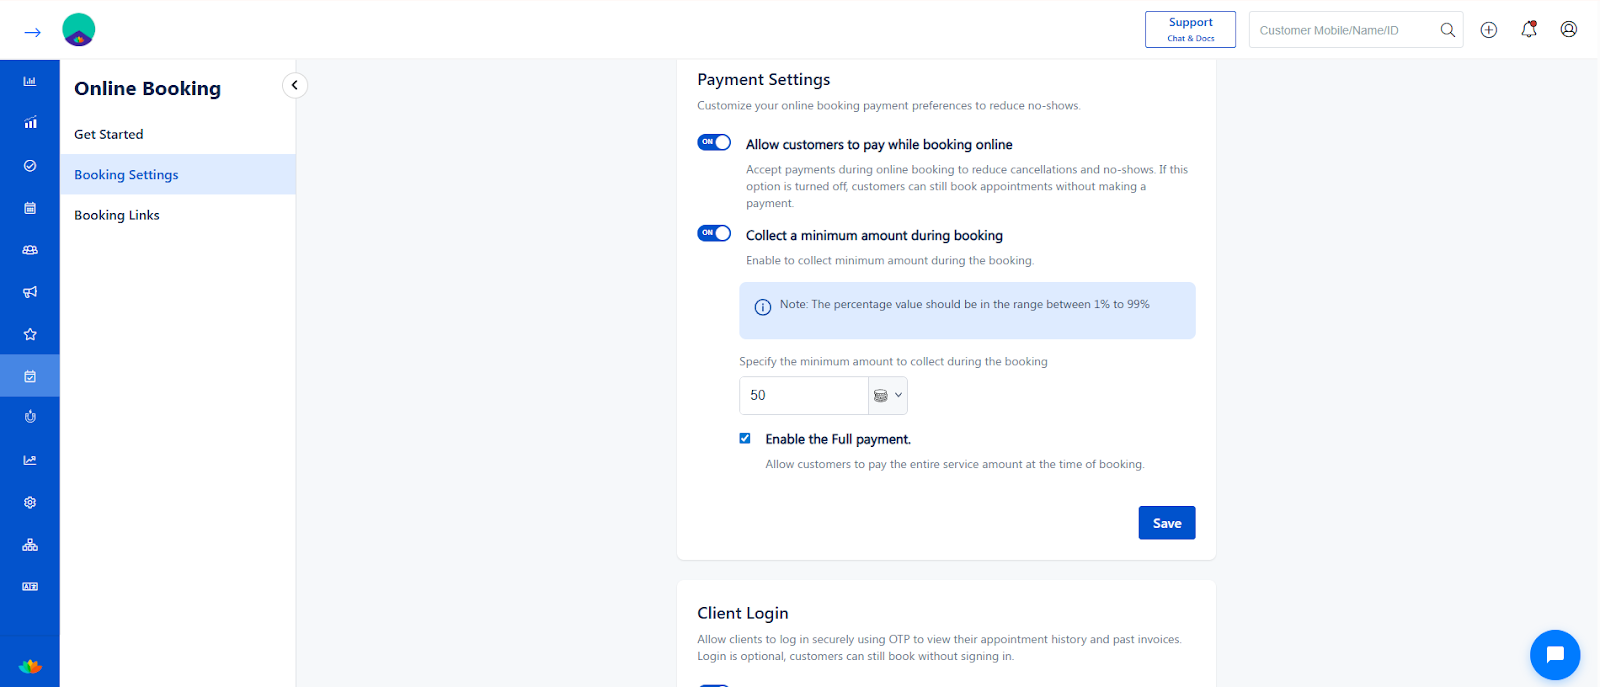
Control how payments are handled during booking.
Step 1: Allow customers to pay while booking
Enable to collect advance payment.
Reduces no-shows and cancellations.
Step 2: Collect minimum amount during booking
Toggle ON to collect partial payment.
Enter percentage (Allowed range: 1% – 99%).
Step 3: Specify the minimum amount
Enter value (Example: 50 $).
Defines how much must be paid to confirm.
Step 4: Enable Full Payment
Customers can pay full service amount while booking.
Allow Customers to Choose “Pay Now” or “Pay Later”
This option gives customers flexibility to either pay online during booking or pay at the salon after service.
Toggle ON – What Happens?
When enabled:
Customers will see two options during booking:
Pay Now
Pay Later
Customers can decide whether to complete payment immediately or at the store.
Helps reduce friction for new customers.
Suitable for businesses that allow walk-in style payments.
However, payment rules can still be enforced based on:
Booking Value
No-Show Count
Toggle OFF – What Happens?
When disabled:
Customers will not see the Pay Later option.
Online payment becomes mandatory (if payment collection is enabled).
Booking confirmation may depend on successful payment.
This is recommended if you want strict payment control to reduce revenue leakage.
Payment Rule 1: By Booking Value
This rule forces online payment if the total booking amount exceeds a specific value.
How It Works
When this option is enabled:
Enter a Minimum Booking Value (Example: ₹10).
If the total service amount is below ₹10:
Customer can book without mandatory payment.
If the total service amount is above ₹10:
The “Book Now” button automatically changes to “Pay Now”.
Online payment becomes compulsory.
Step-by-Step Configuration
Enable customers to choose Pay Now or Pay Later.
Go to By Booking Value section.
Enter the Minimum Booking Value.
Click Save.
Example Scenario
Minimum Booking Value = ₹2000
Customer selects services worth ₹1500 → Can choose Pay Later.
Customer selects services worth ₹2500 → Must Pay Now.
Payment Rule 2: By No-Show Count
This rule enforces mandatory payment for customers who frequently miss appointments.
How It Works
Set Maximum No-Shows Allowed (Example: 1).
If the customer misses appointments beyond this limit:
The system automatically requires online payment for future bookings.
“Pay Later” option will not be available.
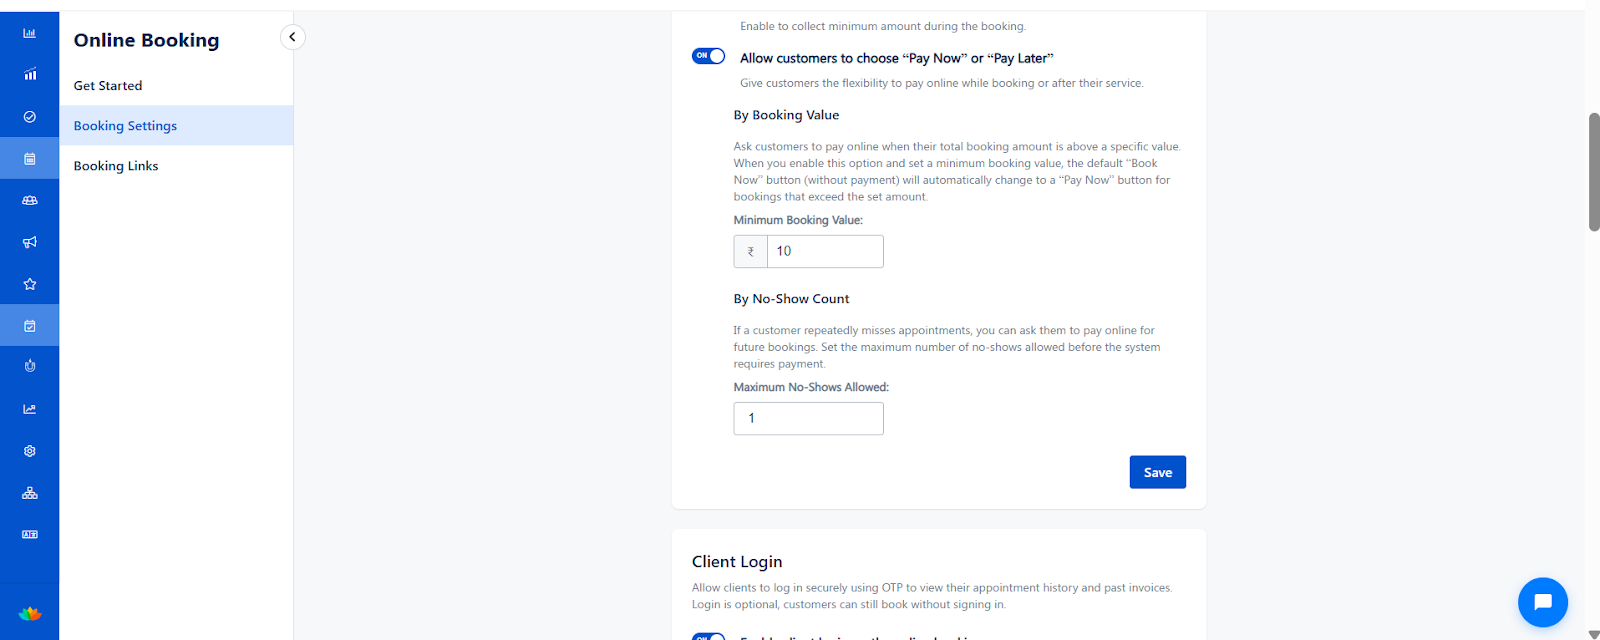
Step-by-Step Configuration
Go to By No-Show Count section.
Enter the number in Maximum No-Shows Allowed.
Click Save.
Example Scenario
Maximum No-Shows Allowed = 1
Customer misses 1 appointment → Still allowed Pay Later.
Customer misses 2 appointments → Must Pay Now for future bookings.
Click Save.
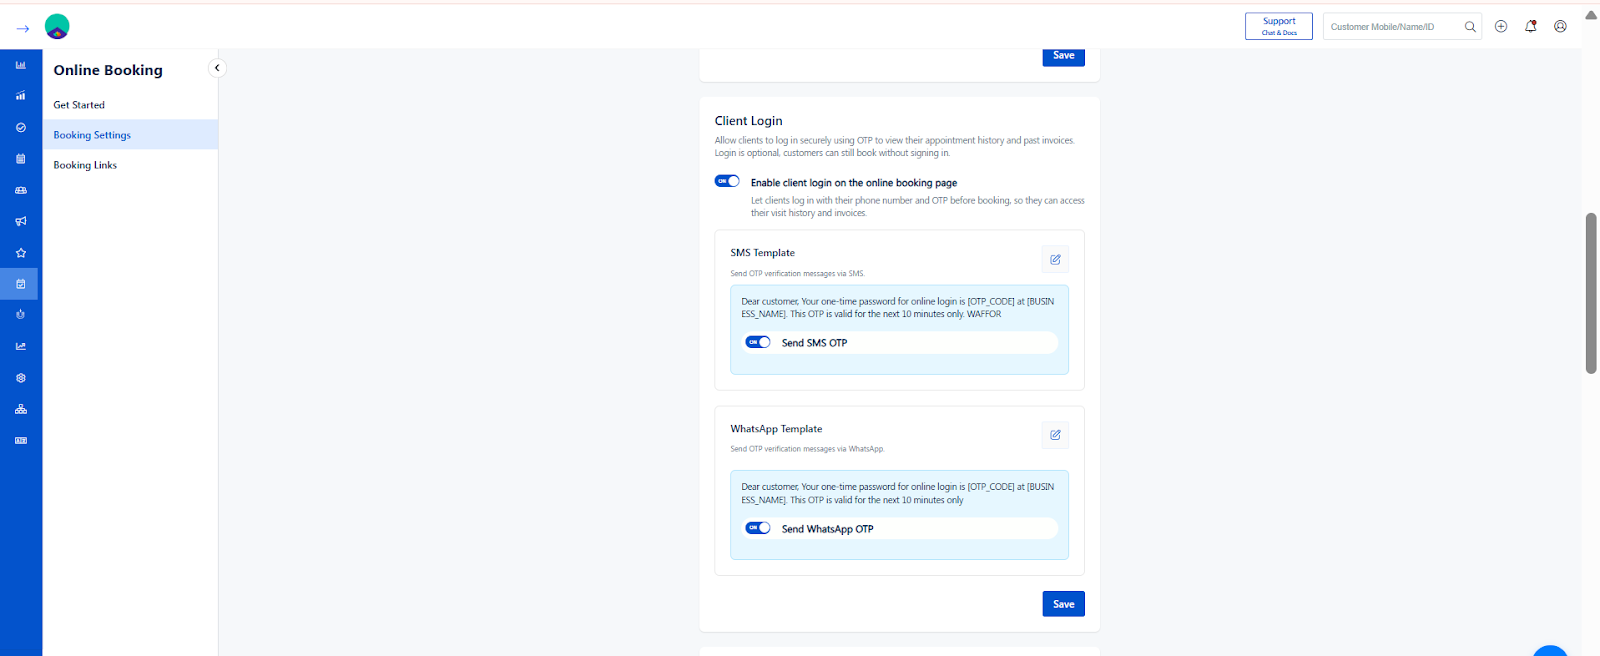
Client Login – Online Booking (Enable / Disable)
The Client Login feature allows customers to securely log in using OTP to view their appointment history and invoices.
Login is optional — customers can still book appointments even without signing in.
What is Client Login?
Client Login enables customers to:
Log in using their mobile number
Verify using OTP
View appointment history
Access past invoices
Track visit details
This improves transparency and customer experience.
Toggle ON – What Happens?
When Enable client login on the online booking page is turned ON:
A Login option appears on the Welns Online Booking page.
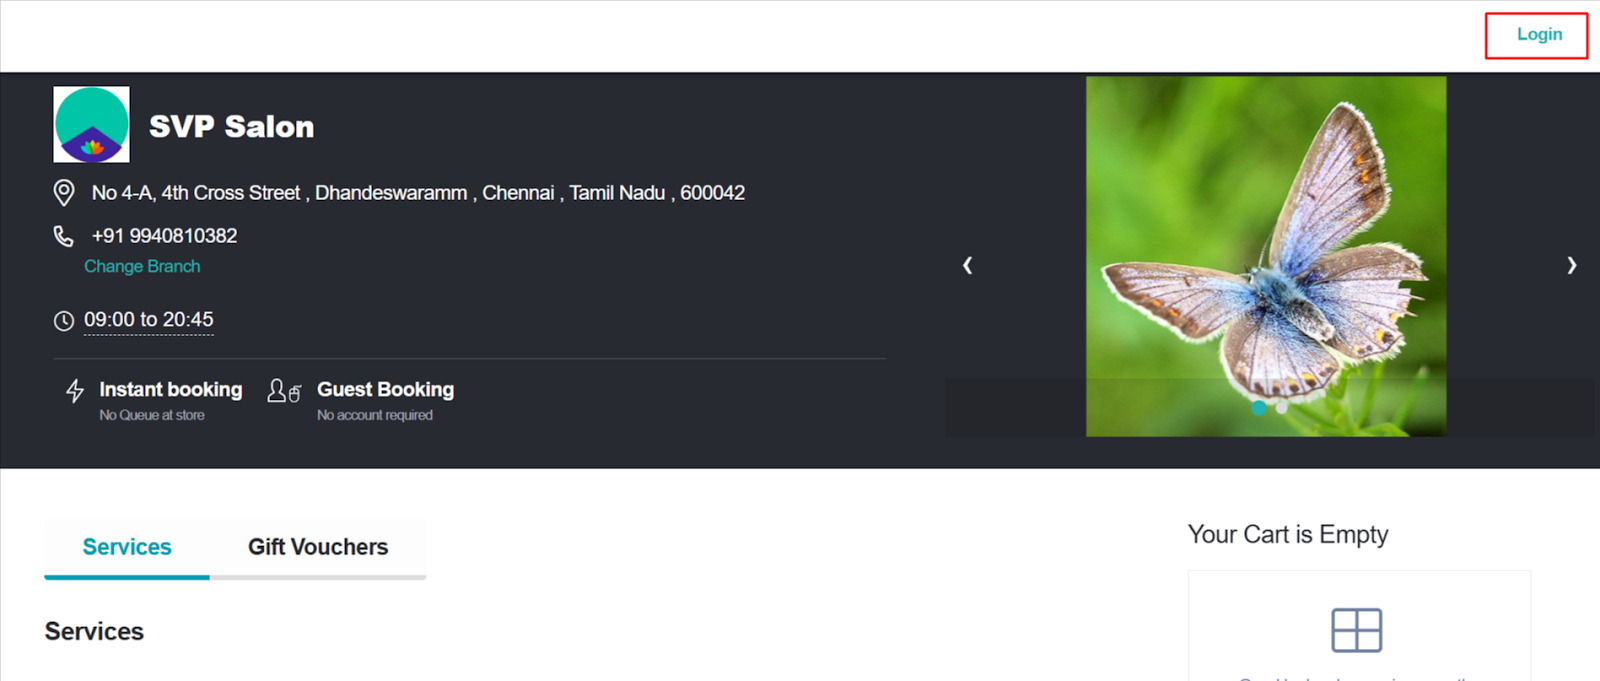
Customers must enter their phone number.
OTP verification will be triggered.
After login, customers can:
View previous appointments
Check billing history
Access invoice details
Booking can still be allowed without login (if configured).
Toggle OFF – What Happens?
When the toggle is turned OFF:
The Login option will NOT be shown on the Welns online booking page.
Customers cannot log in before booking.
Appointment history and invoices will not be accessible from the booking page.
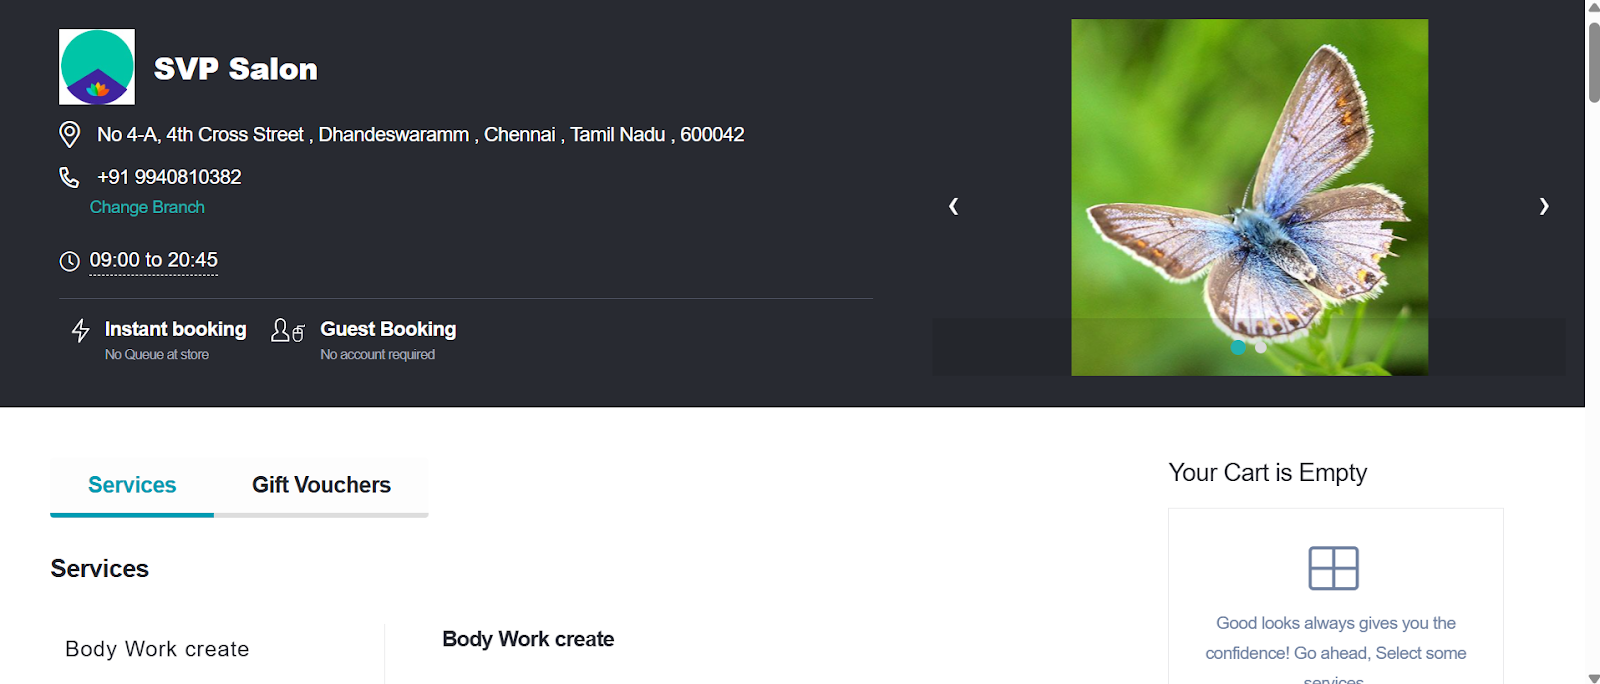
Booking works as a simple guest booking process.
This mode is suitable if:
You want a faster booking flow.
You do not require login-based tracking.
You want minimal steps during appointment scheduling.
How to Enable Client Login
Step 1:
Go to Client Login section inside Online Booking.
Step 2:
Turn ON Enable client login on the online booking page.
Step 3:
Ensure OTP service (SMS/WhatsApp) is properly configured.
Step 4:
Click Save.
How to Disable Client Login
Step 1:
Go to Client Login section.
Step 2:
Turn OFF the toggle.
Step 3:
Click Save.
After saving:
Refresh the booking URL.
Login option will no longer be visible on the booking page.
Disable client login on the online booking page:
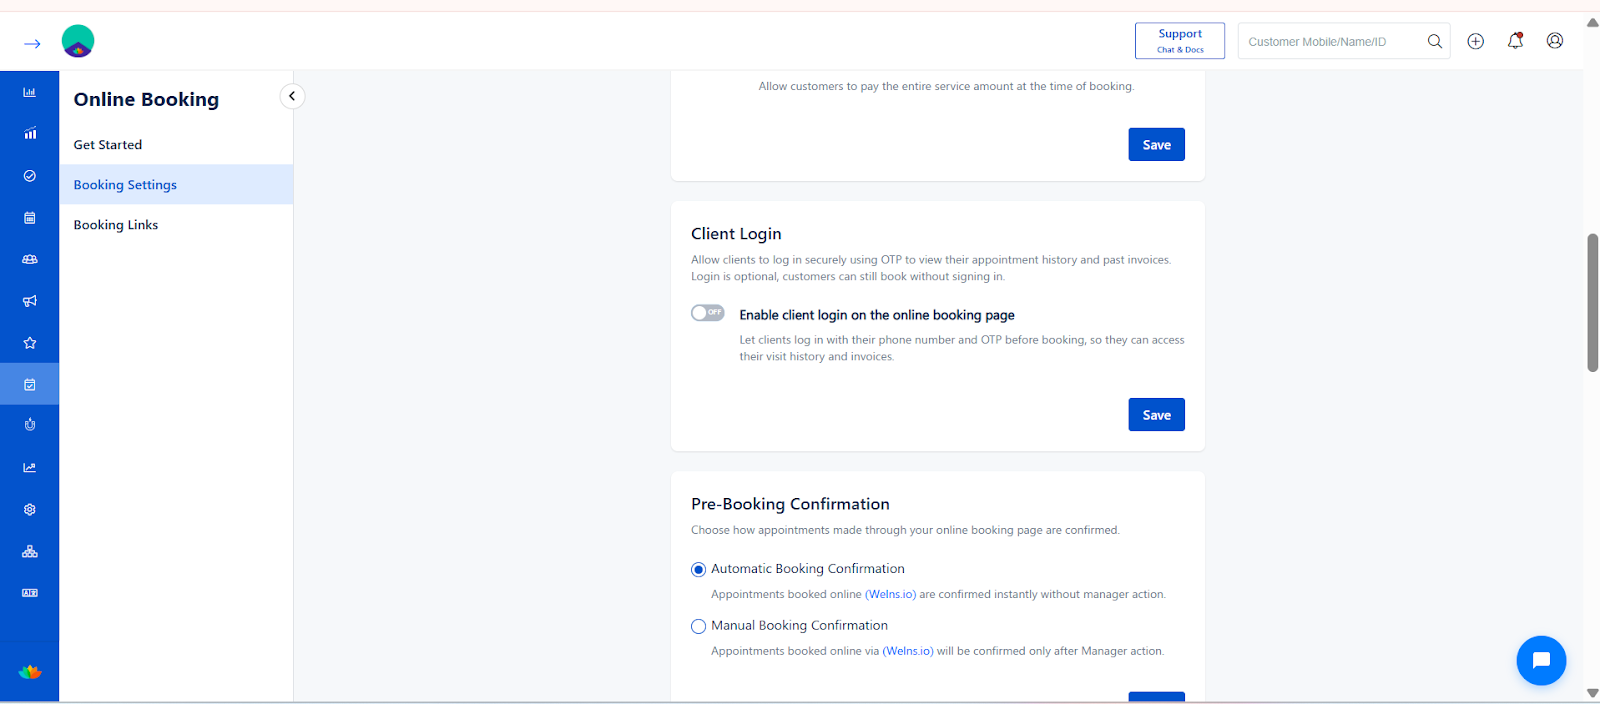
D) Pre-Booking Confirmation
Choose how appointments are confirmed.
Option 1: Automatic Booking Confirmation
Appointment gets confirmed instantly.
No manual approval required.
Option 2: Manual Booking Confirmation
Manager approval required.
Appointment confirmed only after action.
Click Save.
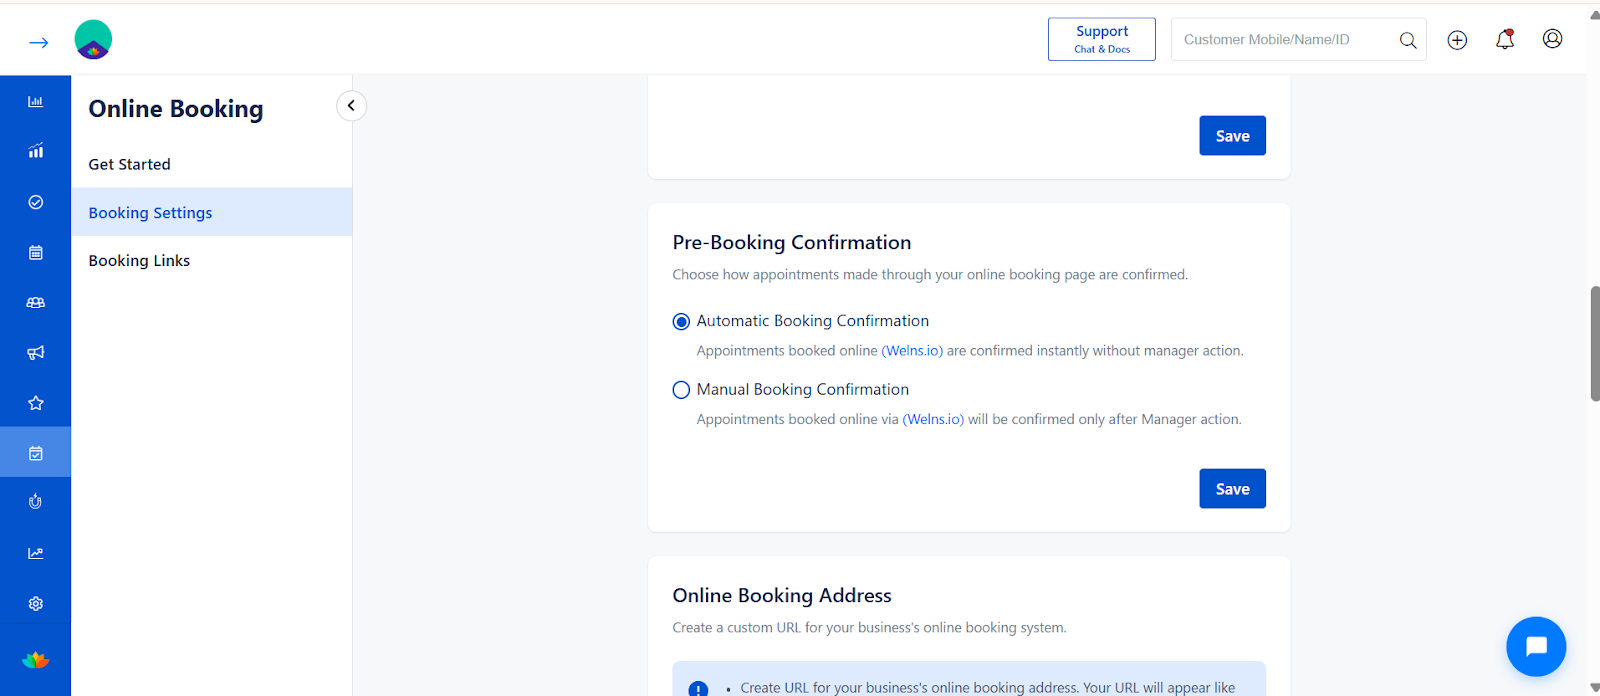
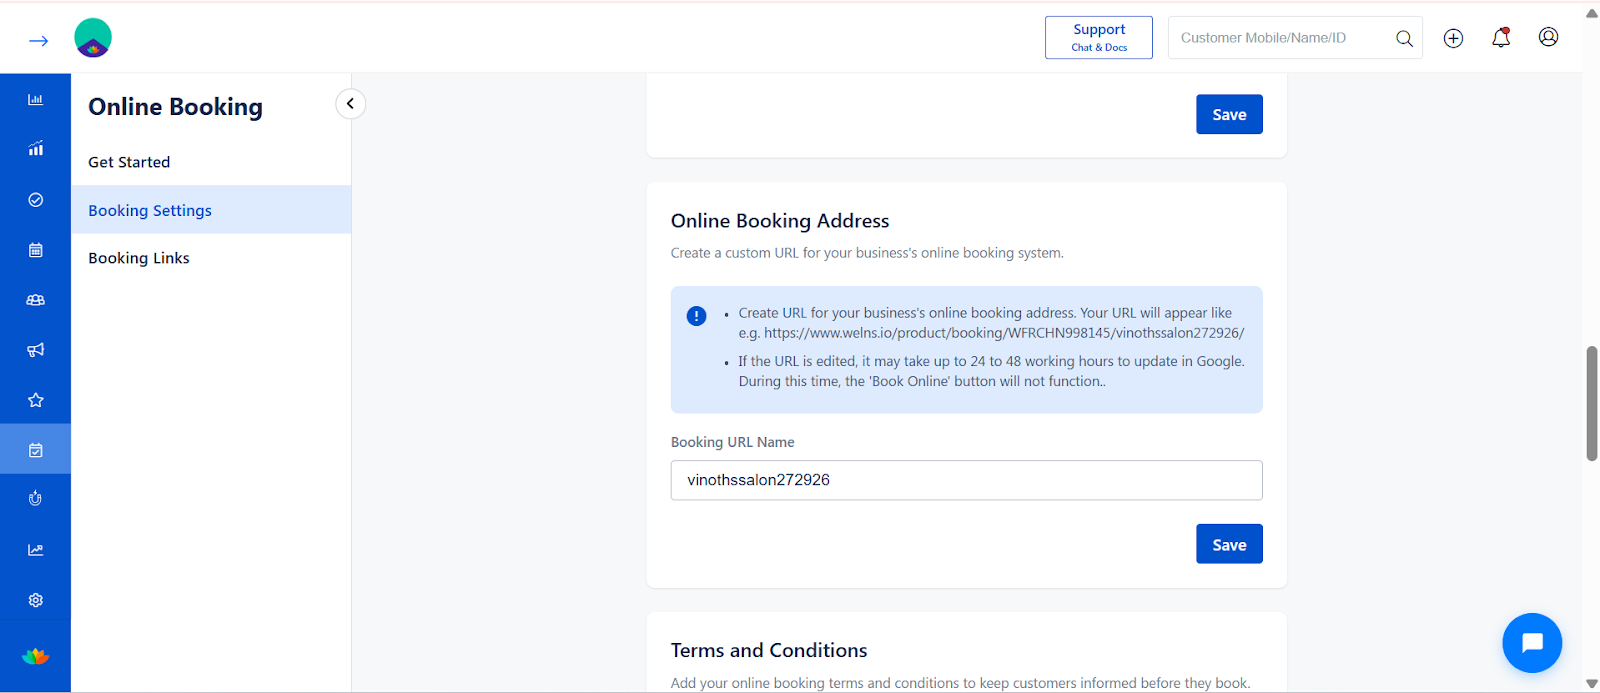
E) Online Booking Address (Booking URL)
Create your custom booking URL.
Step 1:
Enter Booking URL name.
Example:
yourbusinessname
Step 2:
System generates link:
https://yourdomain.com/yourbusinessname
⚠️ Note:
If URL is edited, it may take up to 48 hours to update on Google.
During update, Book Online button may not function.
Click Save.
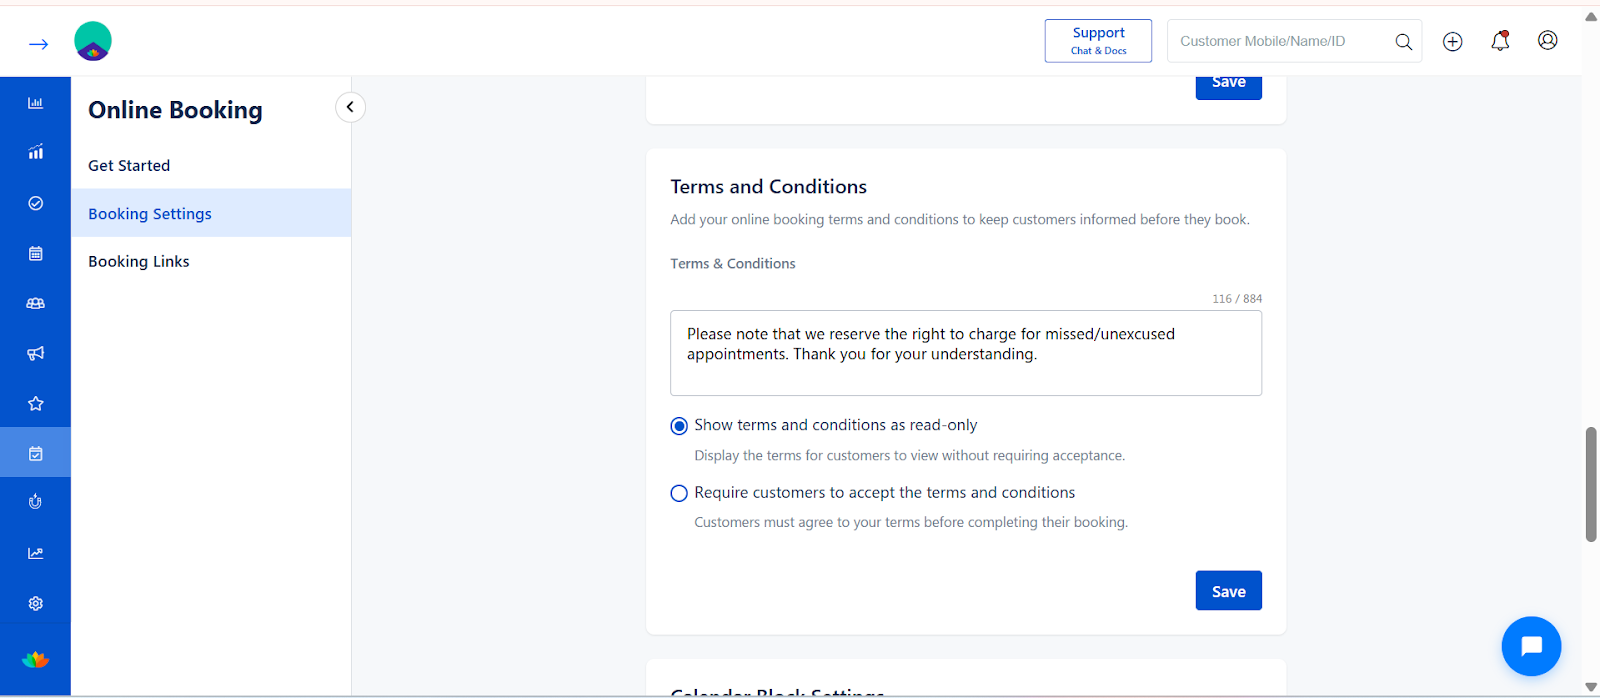
F) Terms and Conditions
Add policies customers must agree to before booking.
Step 1:
Enter your booking terms.
Step 2: Choose display type:
✅ Show as read-only
✅ Require customers to accept terms before booking
Click Save.
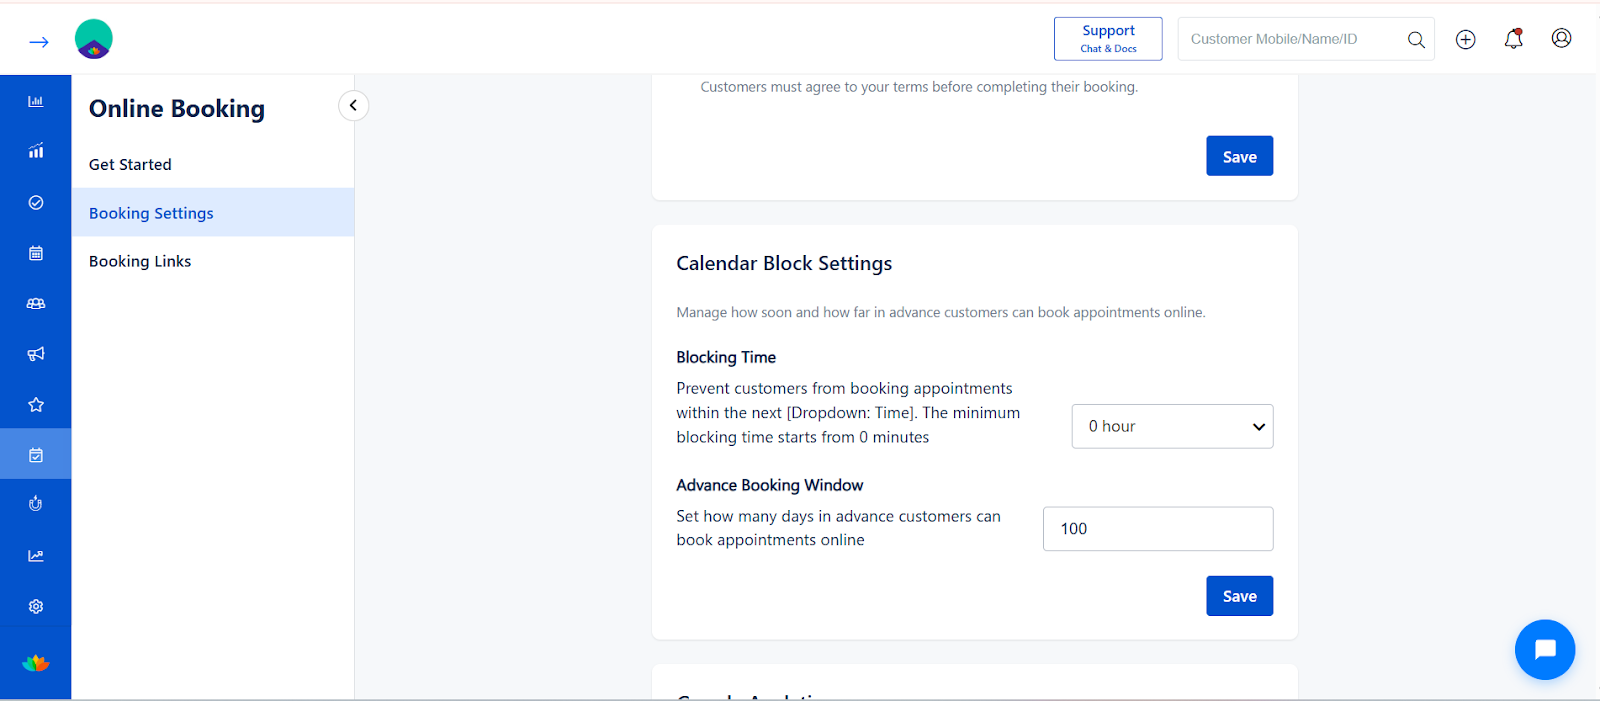
G) Calendar Block Settings
Control booking time restrictions.
Step 1: Booking Time
Set minimum time gap before booking.
Example: Prevent booking within 0 hour / 1 hour etc.
Step 2: Advance Booking Window
Define how many days in advance customers can book.
Example: 100 days.
Click Save.
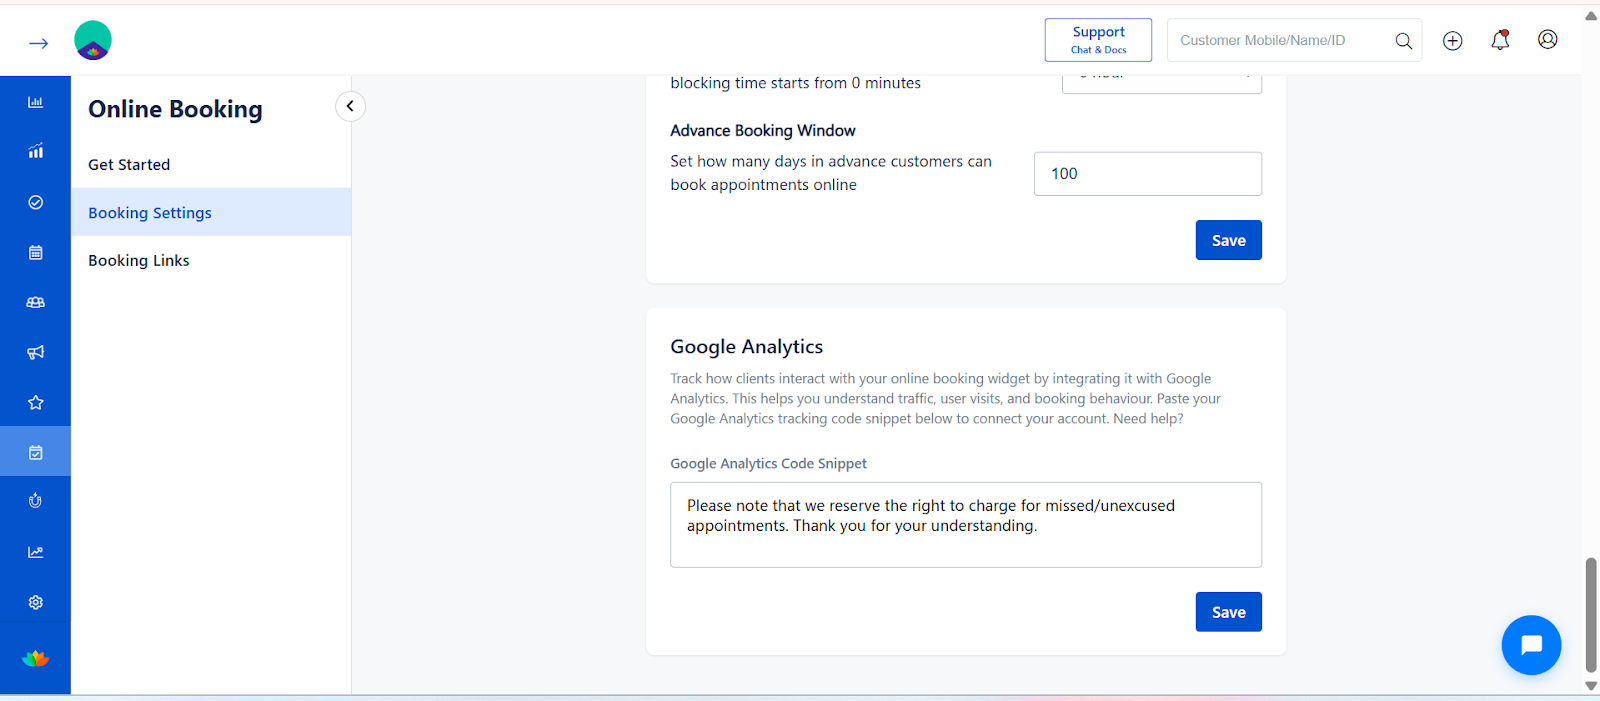
H) Google Analytics Integration
Track booking traffic and visitor behavior.
Step 1:
Paste Google Analytics tracking code snippet.
Step 2:
Click Save.
Now you can monitor:
Traffic
Conversions
Booking source
? Use Cases
✔️ Salon wants to reduce phone bookings
✔️ Business wants an advance payment to reduce no-shows
✔️ Home service providers need customer's address
✔️ Premium salons want staff selection enabled
✔️ Businesses want to track booking traffic via Google Analytics
✔️ Owners want manual approval for better schedule control
? Benefits (Business Impact)
? Increase online bookings
⏳ Reduce front desk workload
? Improve advance payment collection
❌ Reduce no-shows
? Track marketing performance
? Secure customer login & booking history access
? Improve visibility on Google & social platforms
✅ Best Practice Recommendation
For most salons:
Enable online booking
Enable staff selection
Collect at least 30–50% advance
Require Terms & Conditions acceptance
Use Automatic confirmation (if team availability is stable)
===================================================================
Booking Links & Online Booking Widget – Complete Guide
The Booking Links section allows you to generate and share platform-specific booking URLs and embed your booking widget on your website.
You can create Google, Facebook, and Direct booking links at both Network and Store levels.
? Navigation Path
Settings → Modules Settings → Online Booking → Booking Links
Or
Side Bar → Online Booking → Booking Links
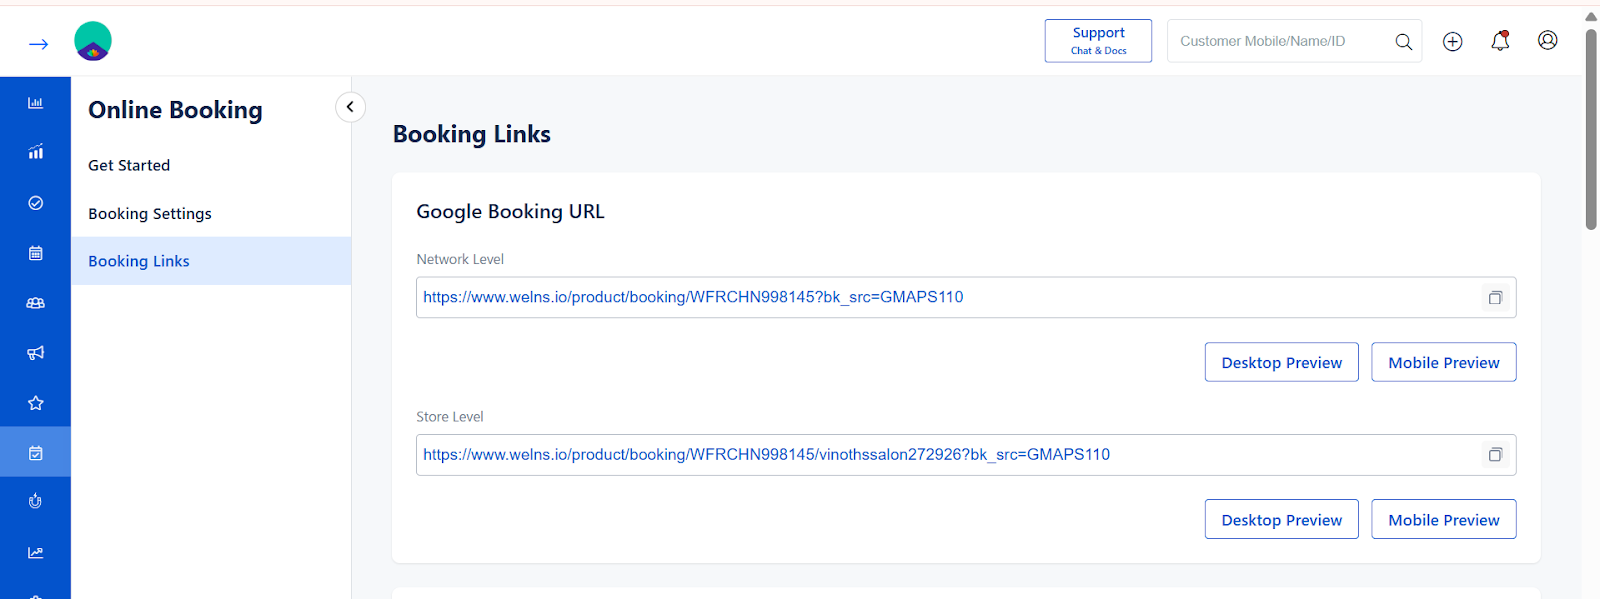
1️⃣ Google Booking URL
This link is designed specifically for Google Search and Google Maps integrations.
You will see two levels:
? Network Level
Applies to all stores under the network.
Use this when managing multiple branches centrally.
? Store Level
Specific to a single outlet.
Use this when promoting an individual store.
When to Use Network vs Store Level?
Use Network Level if all branches share common booking logic.
Use Store Level if each branch has a separate booking page.
How to Use Google Booking URL
Use the URL for the Booking from the Google Business profile.
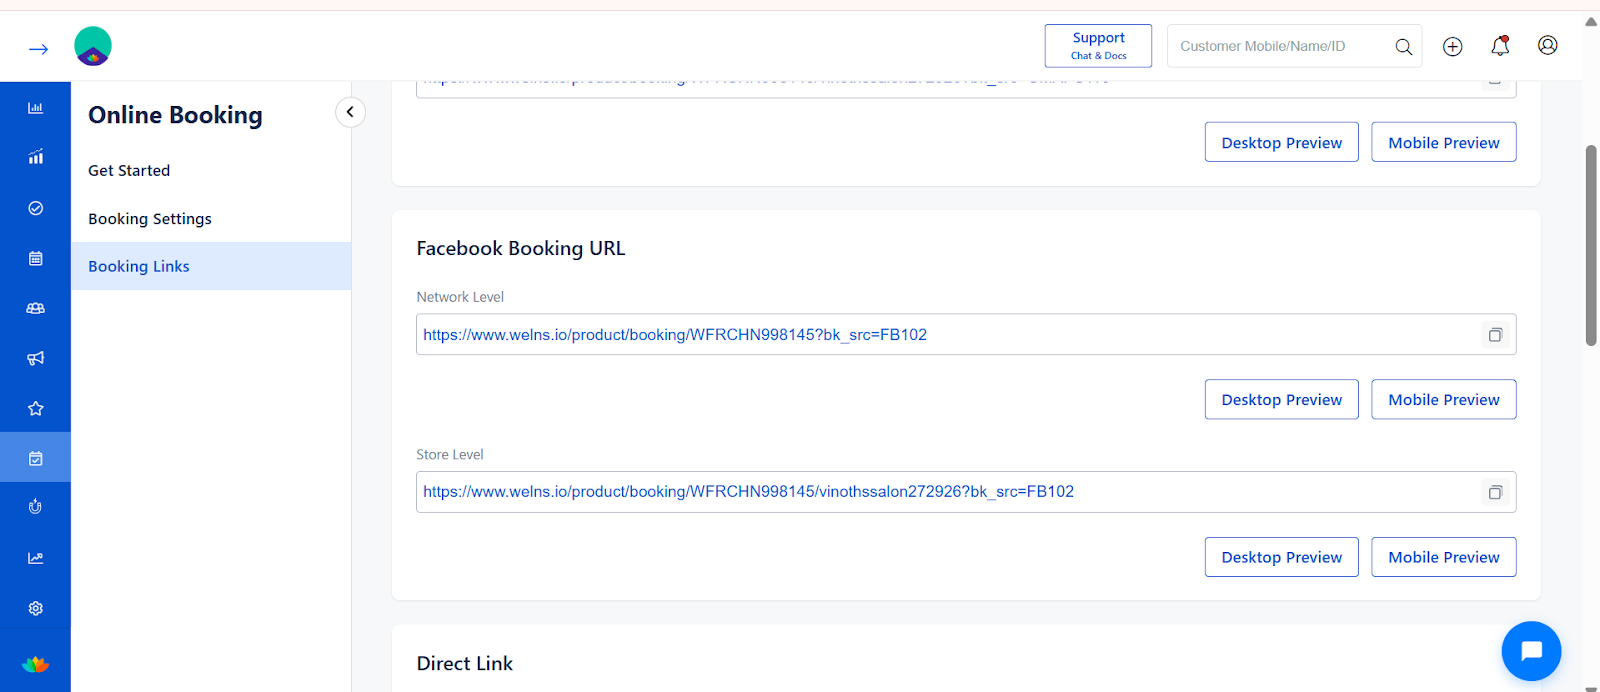
2️⃣ Facebook Booking URL
This link is optimized for Facebook booking buttons.
You will see:
Network Level URL
Store Level URL
How to Use Facebook Booking URL
Step 1:
Copy the relevant URL.
Step 2:
Go to your Facebook Business Page and Paste the copied link.
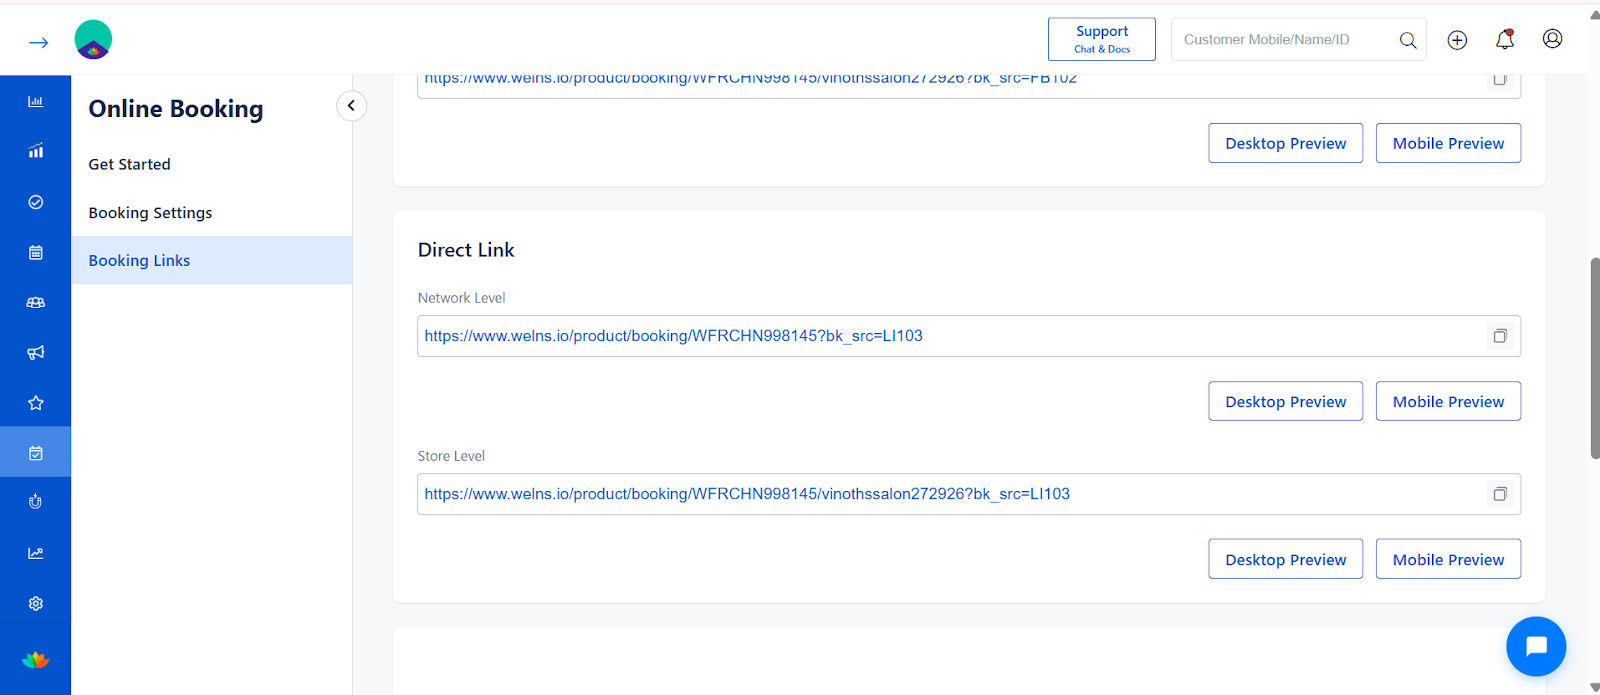
3️⃣ Direct Link
This is your standard booking link that can be shared anywhere.
Available in:
Network Level
Store Level
Where Can You Use Direct Link?
WhatsApp messages
Instagram bio
SMS campaigns
Email marketing
QR code generation
Website button redirects
How to Share Direct Link
Step 1:
Copy the desired link.
Step 2:
Paste it in the platform where you want to promote bookings.
Step 3:
Test using Preview before sharing publicly.
4️⃣ Desktop & Mobile Preview
Each link includes:
Desktop Preview
Mobile Preview
Use this to verify:
Layout design
Service display
Staff visibility
Booking flow experience
Always preview before publishing.
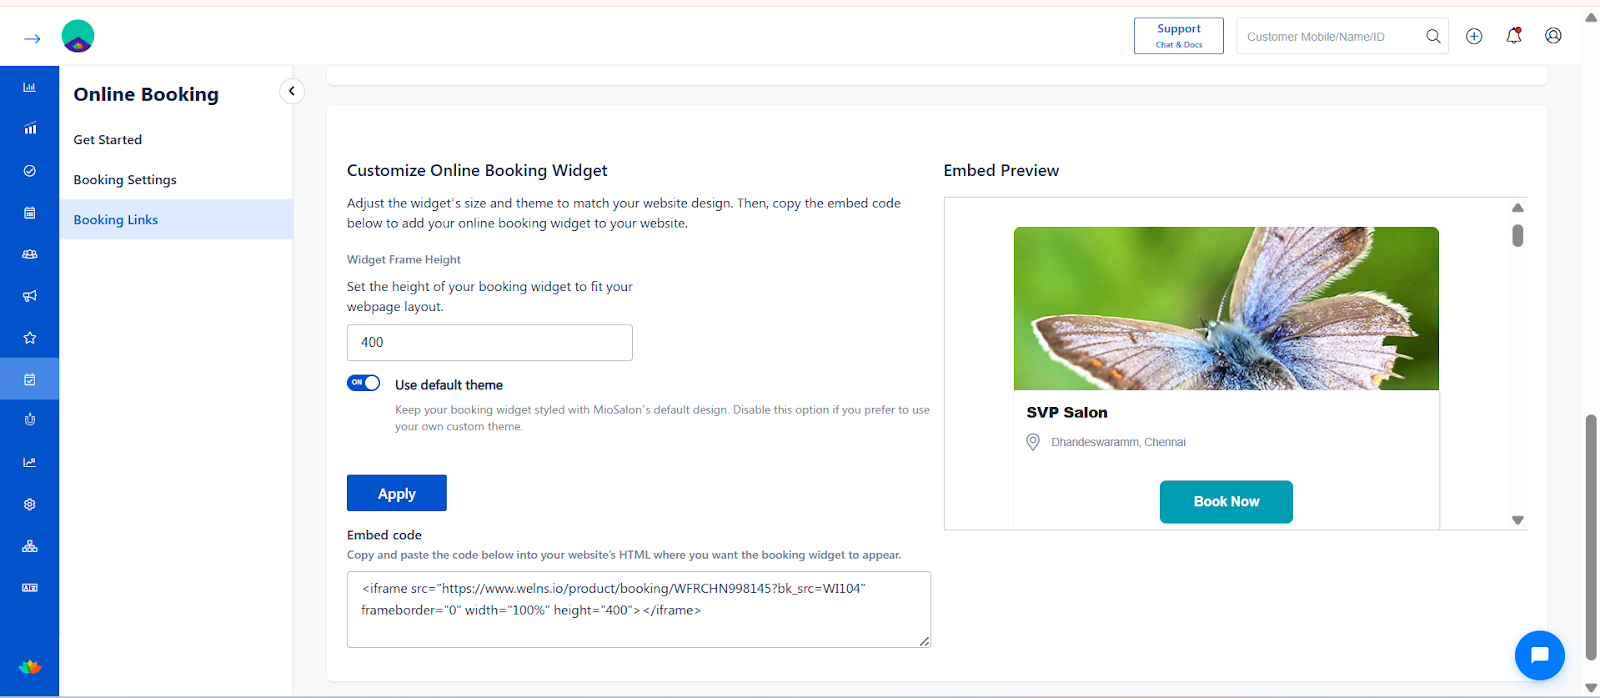
5️⃣ Customize Online Booking Widget
This section allows you to embed the booking system directly into your website.
Disable Default Theme
While Disable mode on default theme we can able to customize the Theme.
Locate the Use Default Theme toggle.
If enabled:
The system uses MioSalon’s default styling.
If disabled:
You can apply your own custom theme colors.
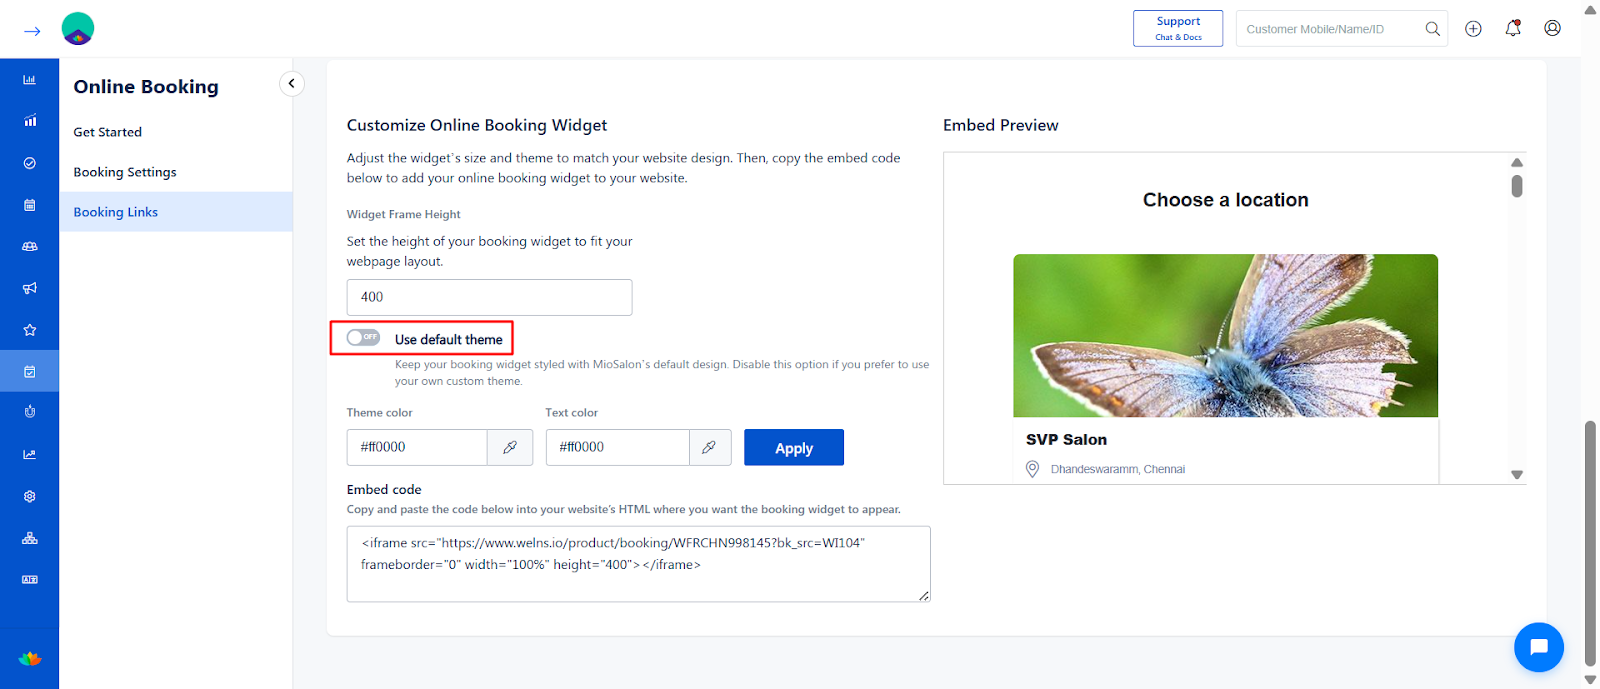
Toggle as per your branding requirement.
Step 3: Change Theme Color
In the Theme Color field:
Enter your preferred HEX color code (e.g., #ff0000).
Or use the color picker icon.
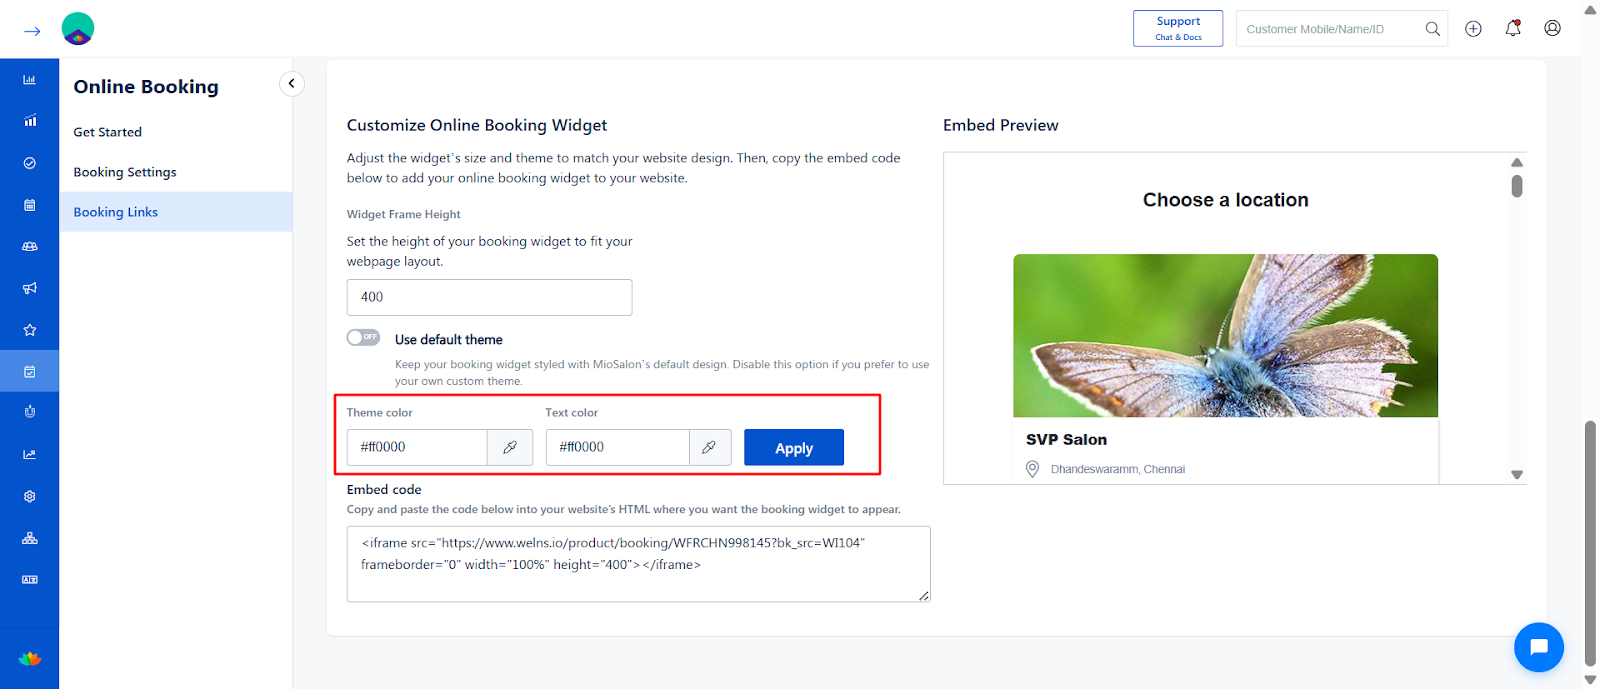
Click Apply.
Observe the changes immediately in the Embed Preview section on the right side.
Step 4: Change Text Color
In the Text Color field:
Enter the preferred HEX color.
Or select using the color picker.
Click Apply.
Real-Time Preview Behavior
All theme changes appear instantly in the Embed Preview panel.
The same styling will reflect on:
Your embedded booking widget (on your website).
Your hosted online booking page.
A) Widget Frame Height
Set the height of the embedded booking frame.
Step:
Enter height value (Example: 400).
This ensures the widget fits properly within your website layout.
B) Use Default Theme
Toggle ON:
Widget follows MioSalon default design theme.
Toggle OFF:
Allows you to apply custom website styling.
Choose based on branding needs.
C) Apply Changes
After adjusting settings:
Click Apply to update the widget preview.
6️⃣ Embed Code
The system generates an iframe embed code.
Example:
<iframe src="BOOKING_URL" width="100%" height="400"></iframe>
How to Add Widget to Website
Step 1:
Copy the embed code.
Step 2:
Paste it inside your website HTML where booking should appear.
Step 3:
Publish website changes.
The booking page will now load directly inside your site.
Important Notes
Always use Store Level link for single-branch promotions.
Changing Booking URL in settings may affect generated links.
Preview before using links in ads or campaigns.
Widget height must match your website layout.
Ensure Online Booking is enabled before sharing links.
Use Cases
✔️ Add booking option on Facebook page
✔️ Share booking link via WhatsApp campaigns
✔️ Embed full booking page inside salon website
✔️ Run paid ads directing customers to the booking link
Benefits (Business Impact)
? Increase online appointment conversions
? Improve visibility across digital platforms
? Simplify booking access for customers
? Manage multi-branch booking easily
? Track booking sources separately
? Provide seamless website booking experience
Was this article helpful?
That’s Great!
Thank you for your feedback
Sorry! We couldn't be helpful
Thank you for your feedback
Feedback sent
We appreciate your effort and will try to fix the article