Overview
MioSalon allows you to sell a brand-new package to a client right at the moment they are booking an appointment.
This streamlined New Package Booking Flow ensures that front-desk staff can simultaneously sell a package, schedule the client’s first session from that package, and accurately track the sales commission—all from the New Appointment screen.
Navigation Path
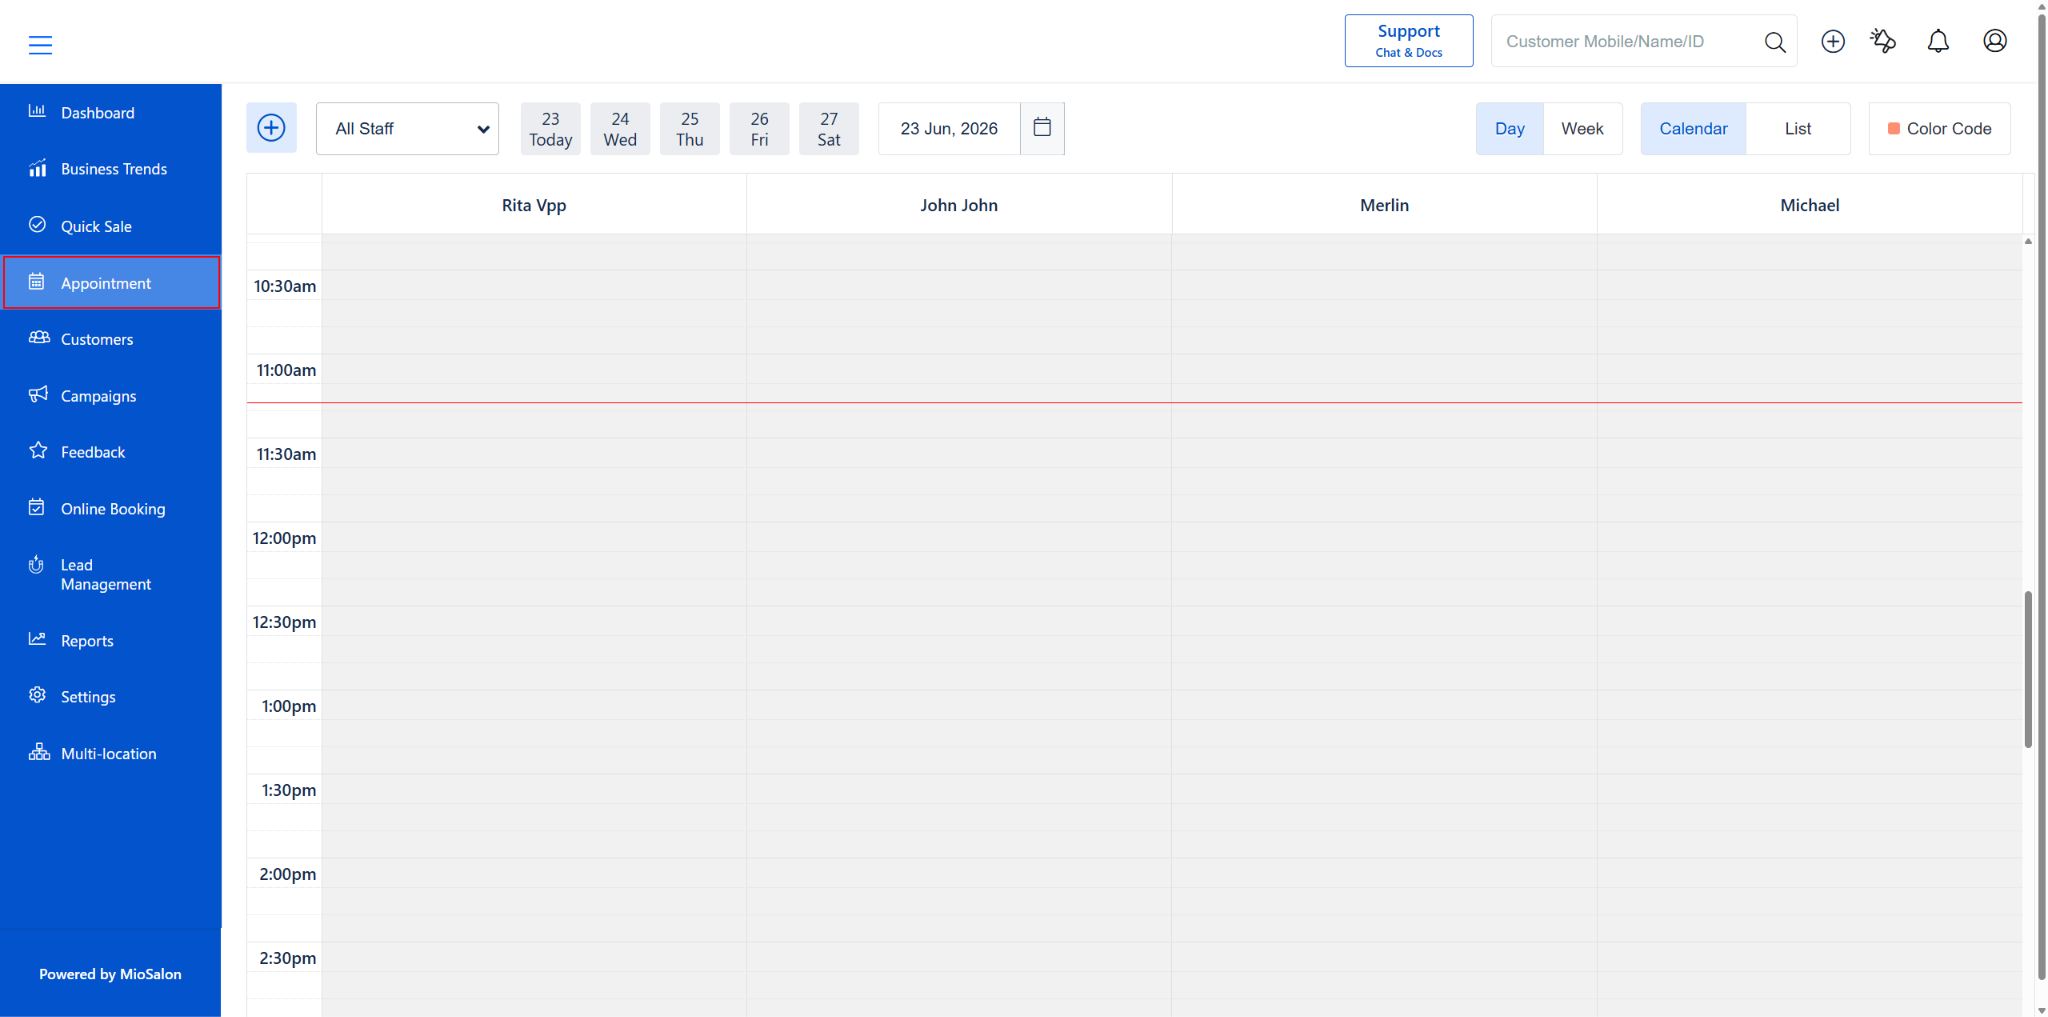
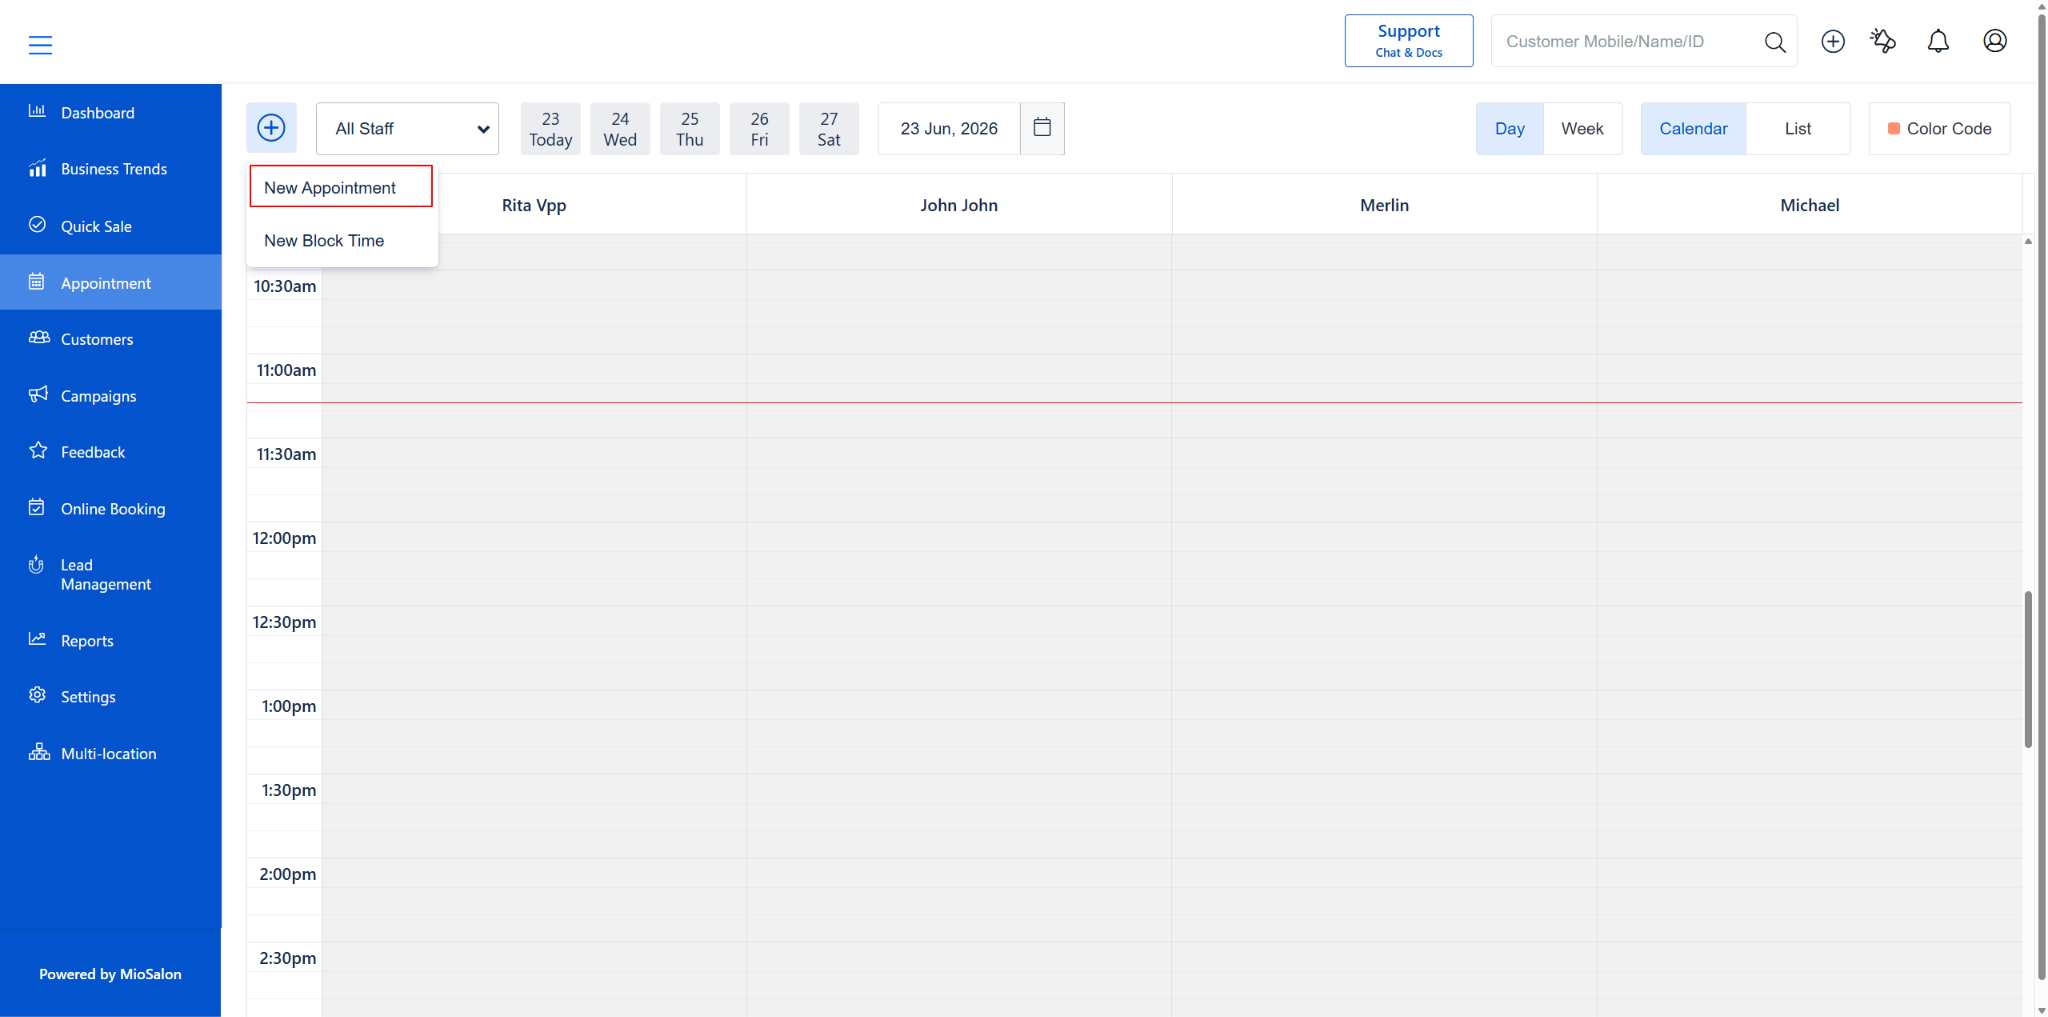
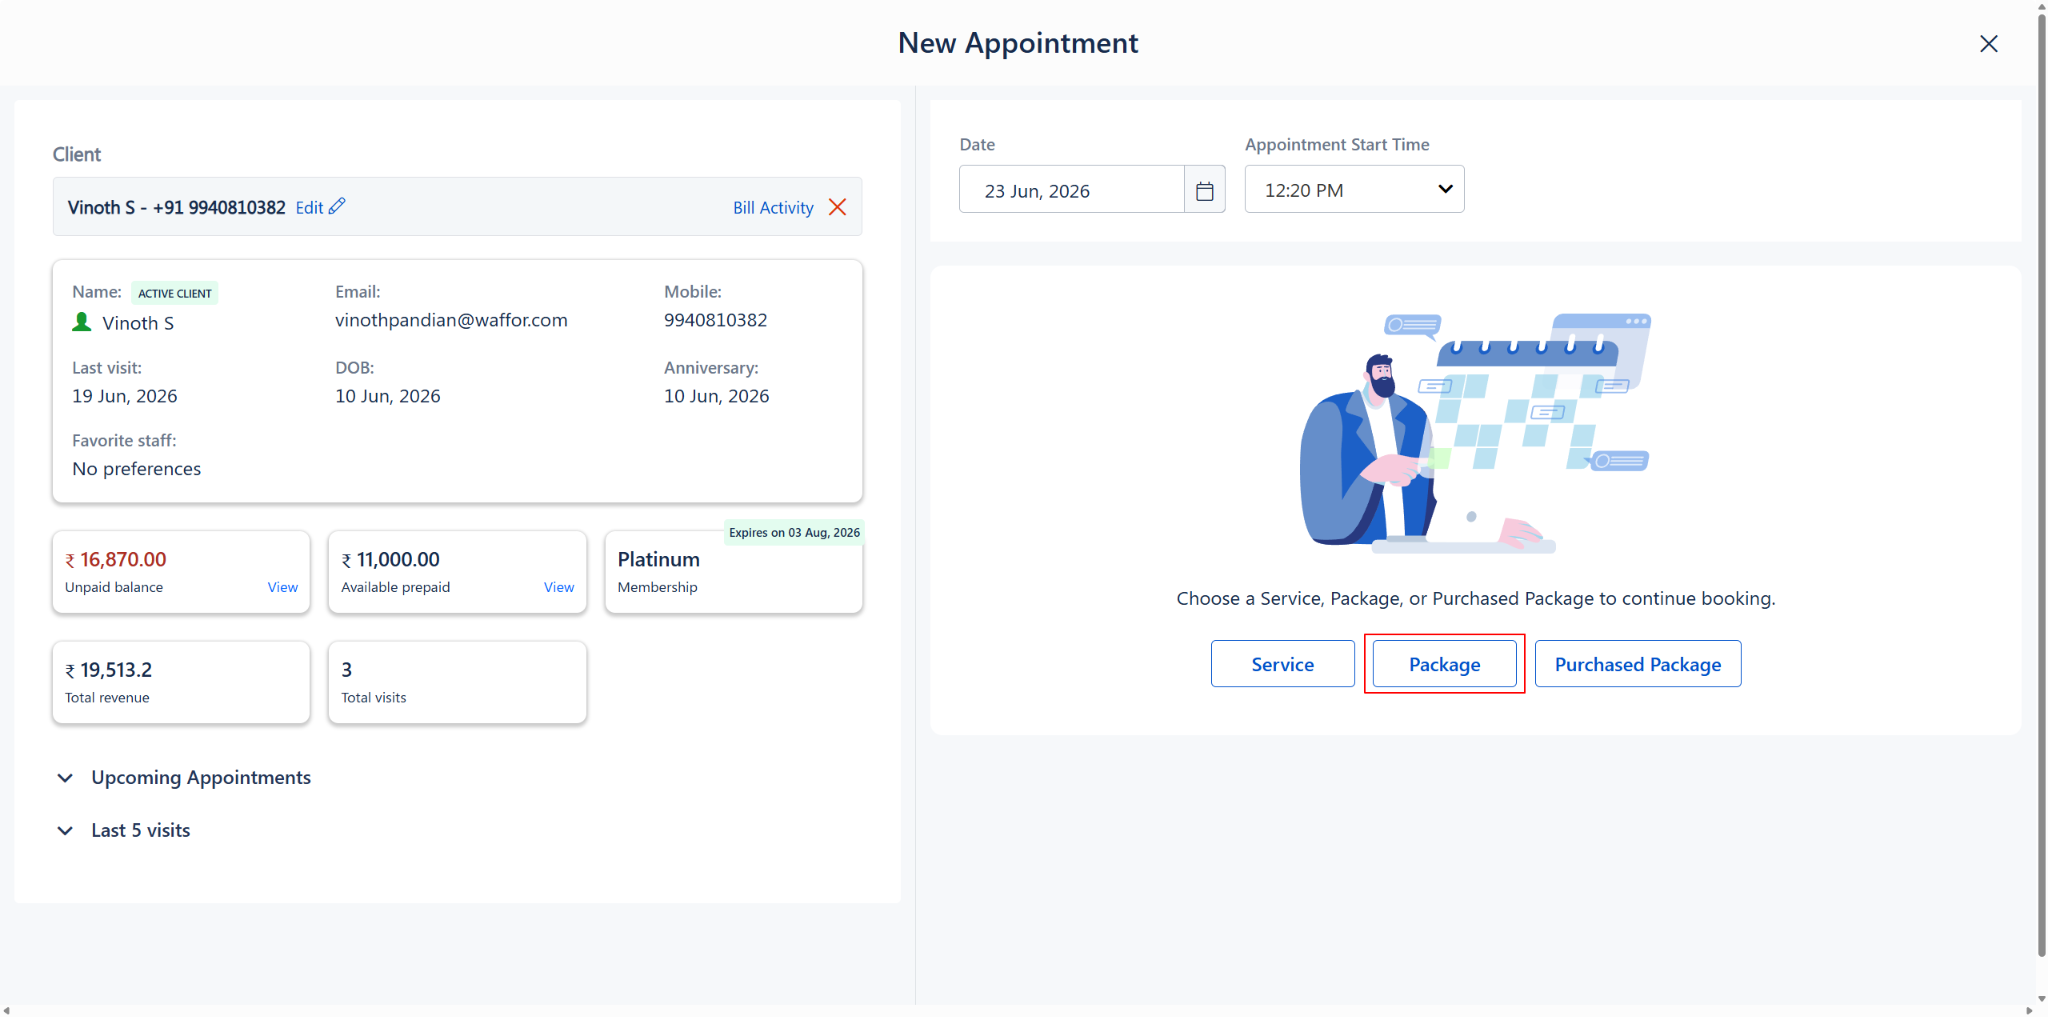
Appointment (left menu) → Plus (+) icon (top-left) → New Booking → Search Client → Click “Package”
Important Notes:
1. Package Redemption: When you book a new package during an appointment, the package is not immediately available for future redemptions.
The package is only officially added to the customer’s profile for future use after the client completes checkout and the package is converted on the bill.
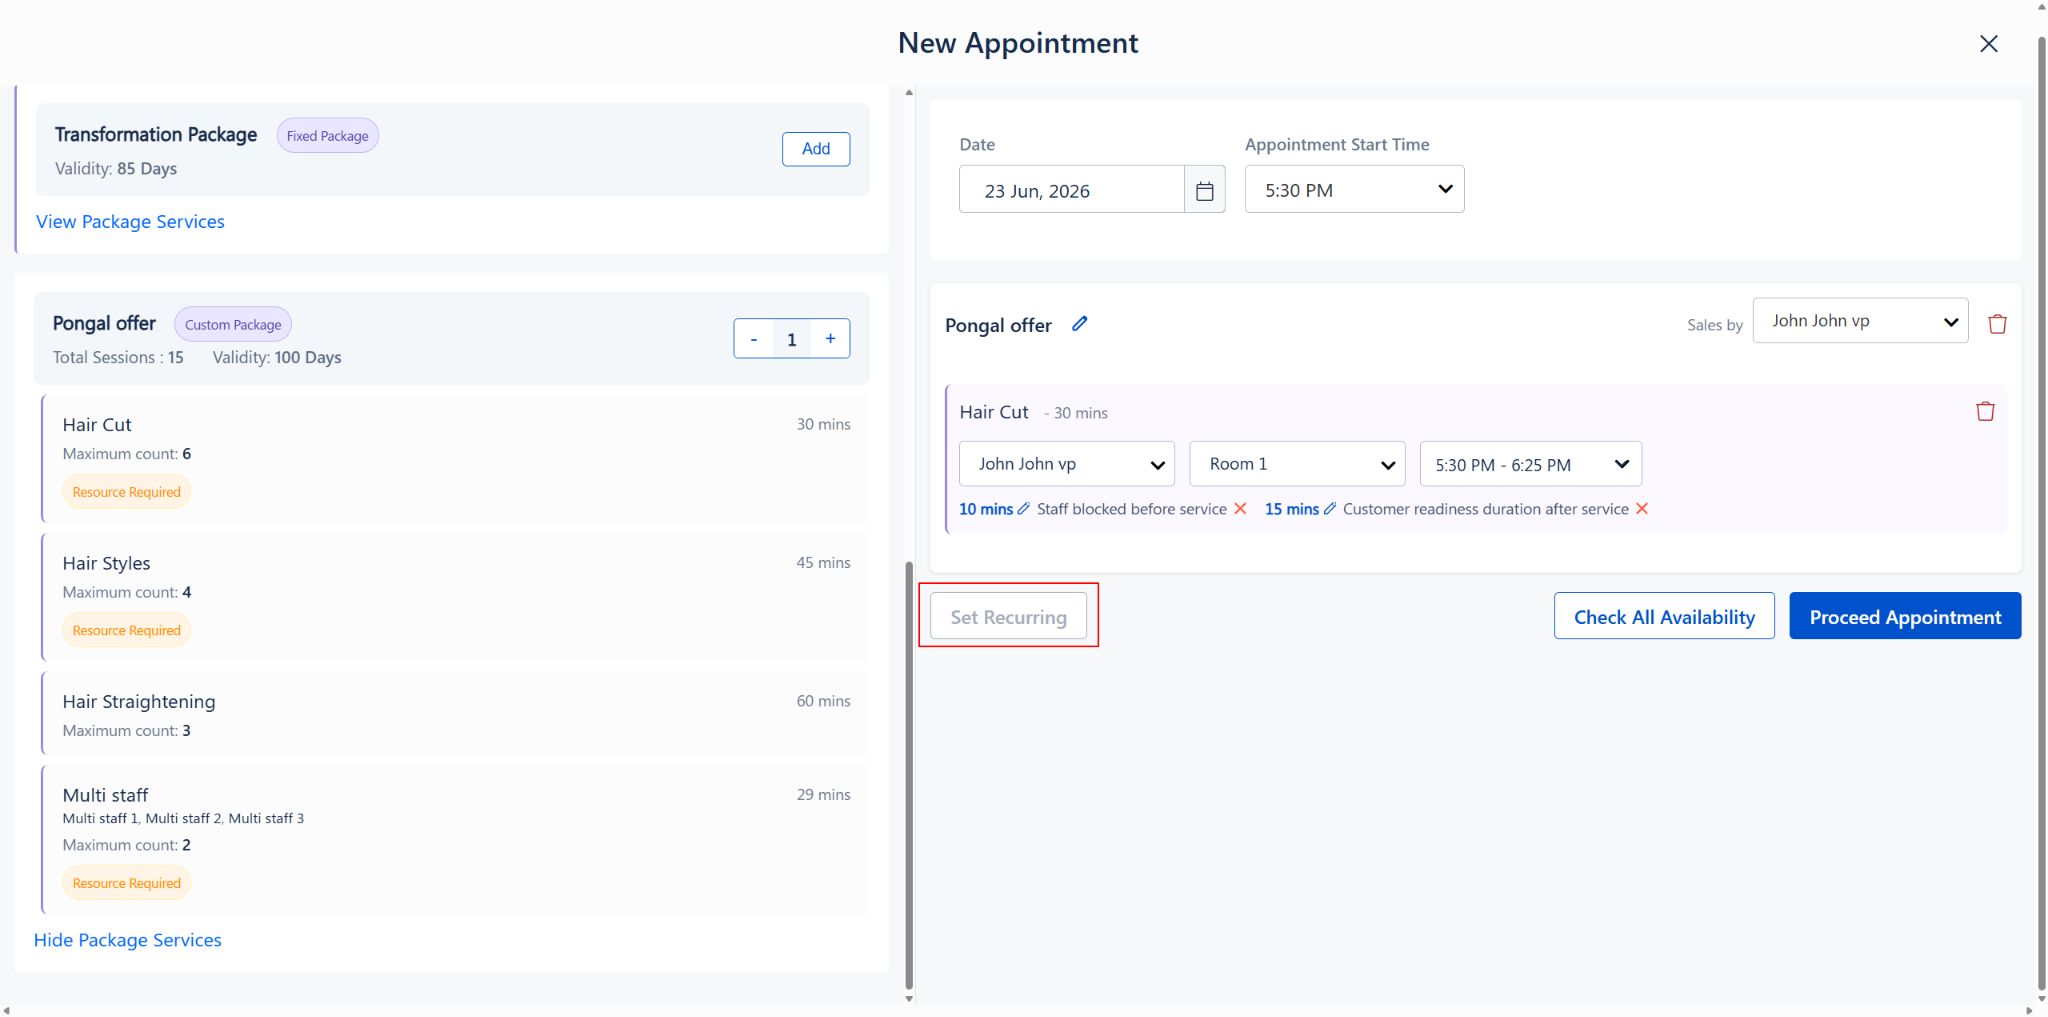
2. Recurring Appointments: Recurring appointments are not allowed for package services.
The “Set Recurring” option is not available when booking a package.
3. Single Session Per Booking: During a package service booking, you can only schedule one session at a time.
For example, if the package includes 10 sessions, only 1 session is booked in this appointment — the remaining sessions can be redeemed in future appointments.
Step-by-Step Instructions
Step 1: Open the Appointment Popup and Select a Client
1. Log in to MioSalon and go to Appointment from the left menu.
2. Click the Plus (+) icon in the *top-left corner, then select “New Booking”.
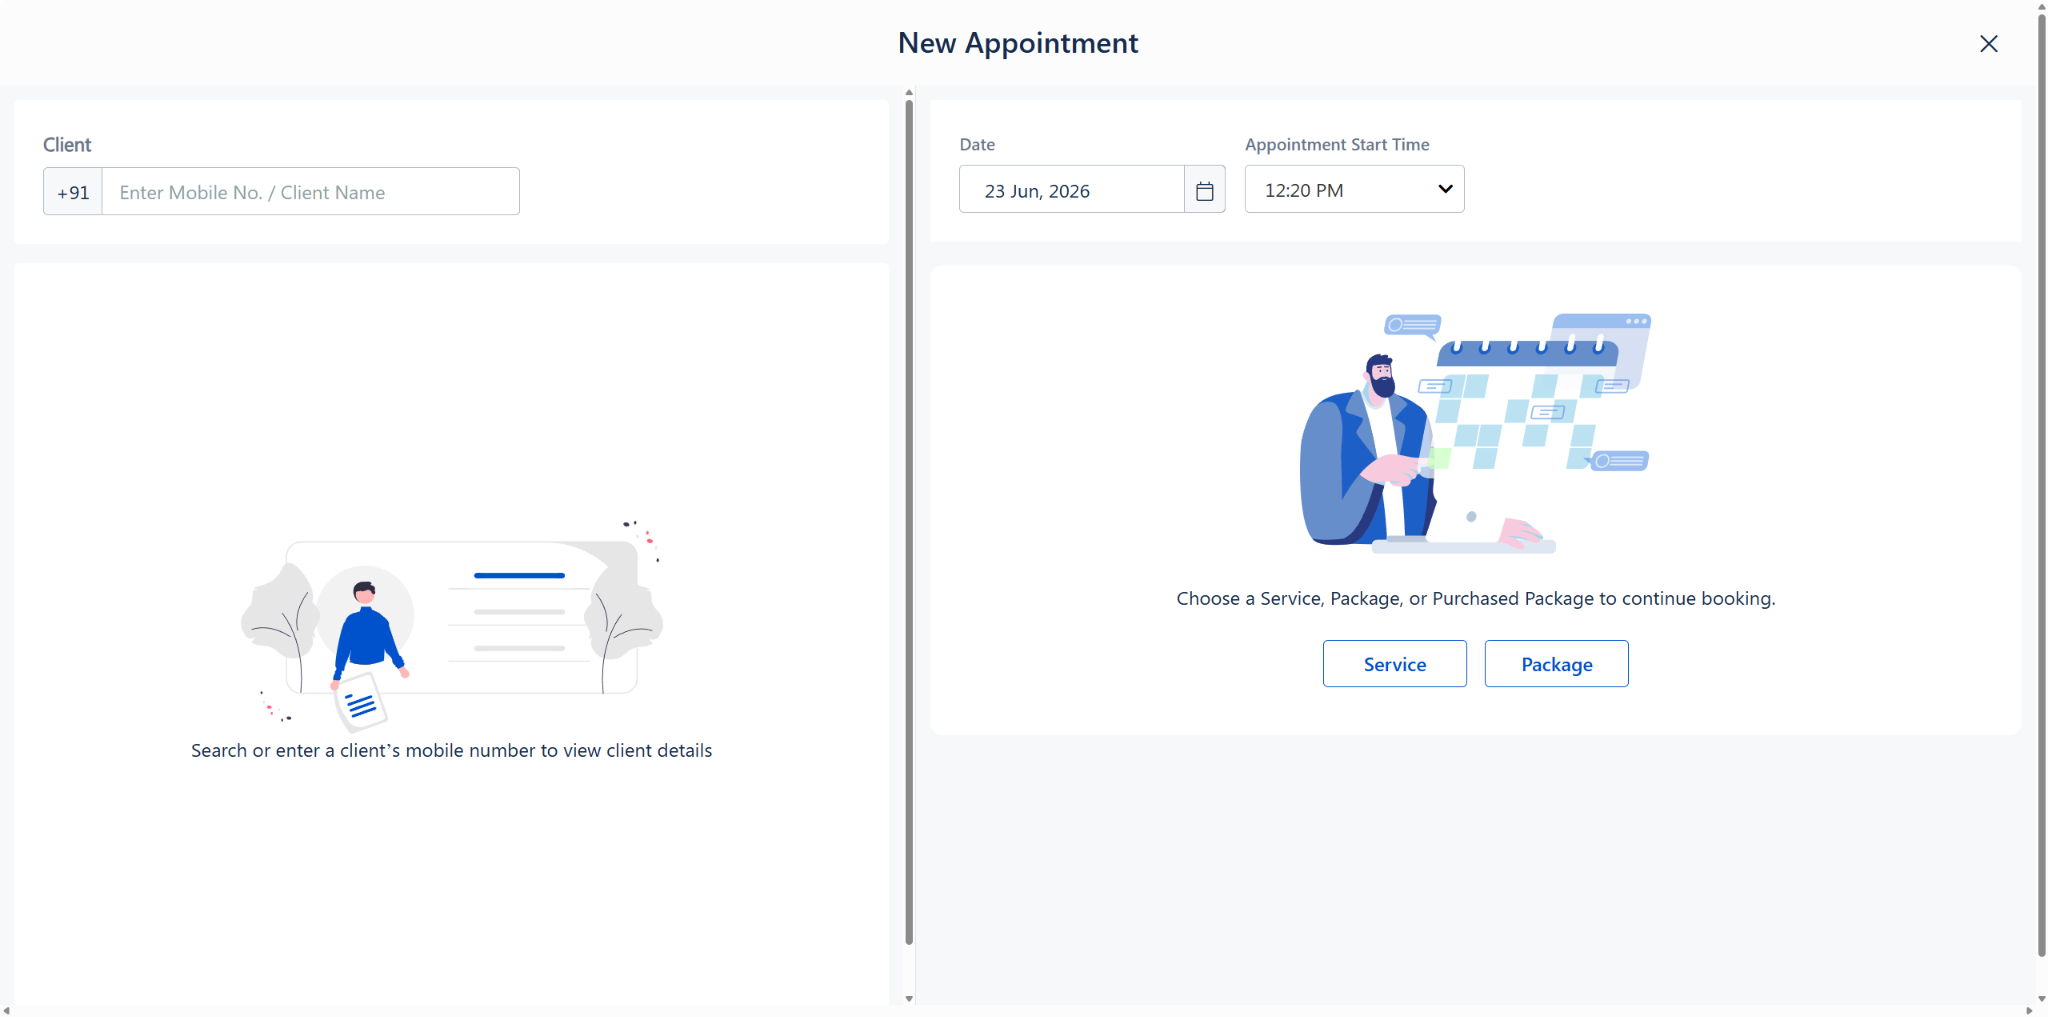
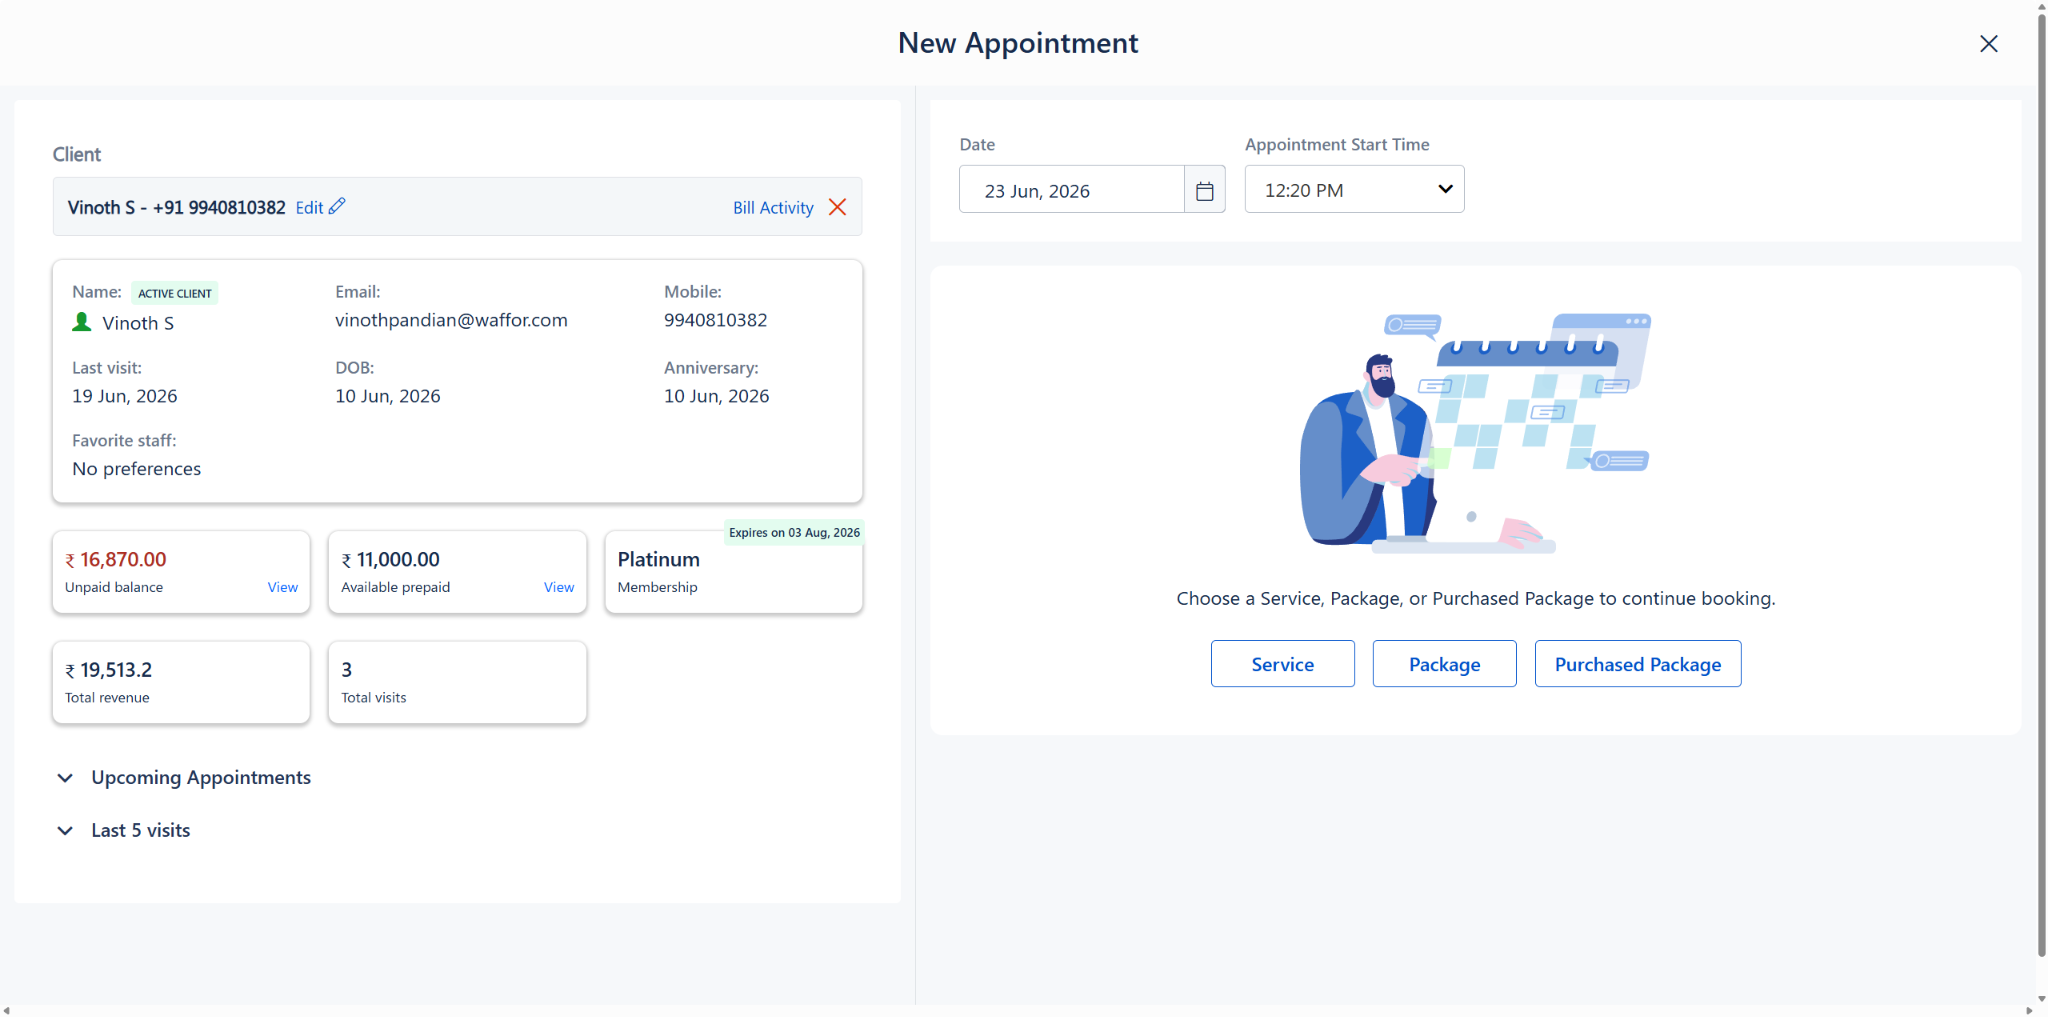
3. In the Client section (left panel), enter the client’s mobile number or name.
4. The Date and Appointment Start Time on the right panel are automatically set to the current date and time (or the time slot you selected on the calendar). You only need to change these if you want to schedule the appointment for a different date or time.
Step 2: Choose “Package” as the Booking Type
On the right panel, you will see a prompt to choose your booking type.
Click the “Package” button. (Note: Do not click “Purchased Package” unless the client has already bought the package previously).
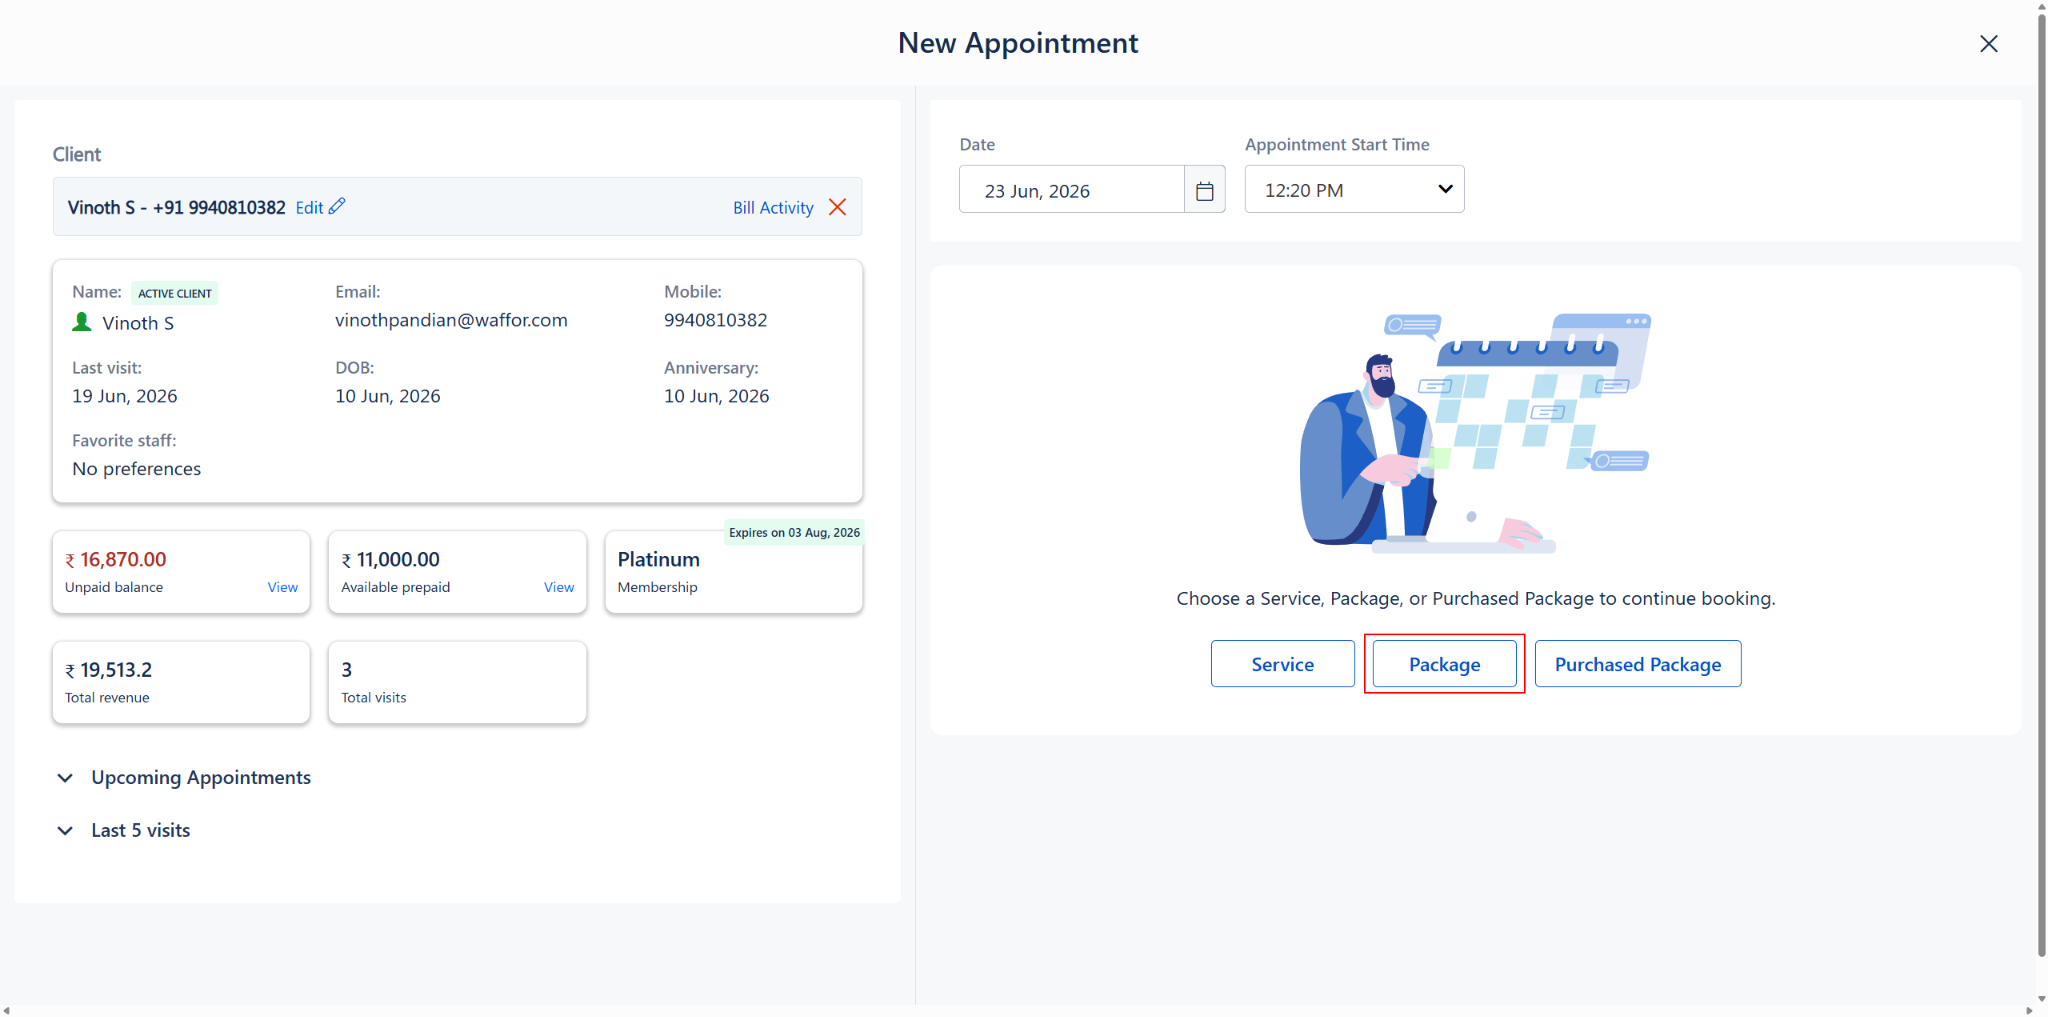
Booking type options showing Service, Package, and Purchased Package buttons
Step 3: Browse and Add the New Package
Once you click “Package”, the left panel switches to the Packages tab.
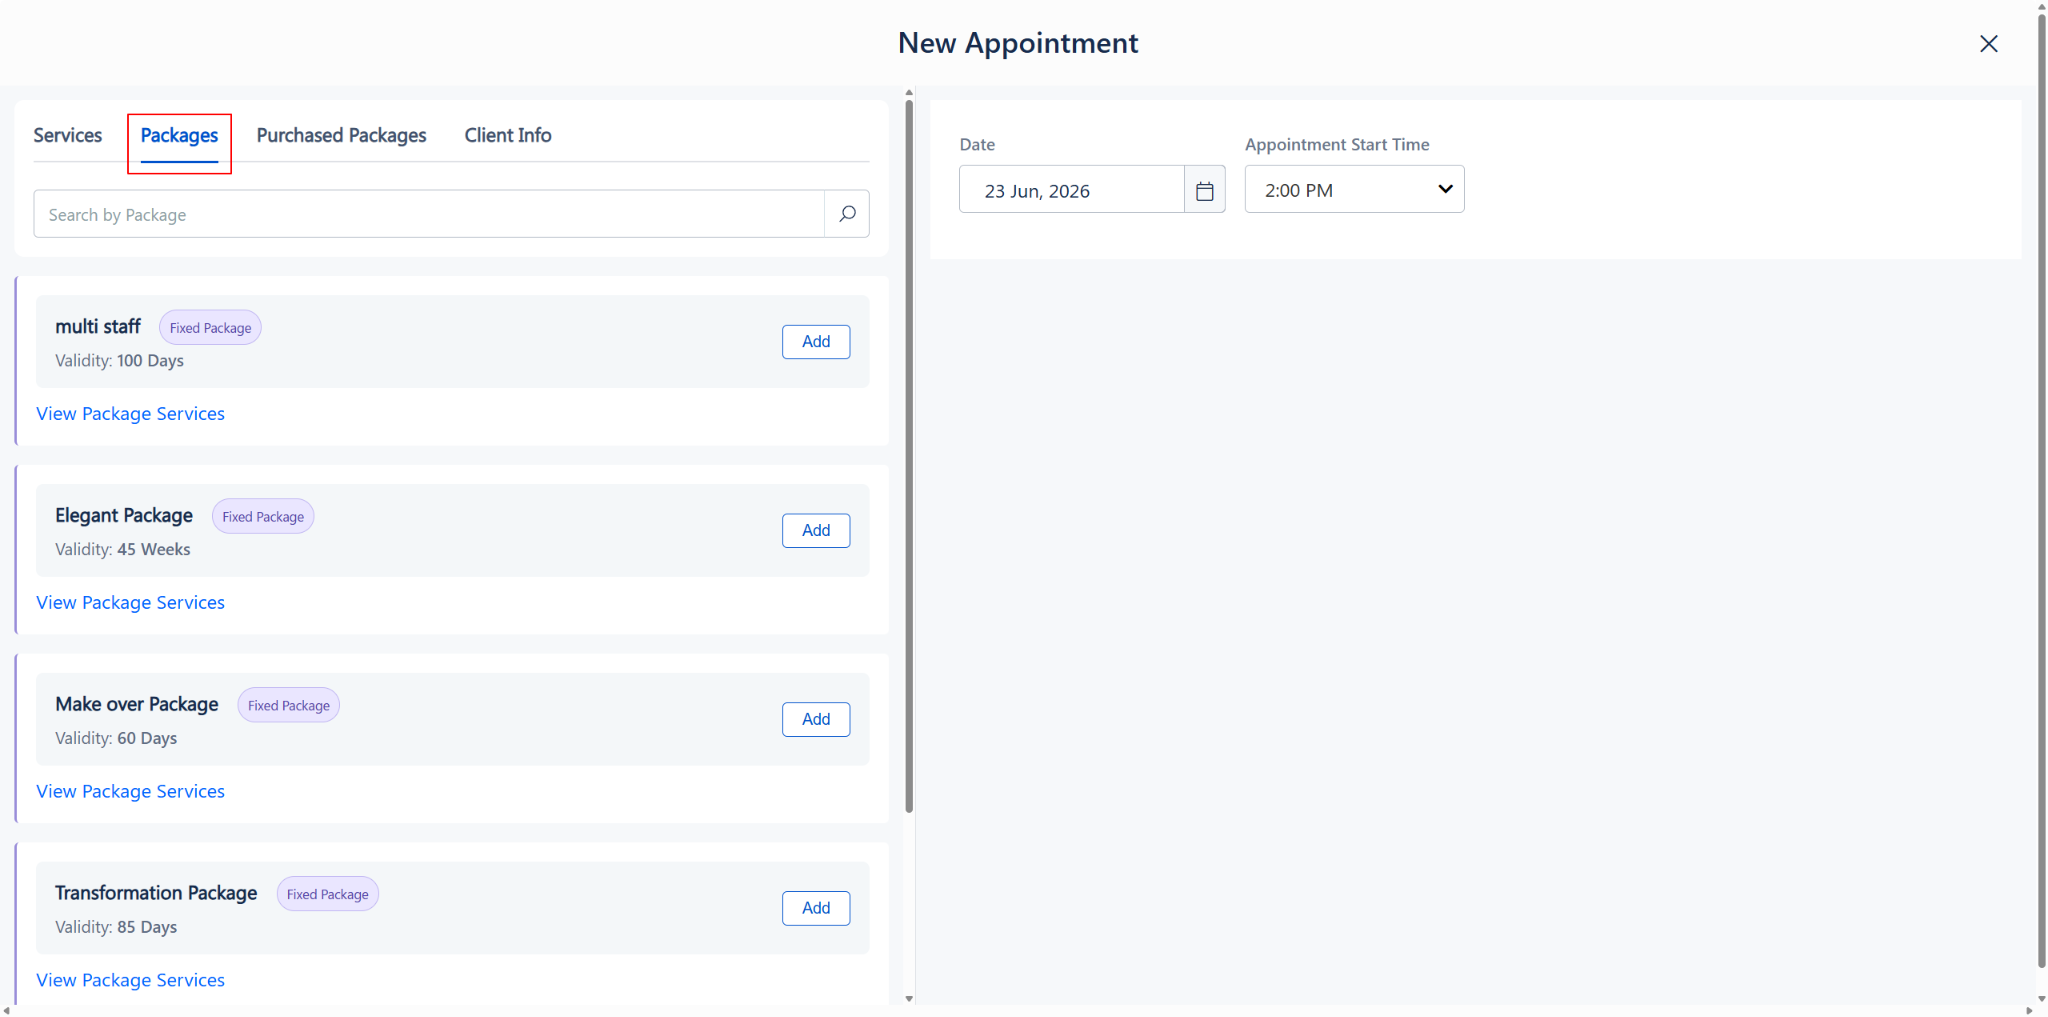
1. Browse the list of available packages (e.g., Elegant Package, Make over Package) or use the search bar.
2. Each package displays its type (Fixed or Custom) and its validity period.
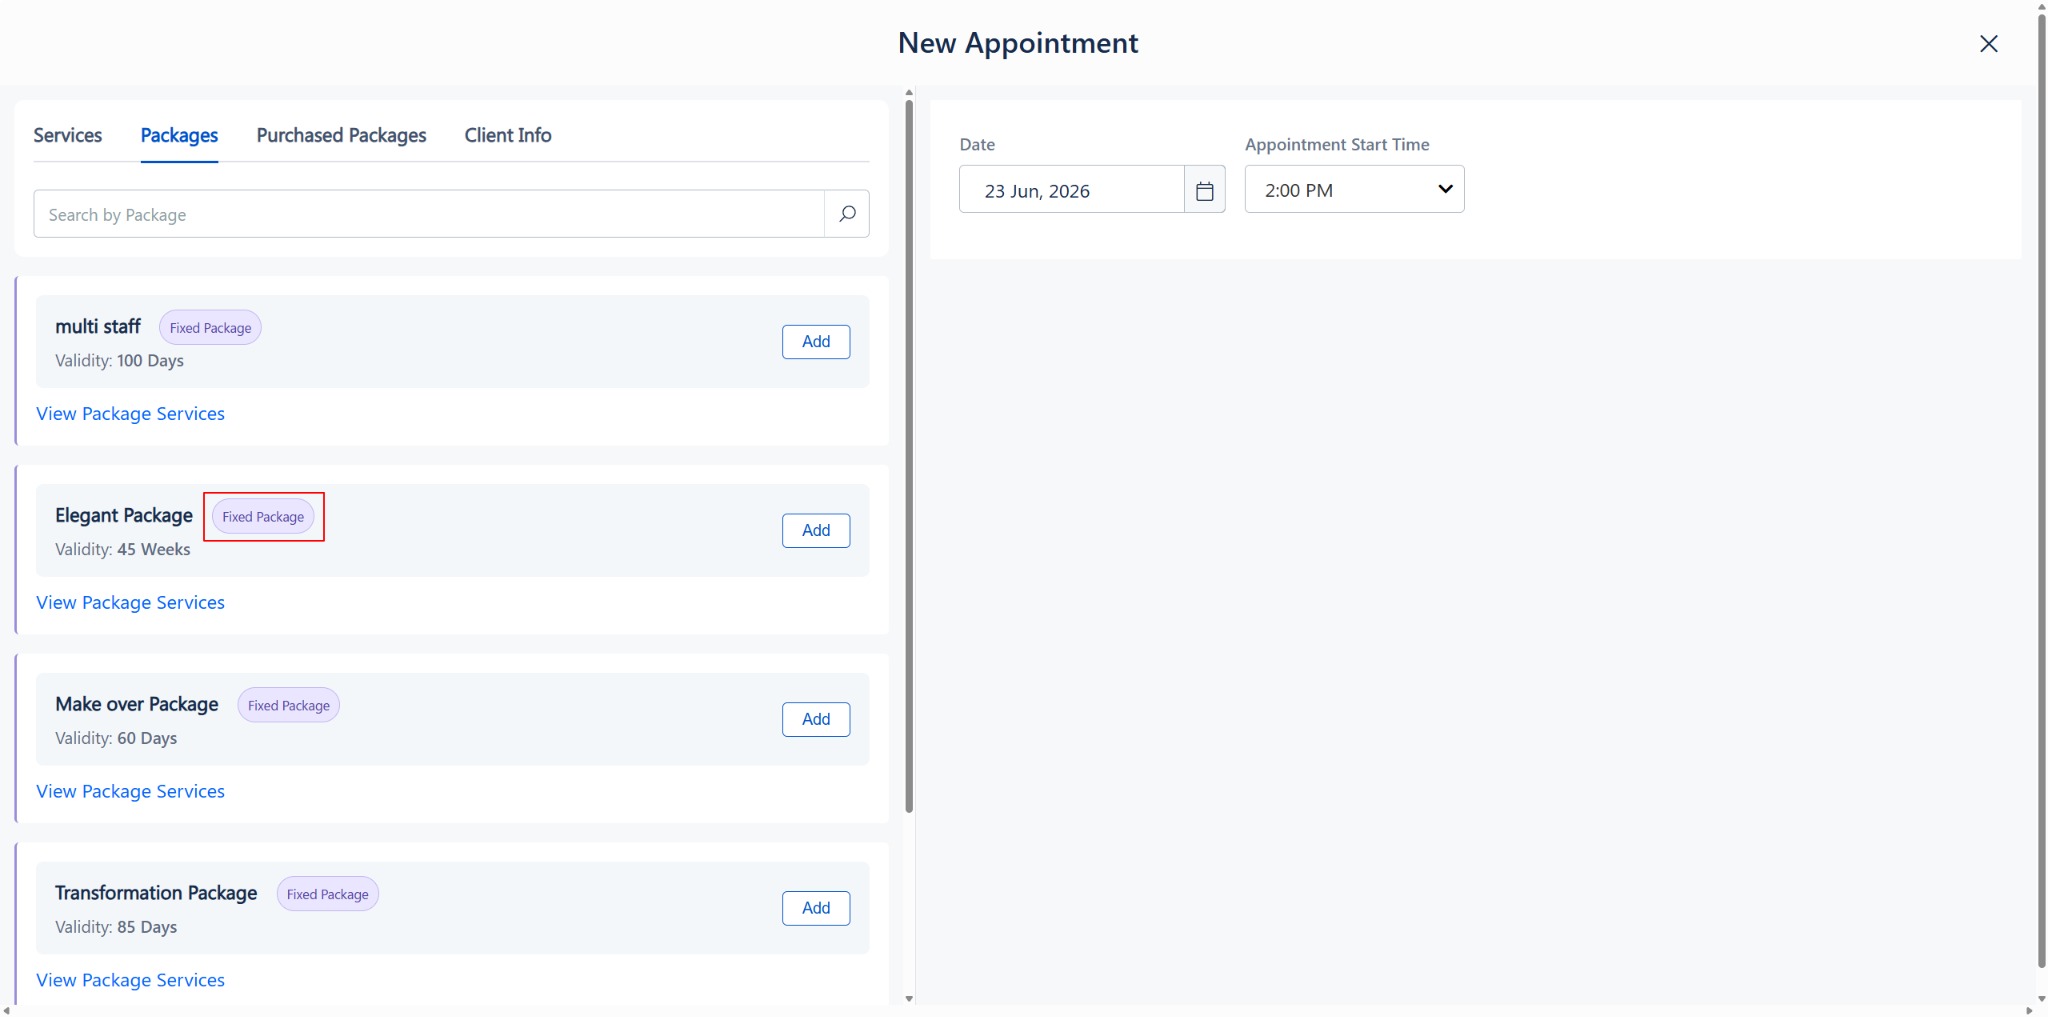
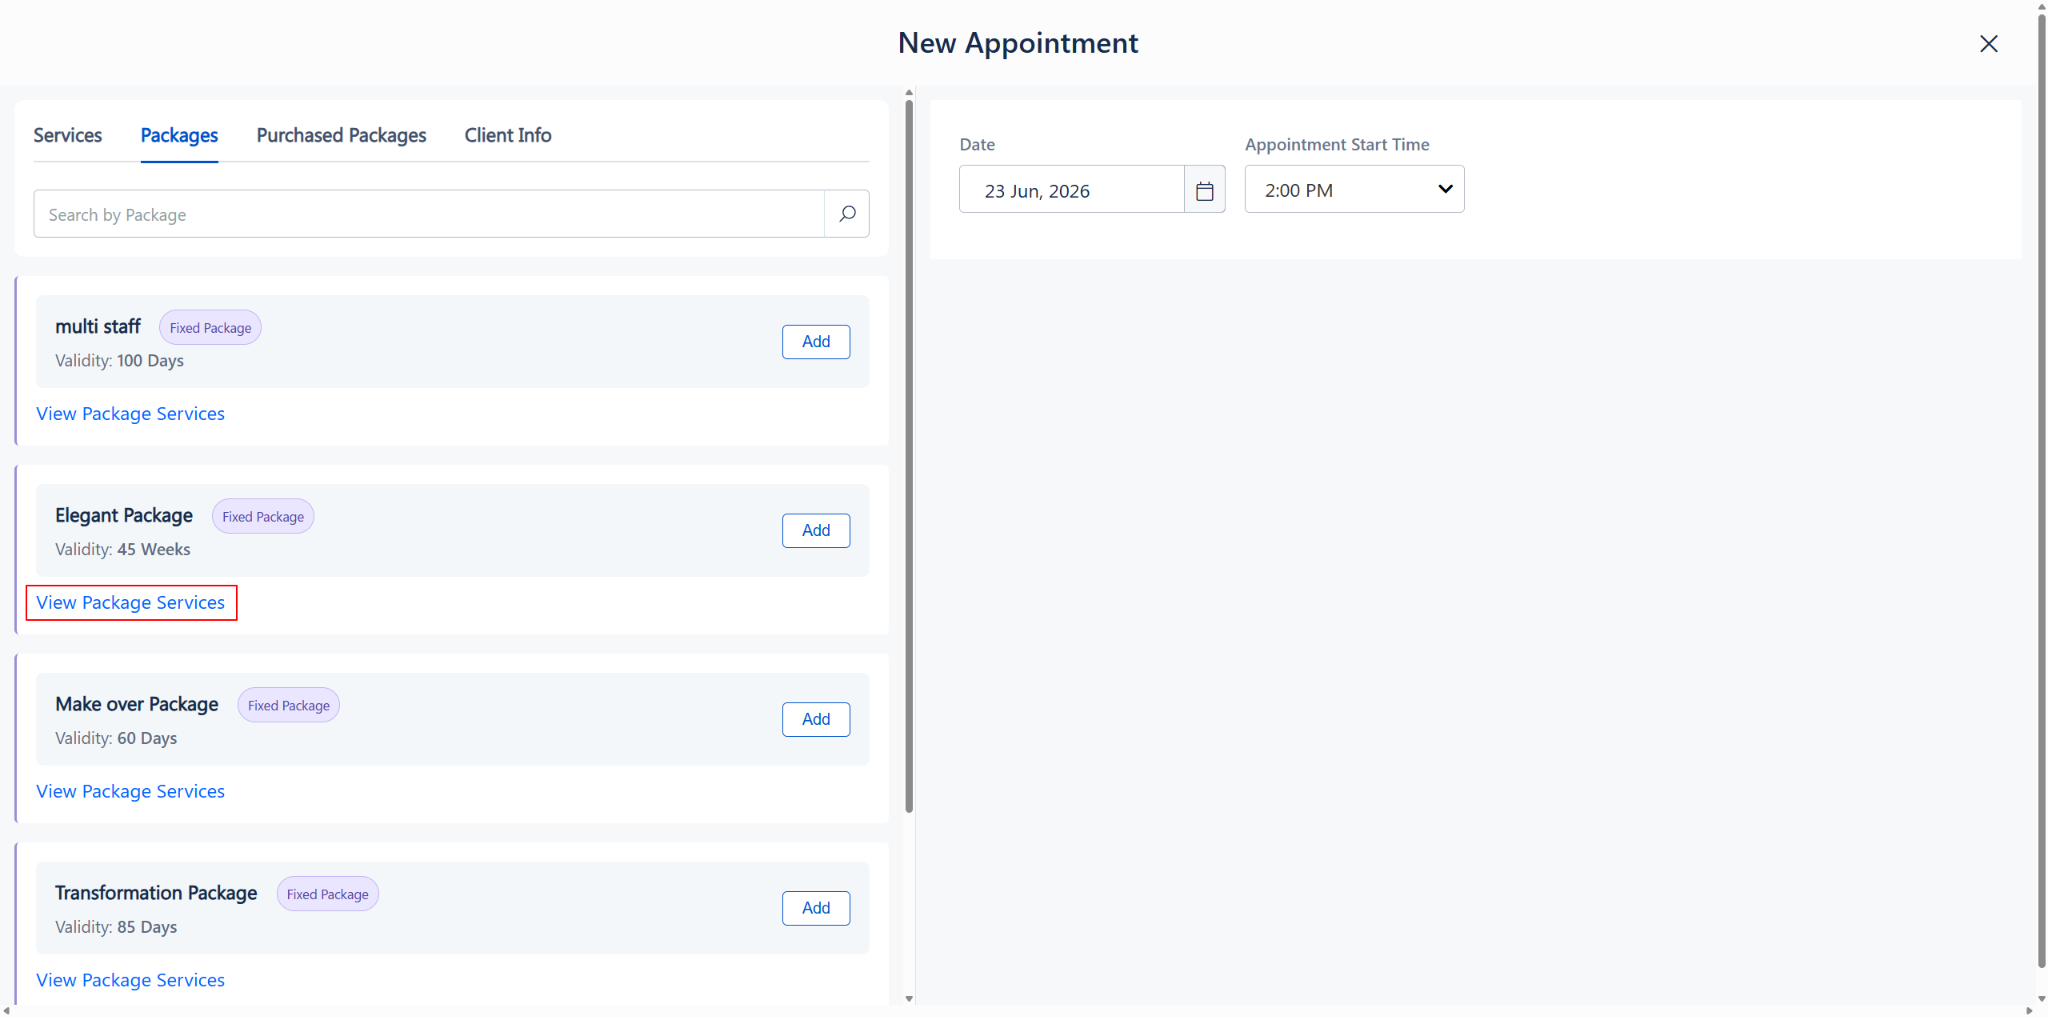
3. View Package Services: Below each package name, click the blue “View Package Services” link to preview the services included in that package.
The services expand inline directly beneath the package card, showing each service name, its duration (e.g., 60 mins), and the maximum count. Click “Hide Package Services” to collapse the list.
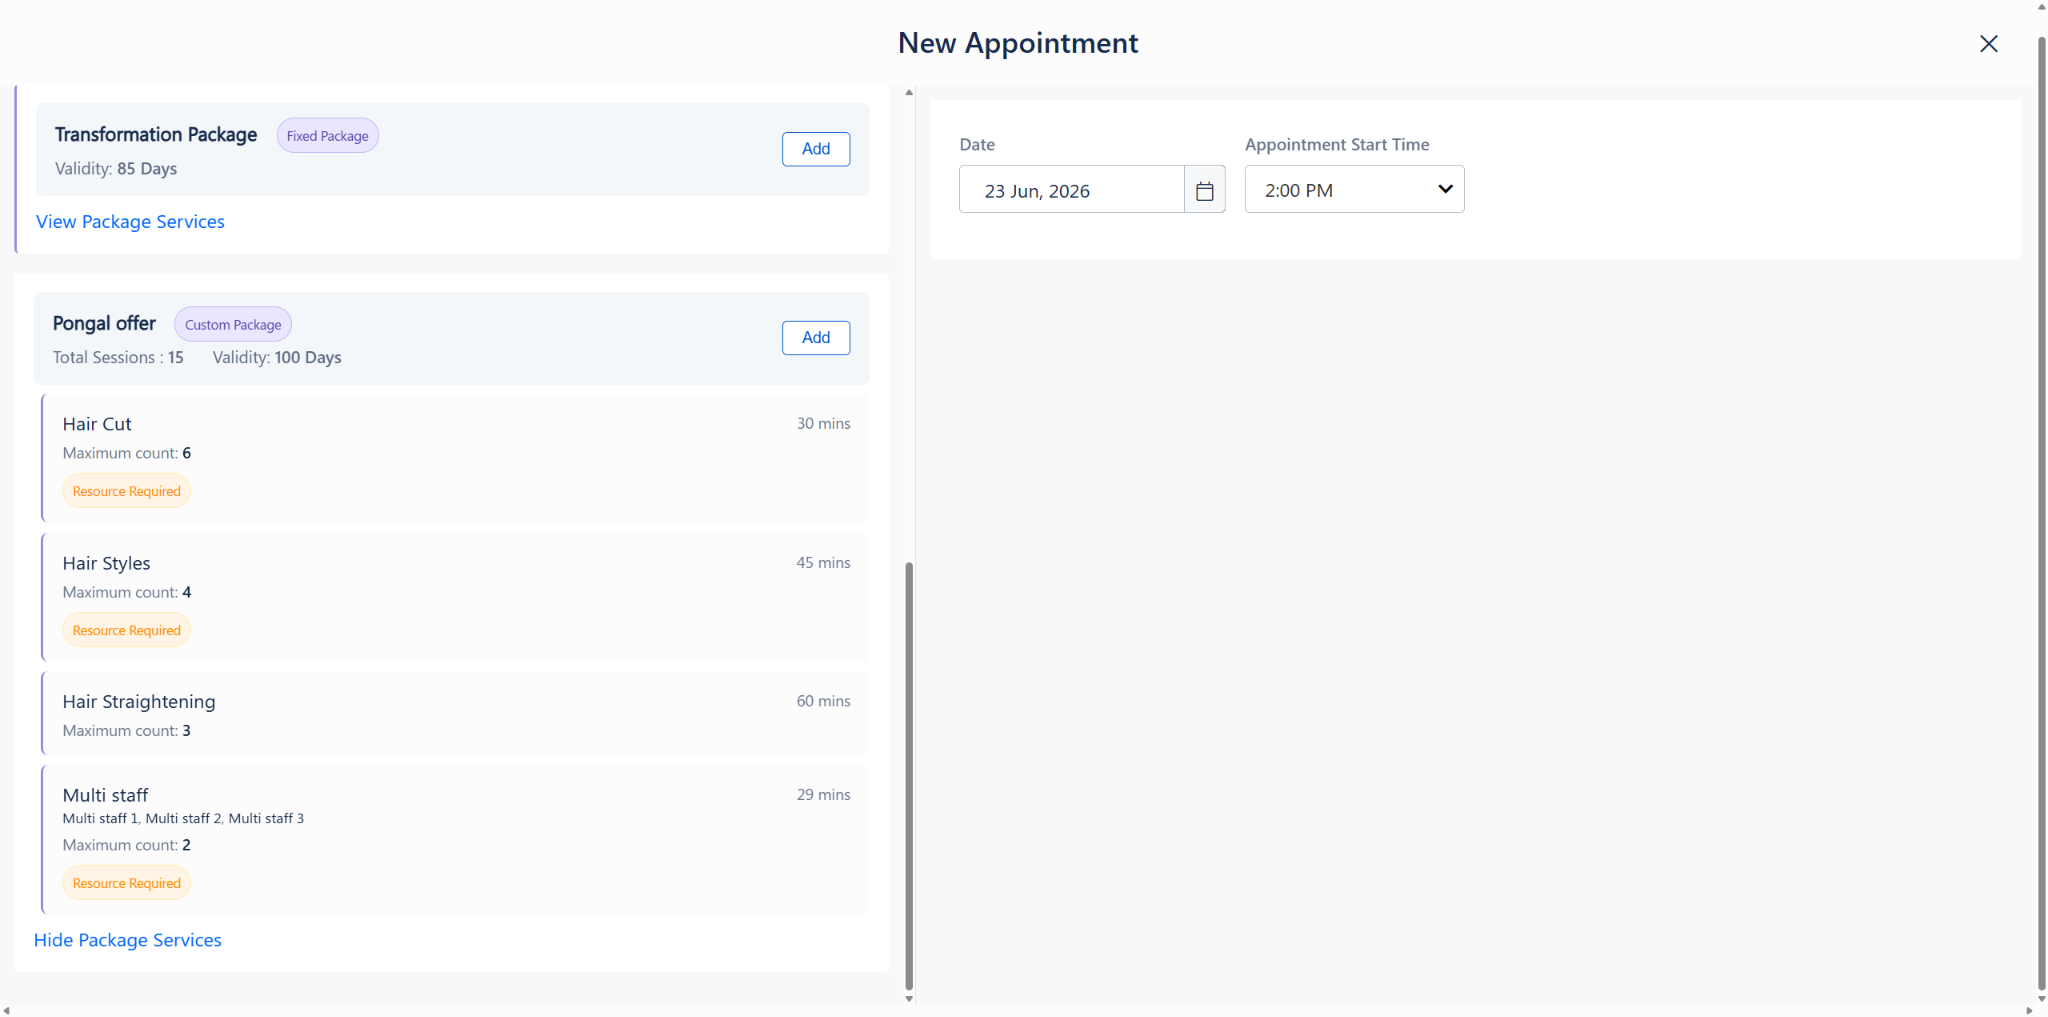
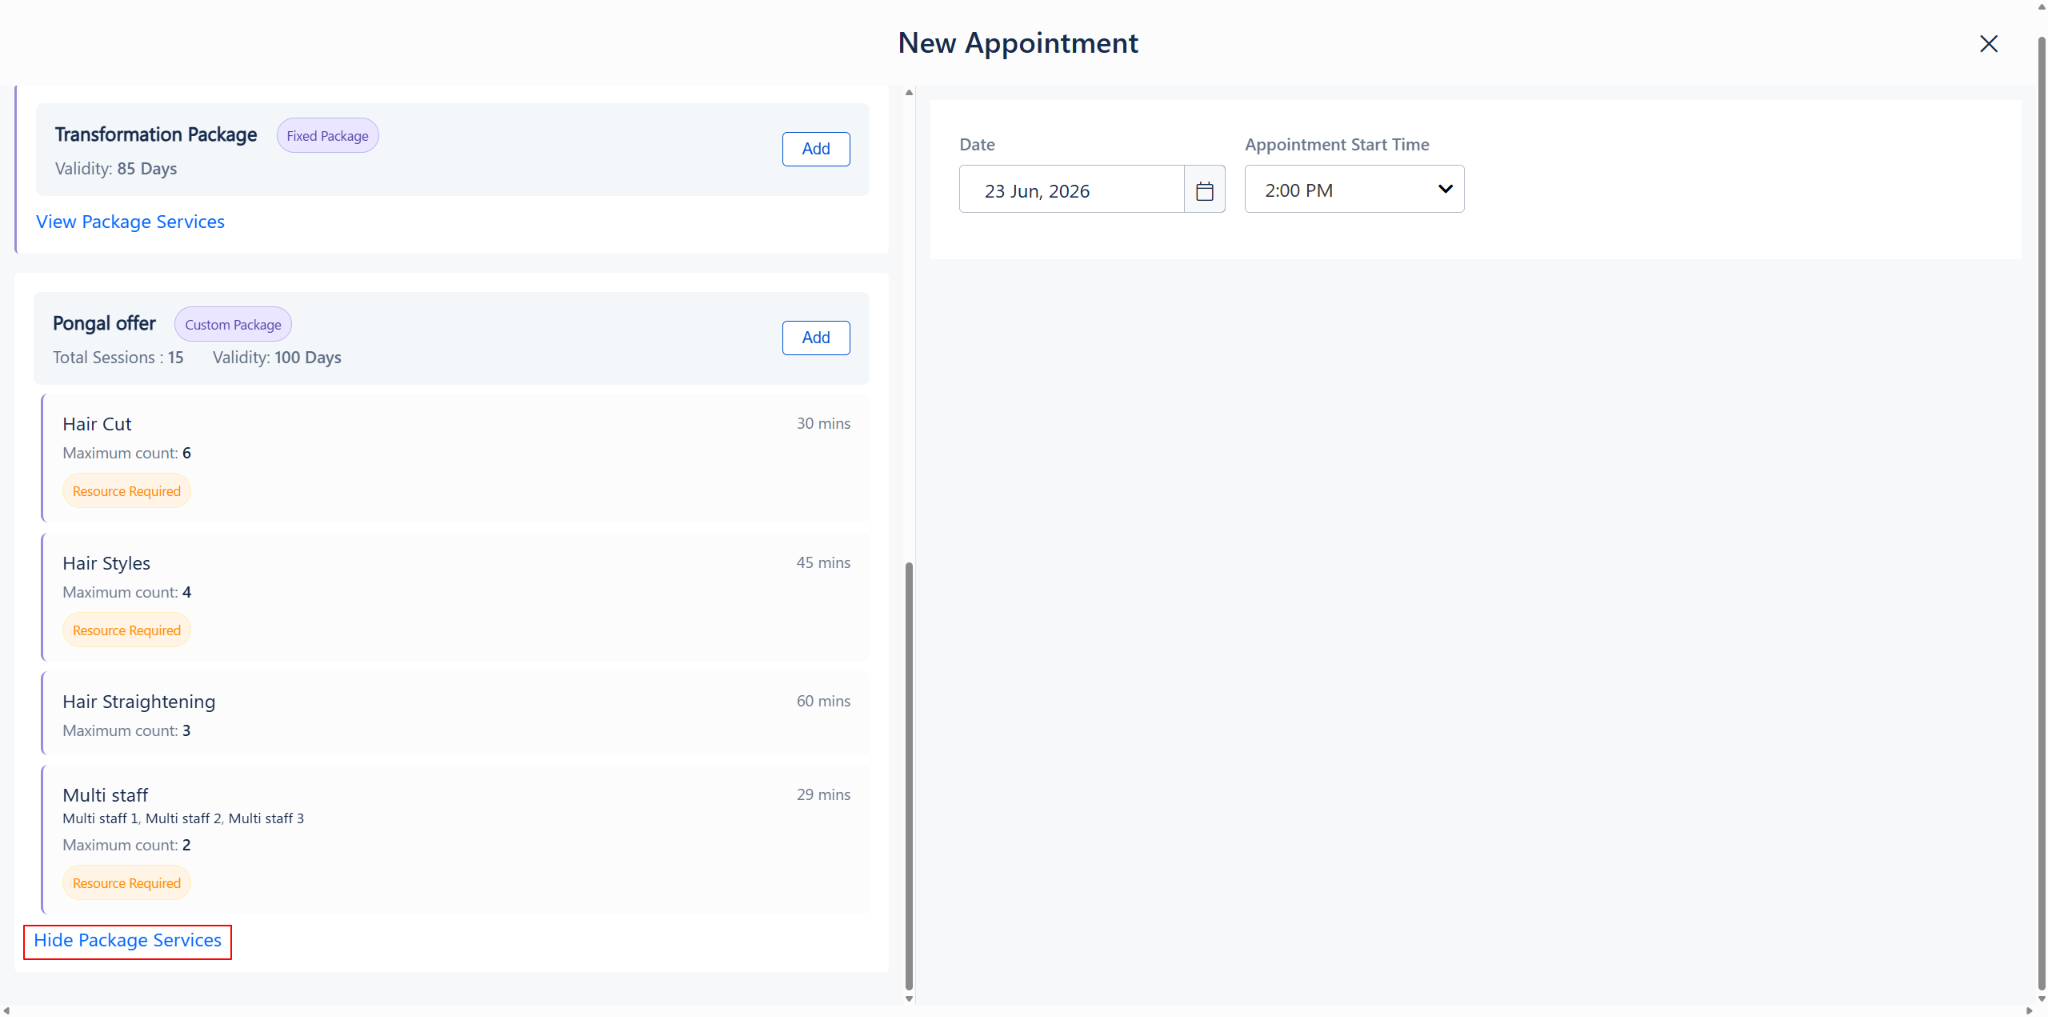
View Package Services expanded inline showing included services under the Transformation Package
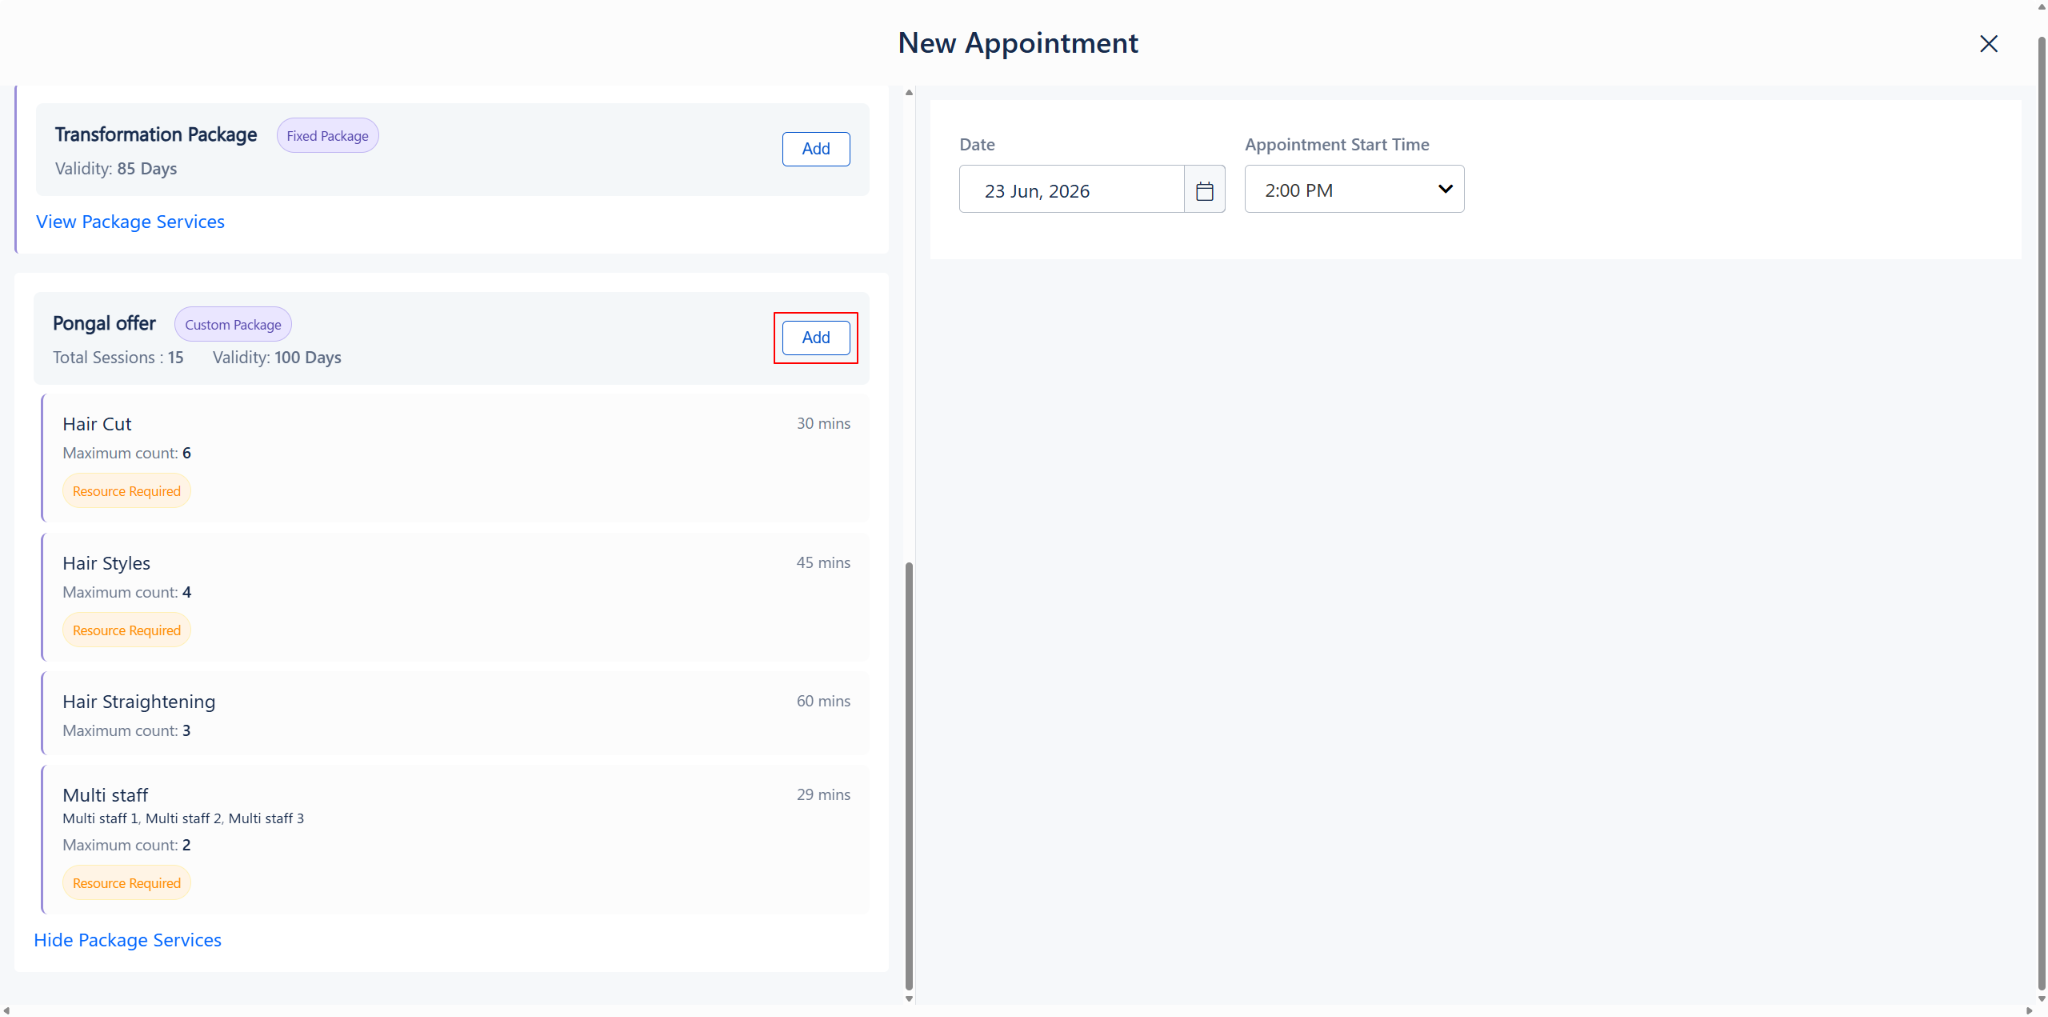
4. Select Package Services (Custom Packages):
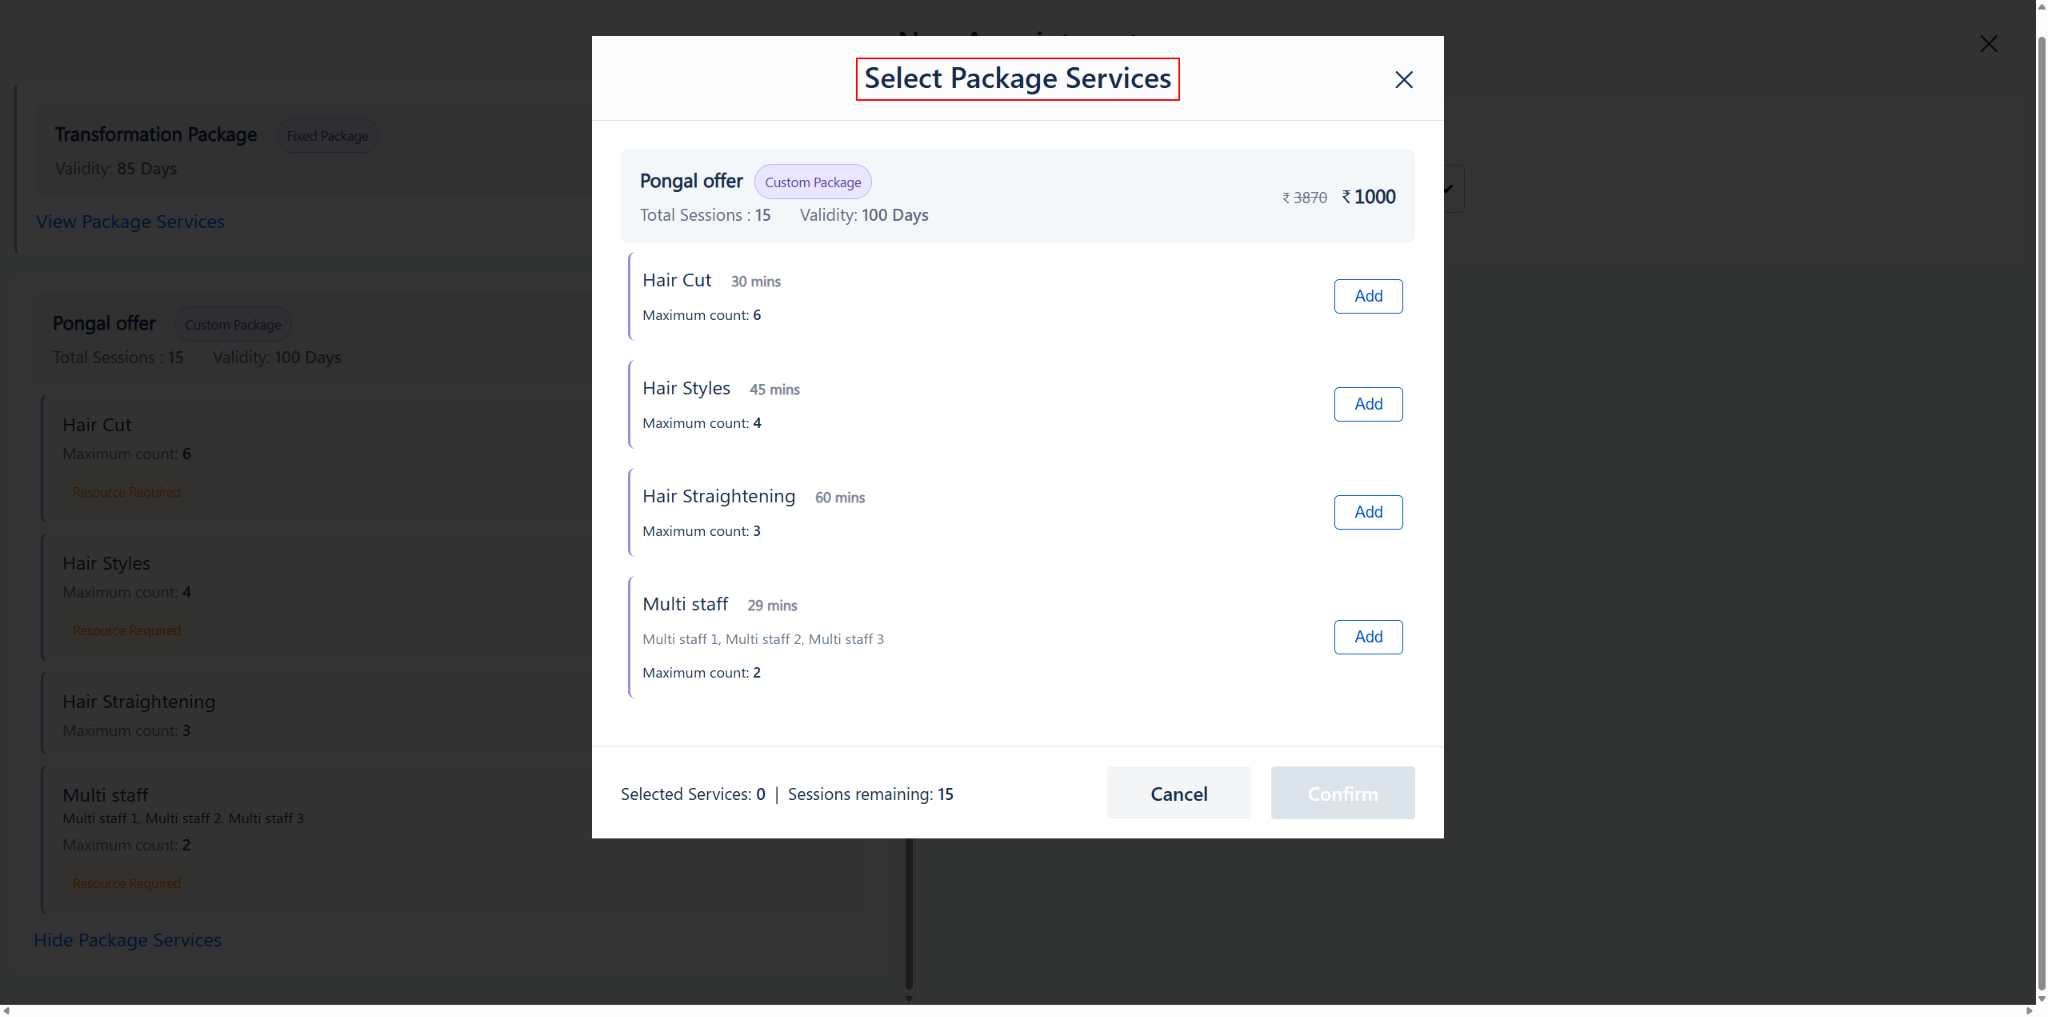
- For Custom Packages, when you click "Add", a "Select Package Services" popup will open.
- This popup shows the package name, price, validity, and all the services included in it — along with each service's duration and how many times it can be used.
- From this list, click "Add" next to the service you want to book for today's appointment.
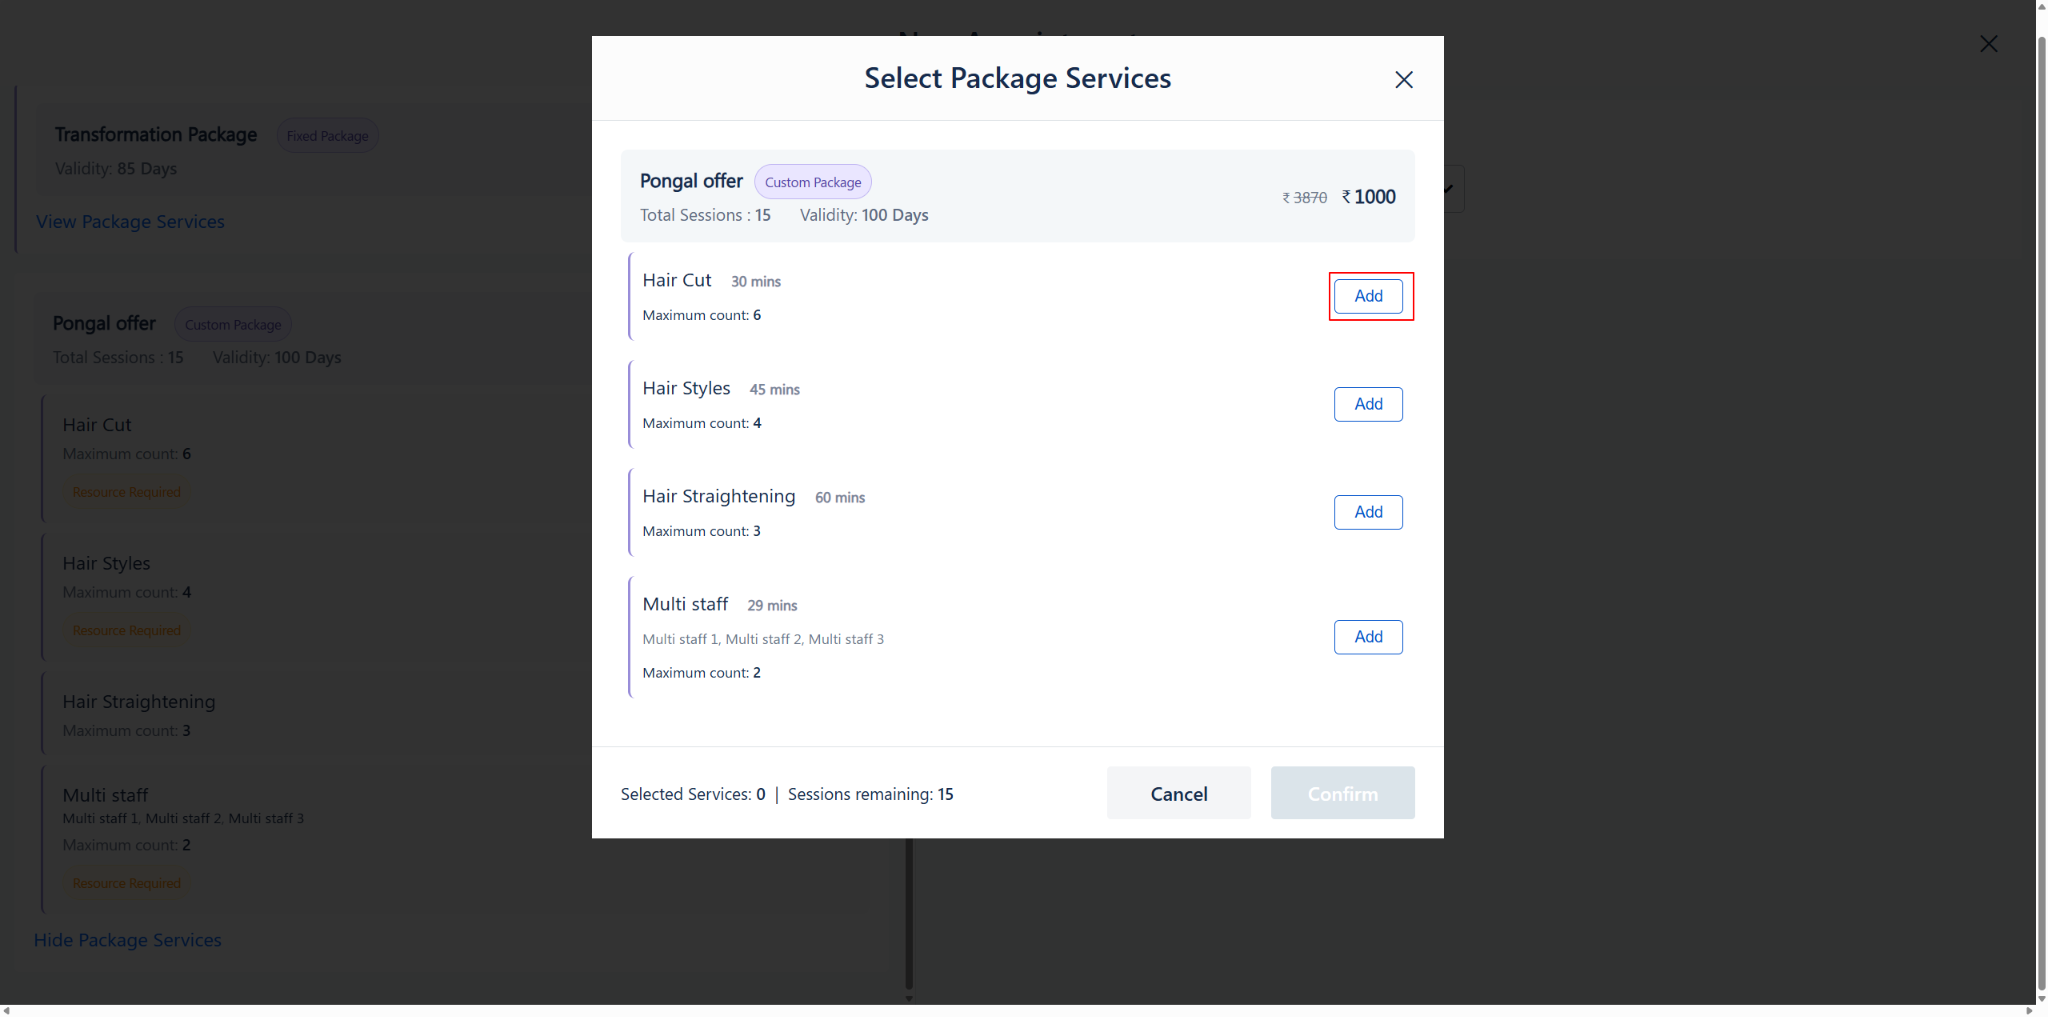
-You can only book one session per visit — so even if the package has 10 sessions in total, you pick just 1 service to schedule right now. The remaining sessions can be booked in future appointments after converting into the bill.
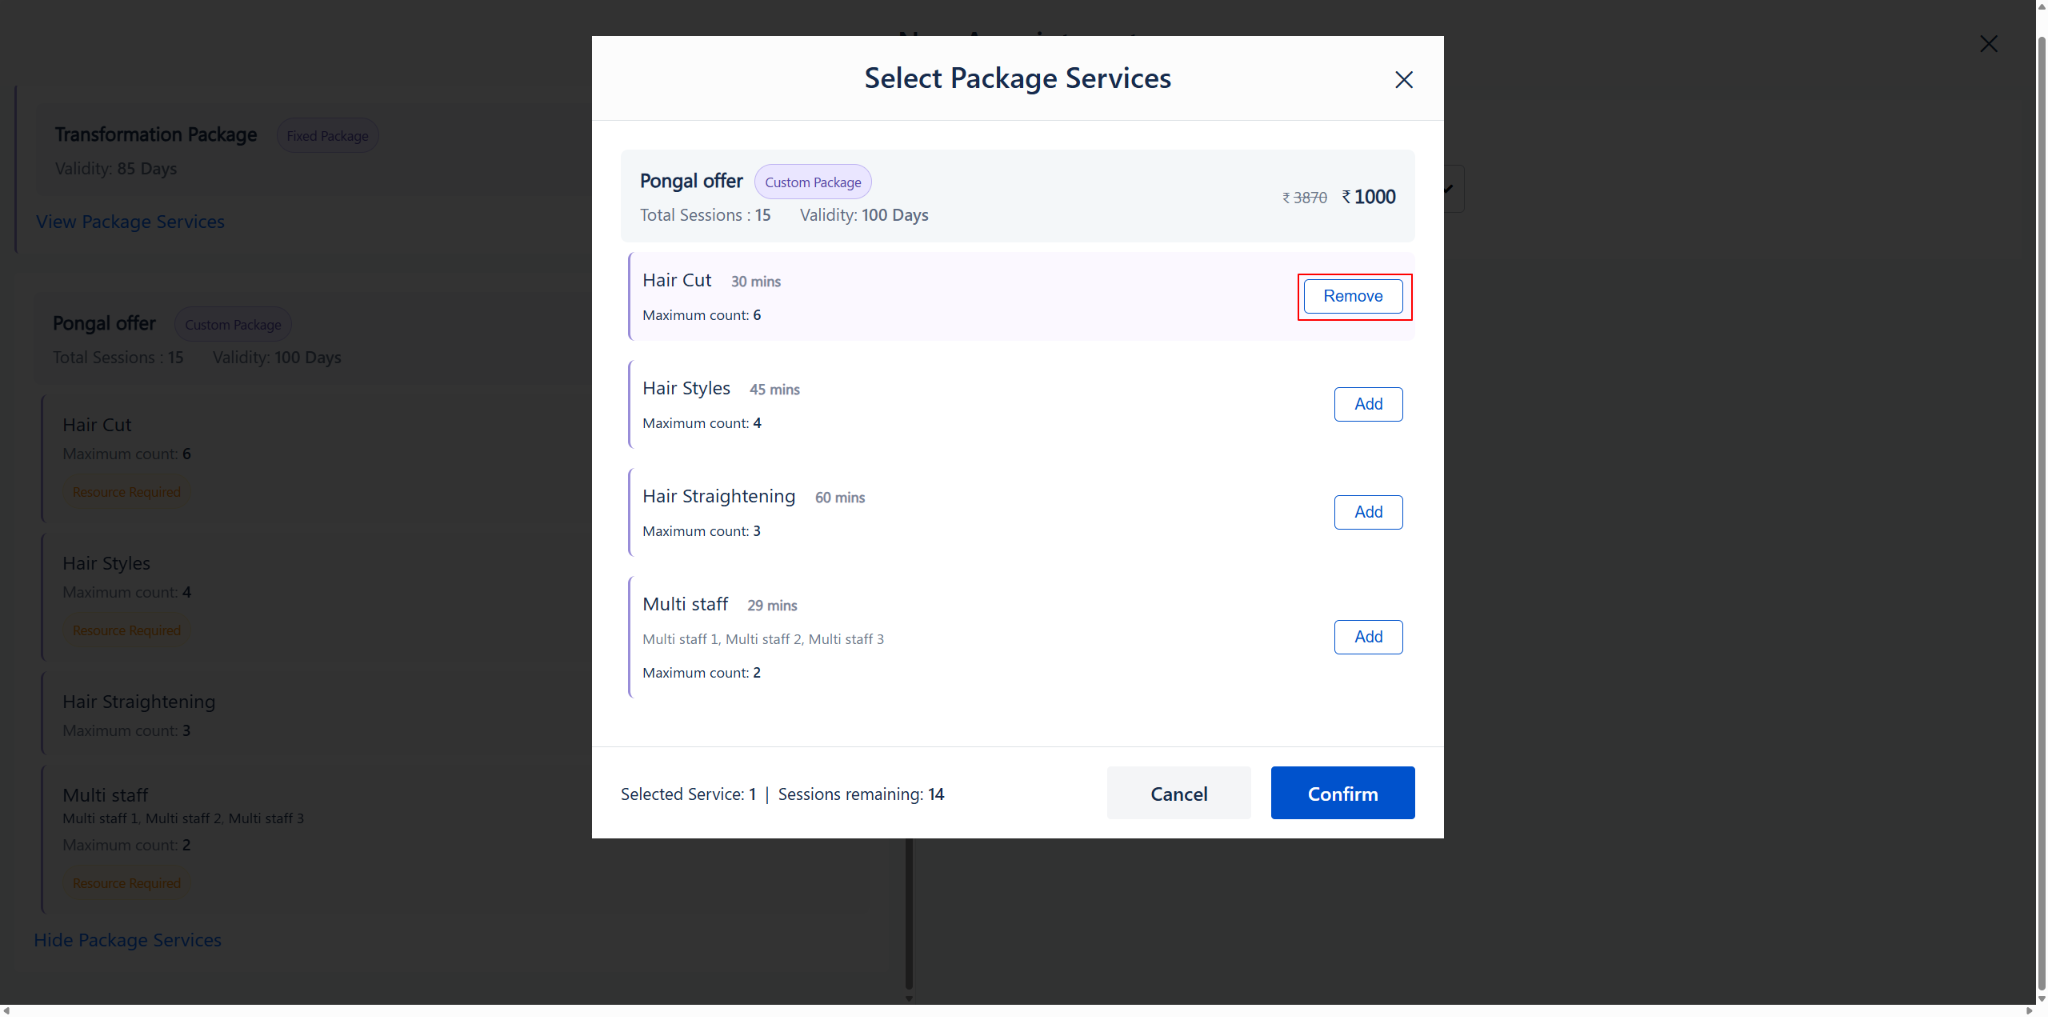
- At the bottom of the popup, you'll see a quick summary showing how many services you've selected and how many sessions are still left. Once you're happy with your selection, click "Confirm" to continue.
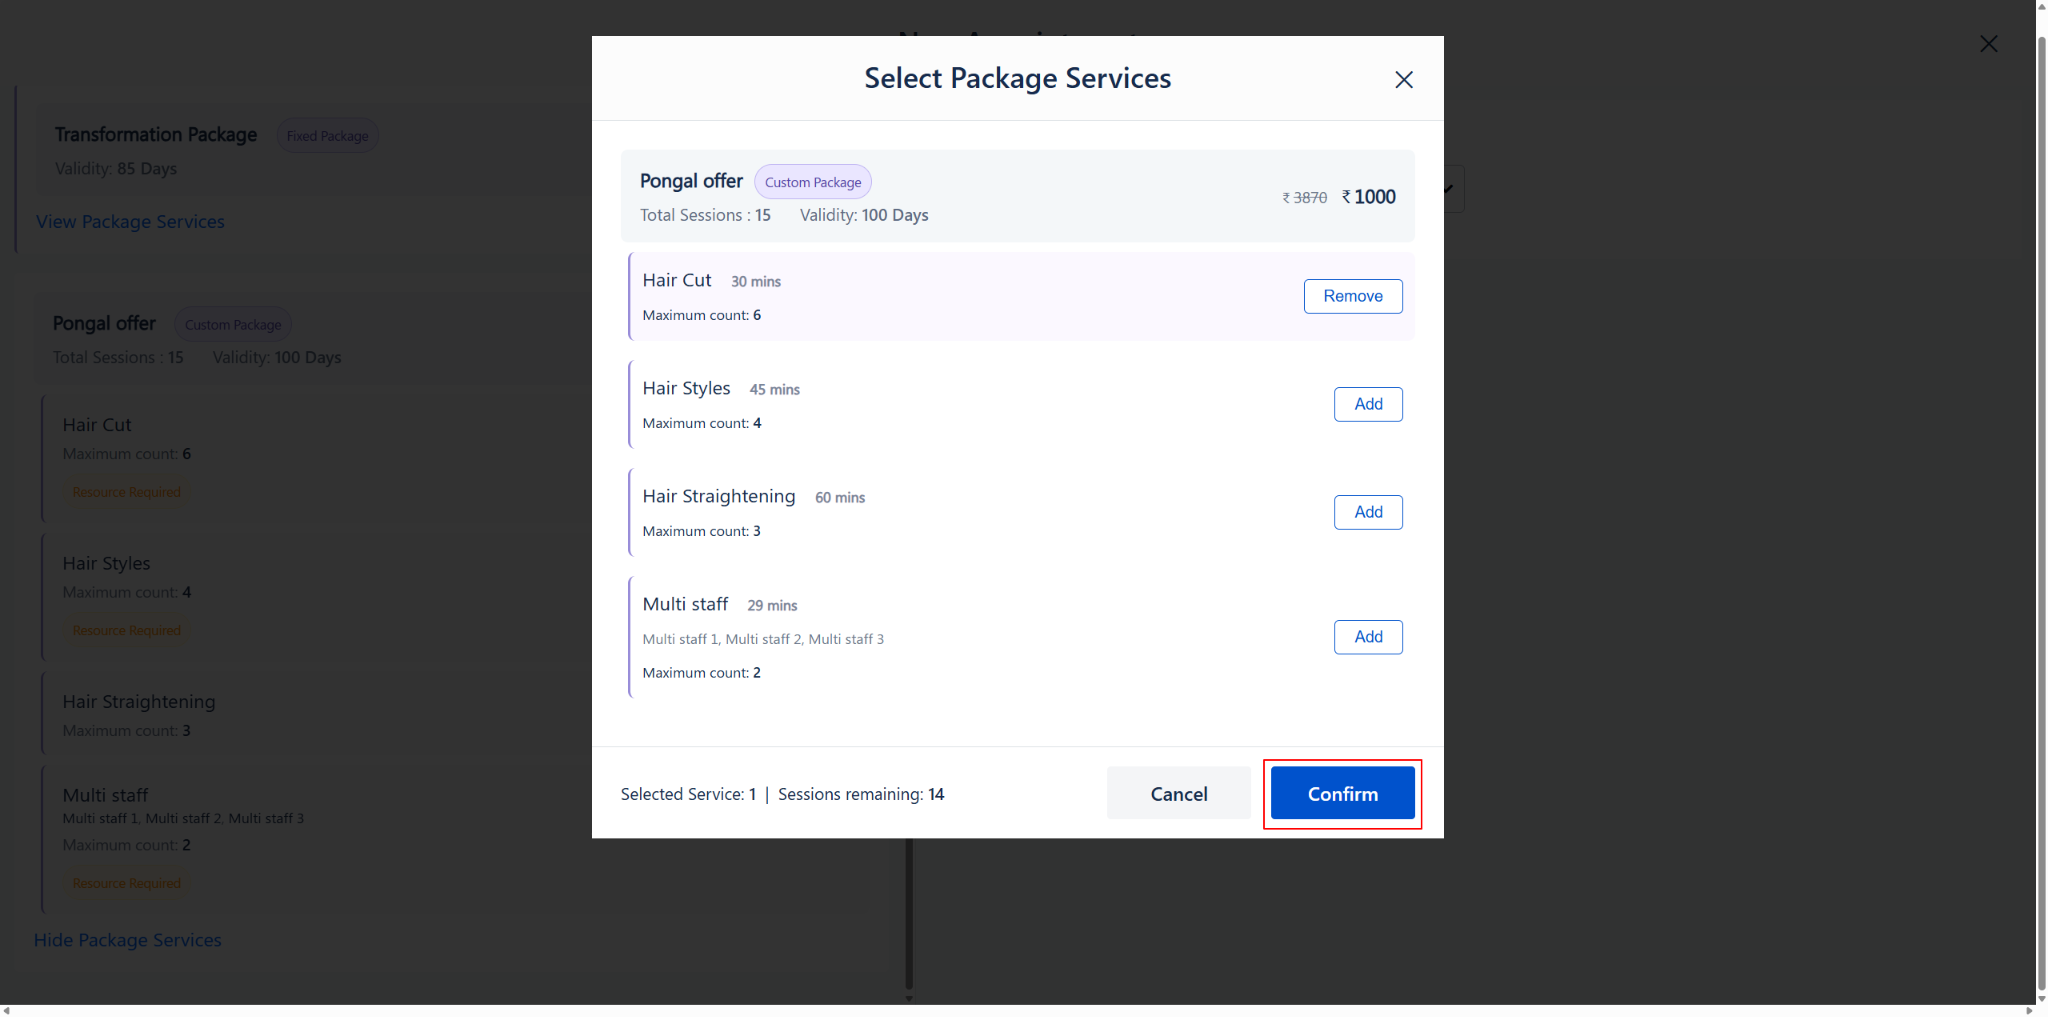
Select Package Services popup showing included services and Add buttons
5. Alternatively, for Fixed Packages, click the “Add” button directly on the package card from the main list.
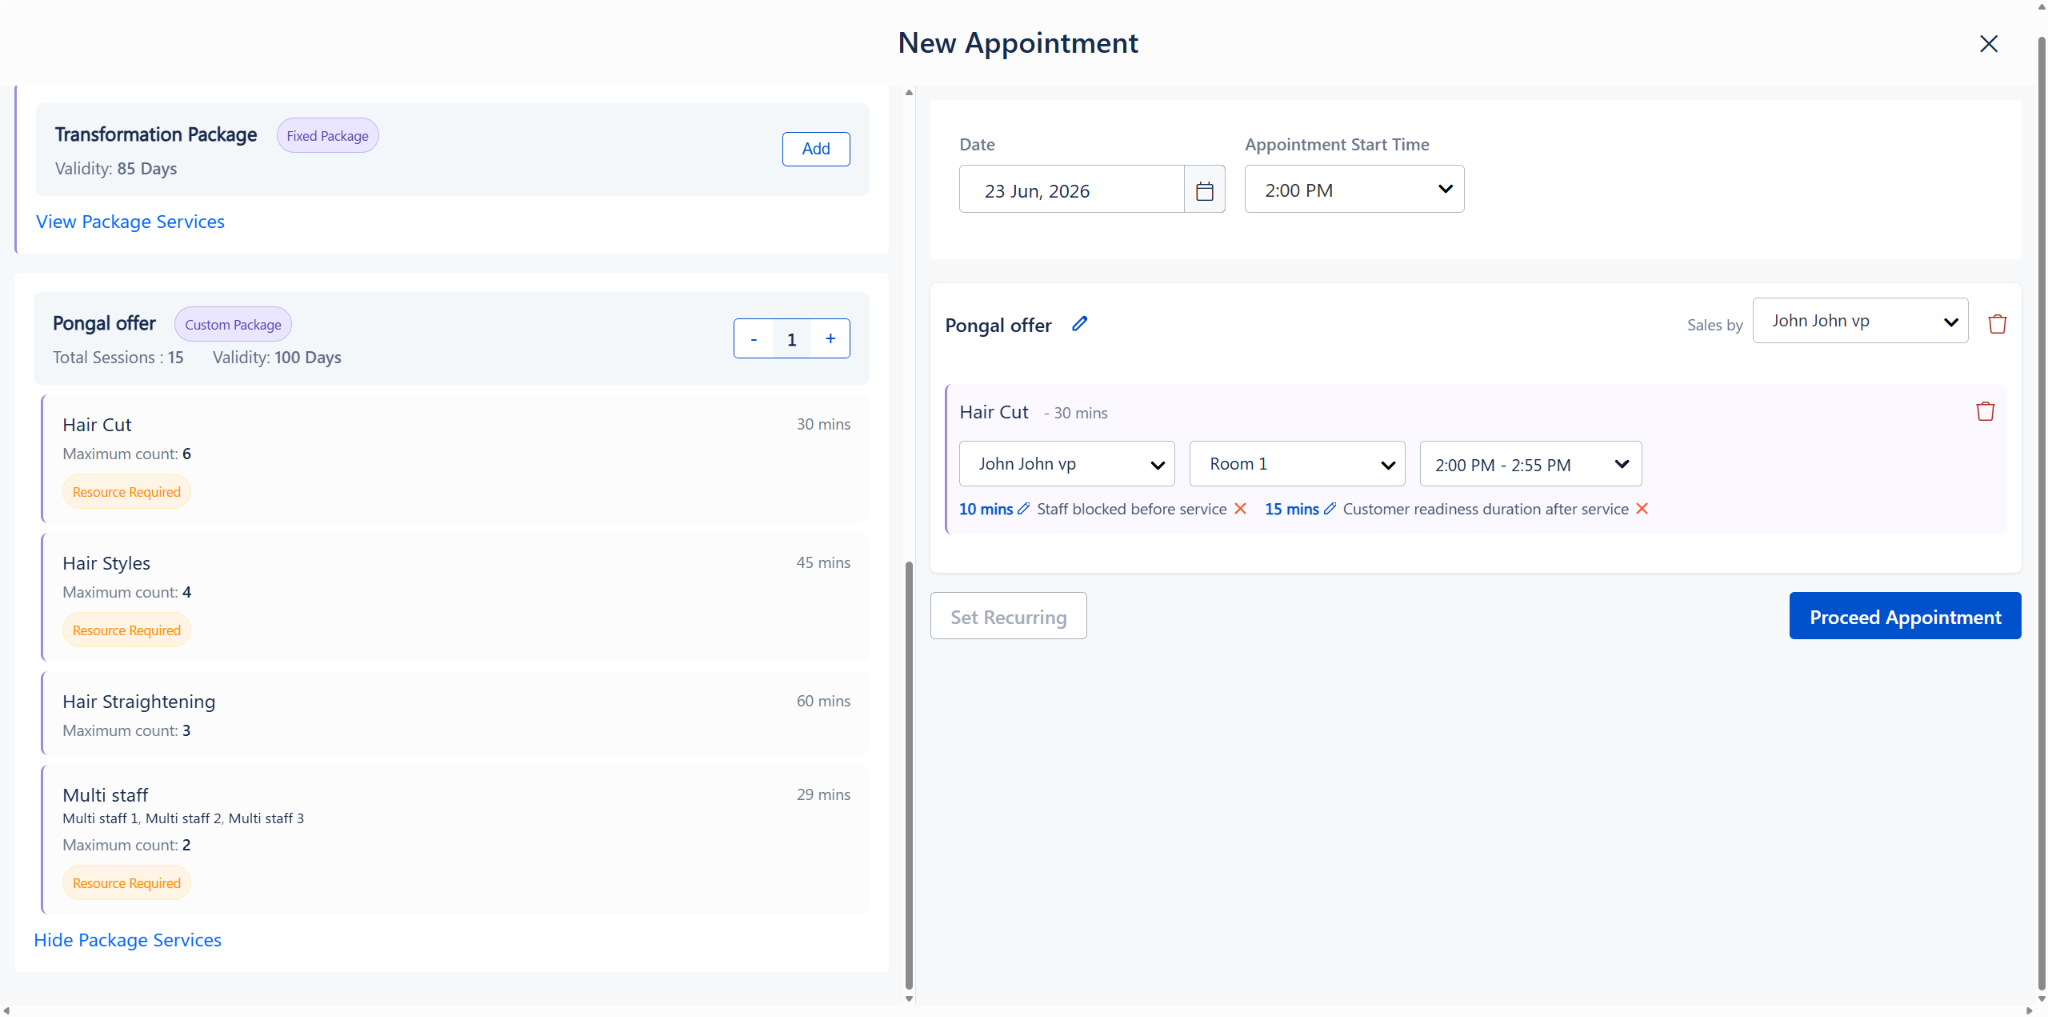
Packages tab showing available packages with Add buttons
Step 4: Assign Sales Staff and Schedule the First Service
After adding the package, it will appear on the right panel. You must configure the sales details and the initial service the client is taking today.
1. Assign Sales Staff: At the top right of the package block, use the “Sales by” dropdown to select the staff member who sold this package. This ensures they receive the appropriate commission or sales credit.
2. Schedule the Service: Below the package details, you will see the services included in the package (e.g., Hair Cut).
o Select the Staff member performing the service.
o Select the Resource (if required).
o Verify the Time Slot and configure any buffer times (Staff blocked before service / Customer readiness duration).
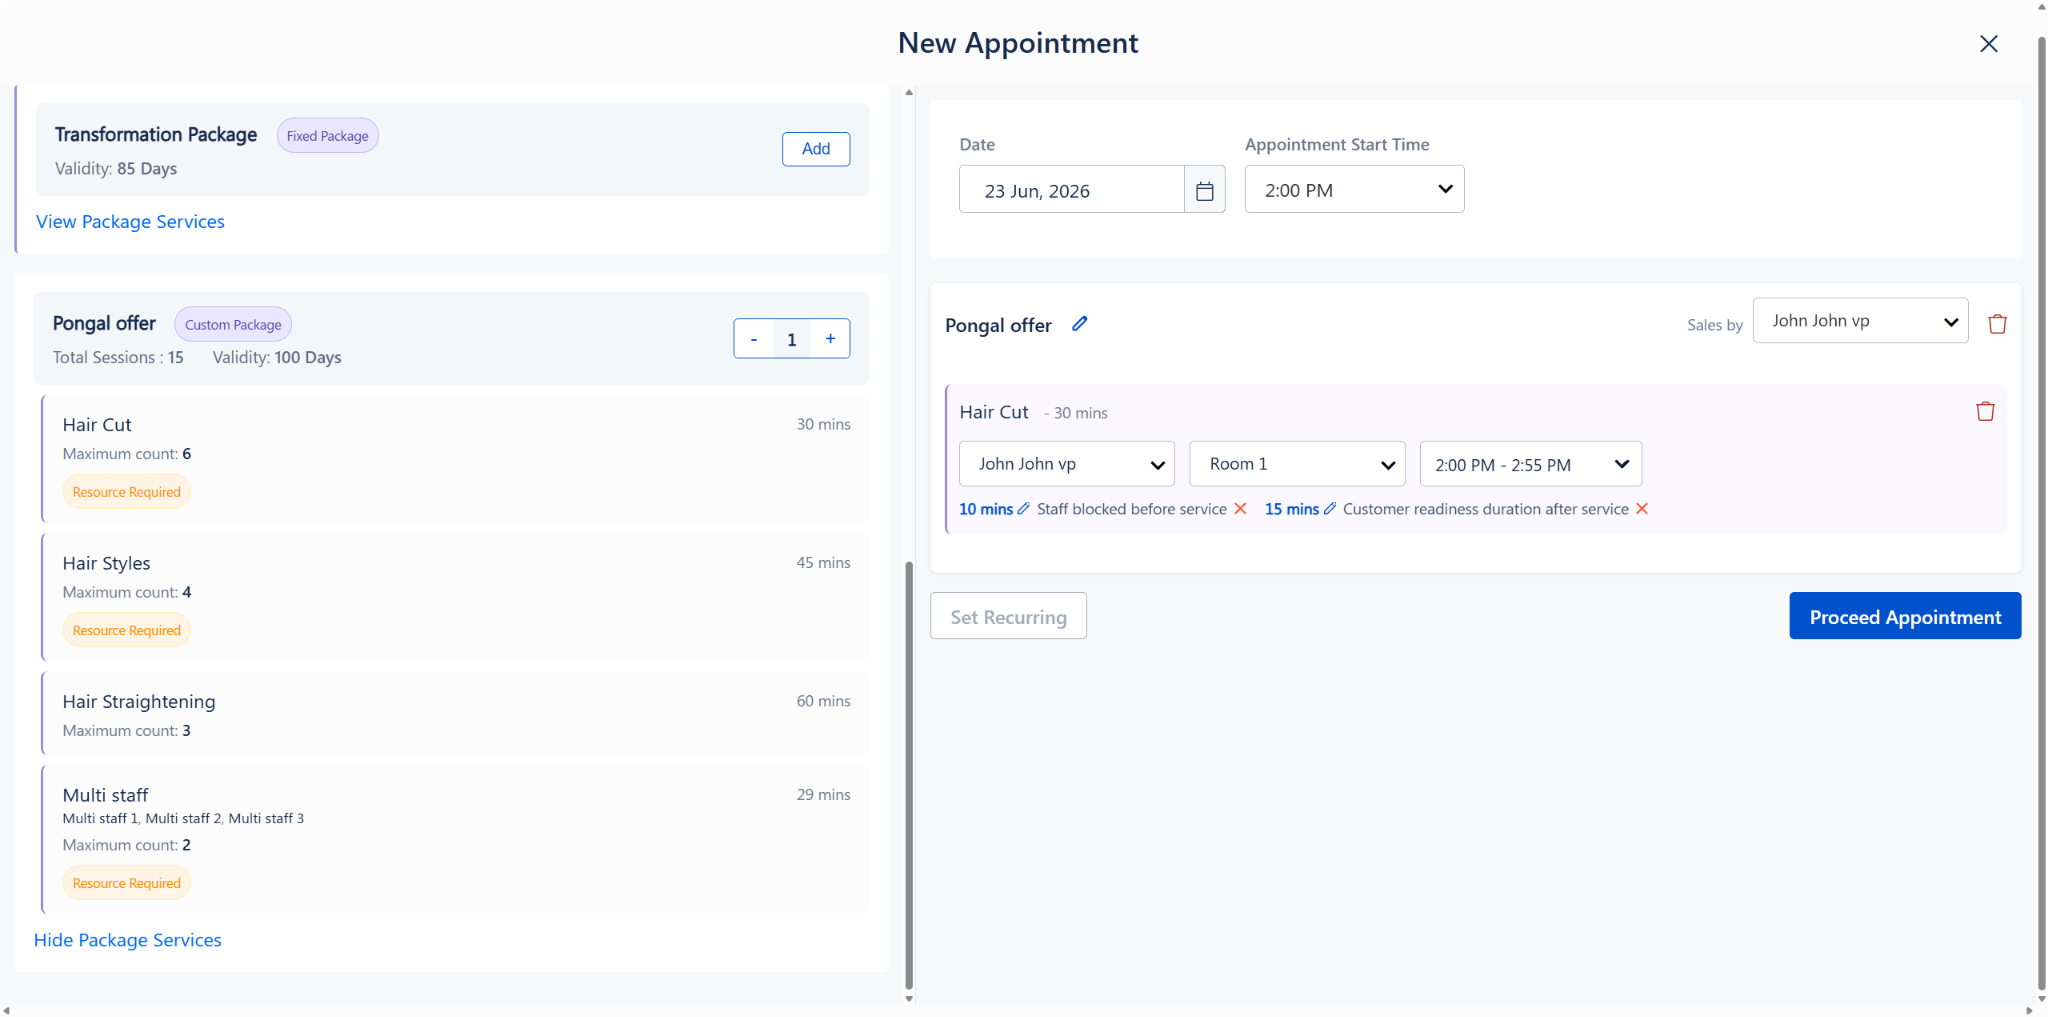
Package added to the right panel showing Sales by dropdown and service scheduling fields
Step 5: Check Availability and Proceed
1. Click “Check All Availability” to ensure the selected staff and resources are free for this session.
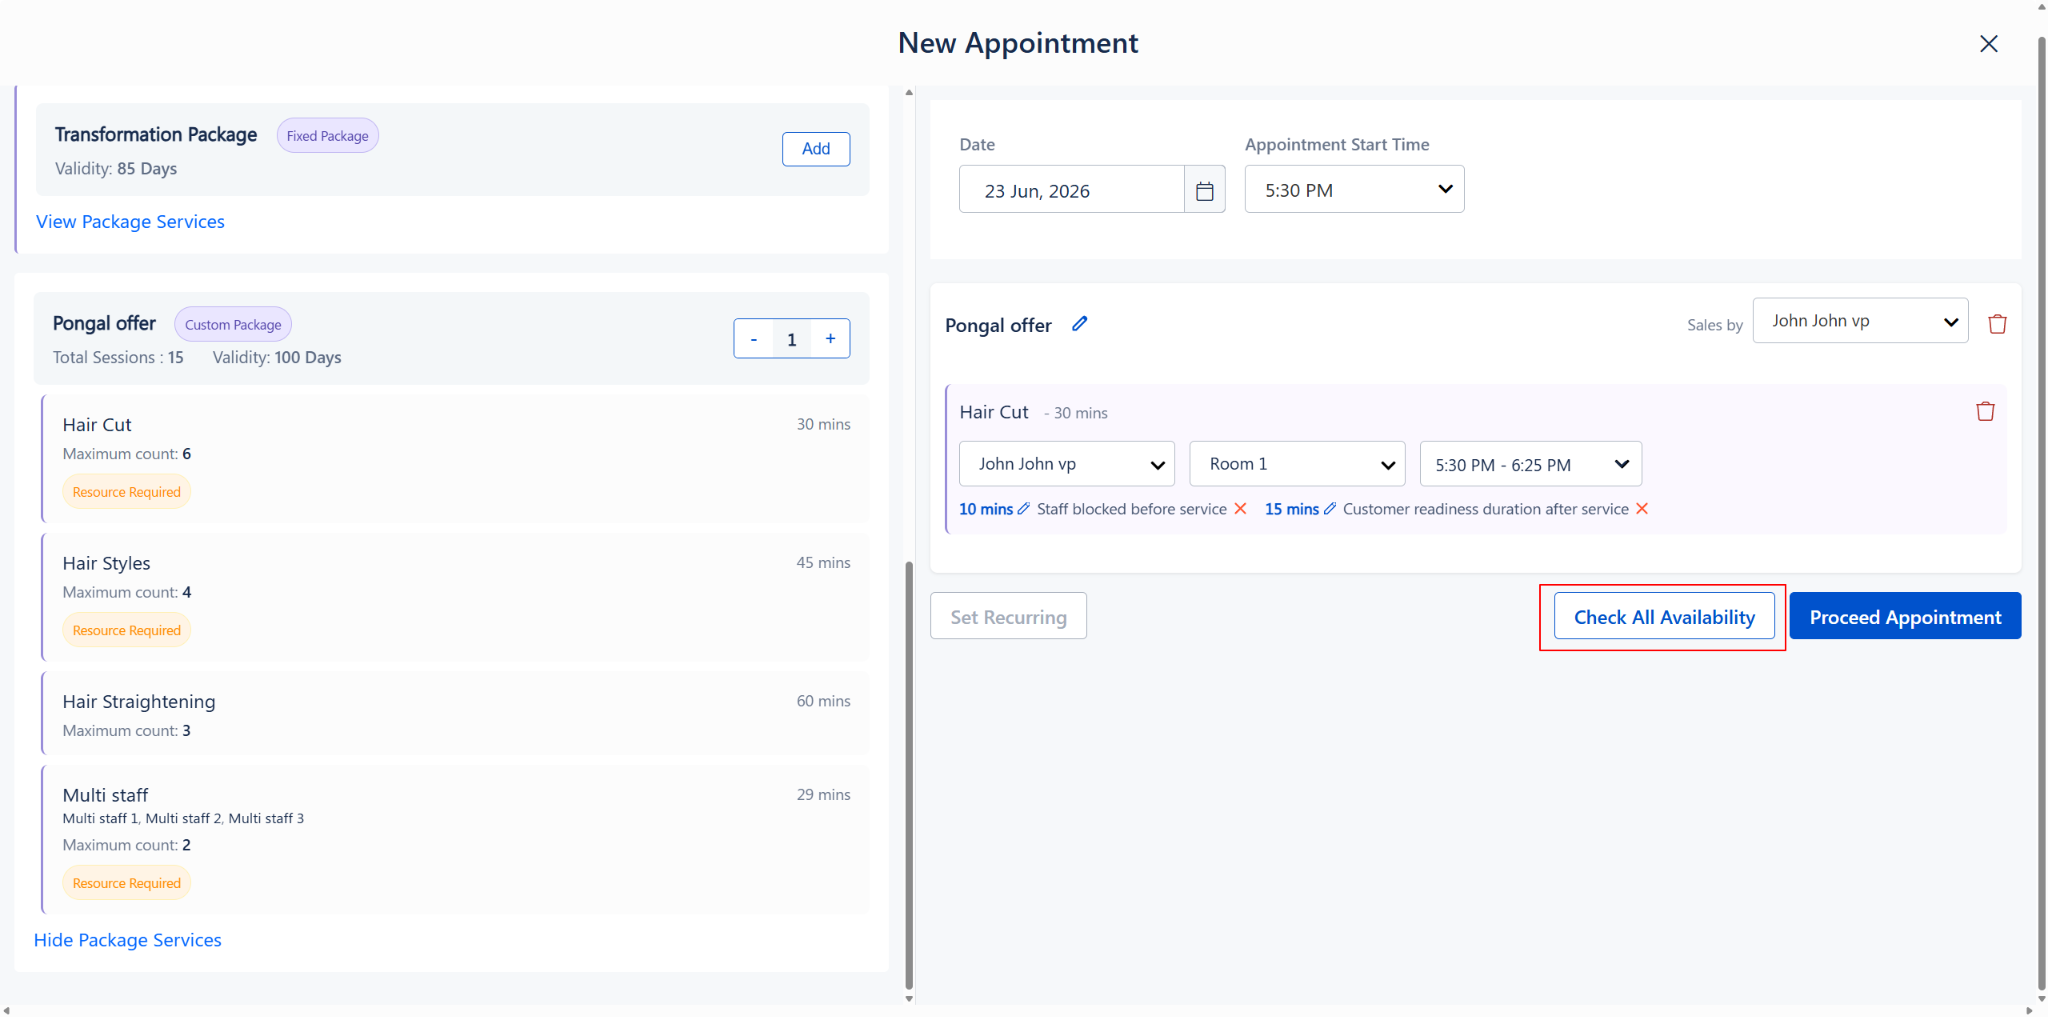
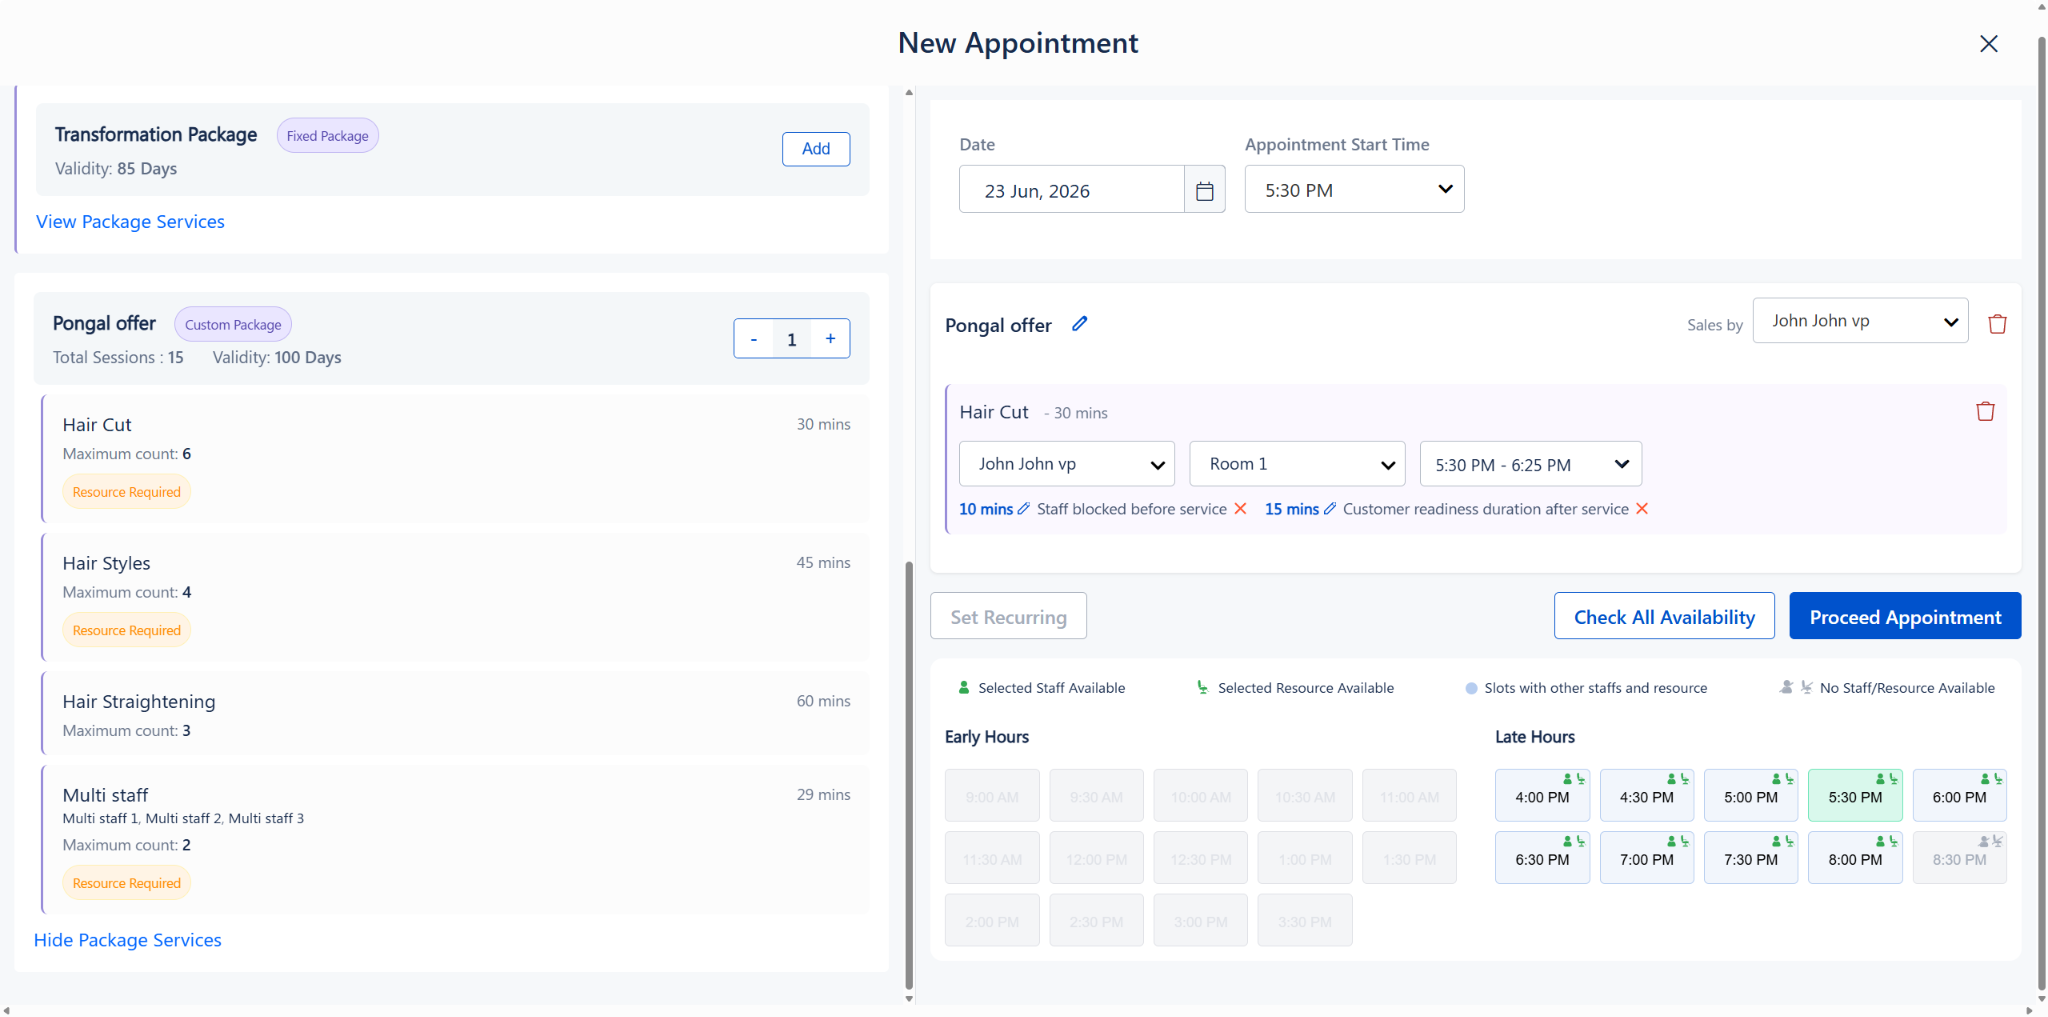
2. Click “Proceed Appointment” to move to the Appointment Summary screen.
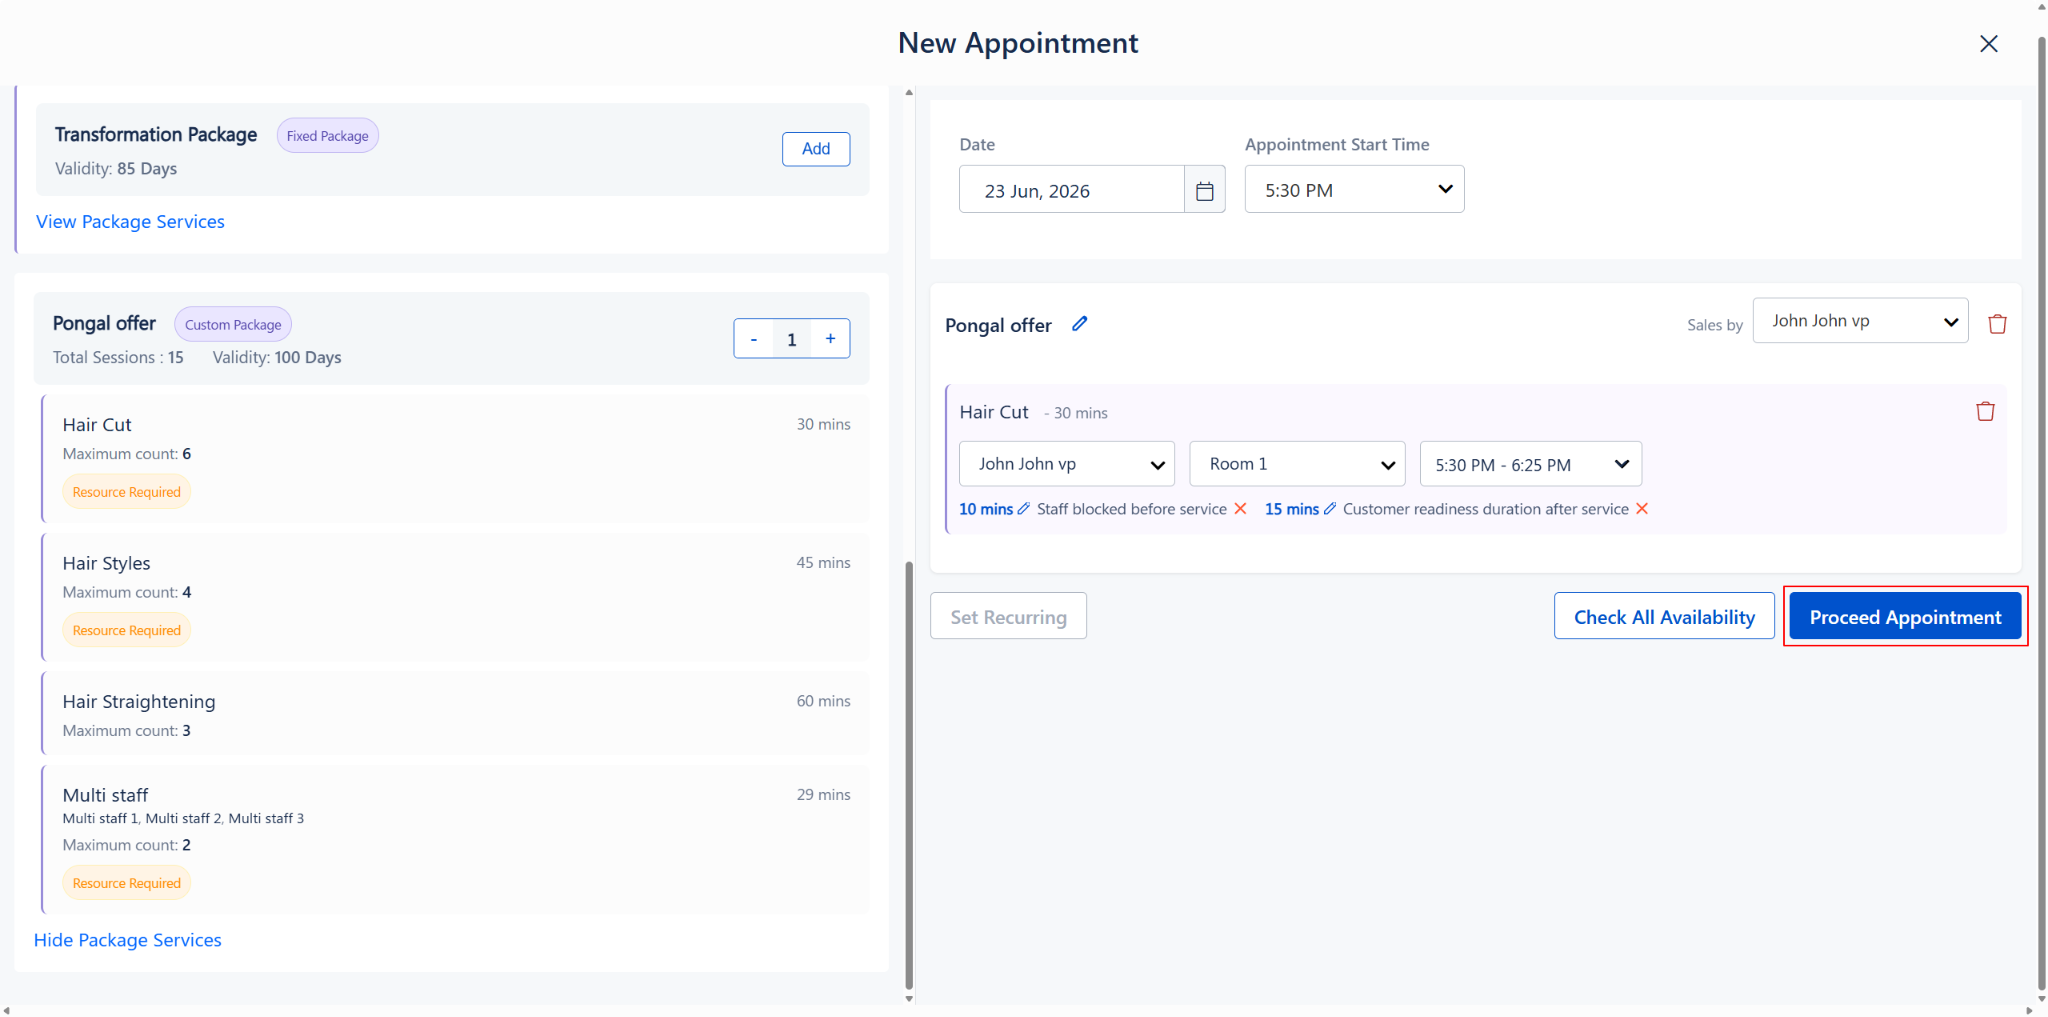
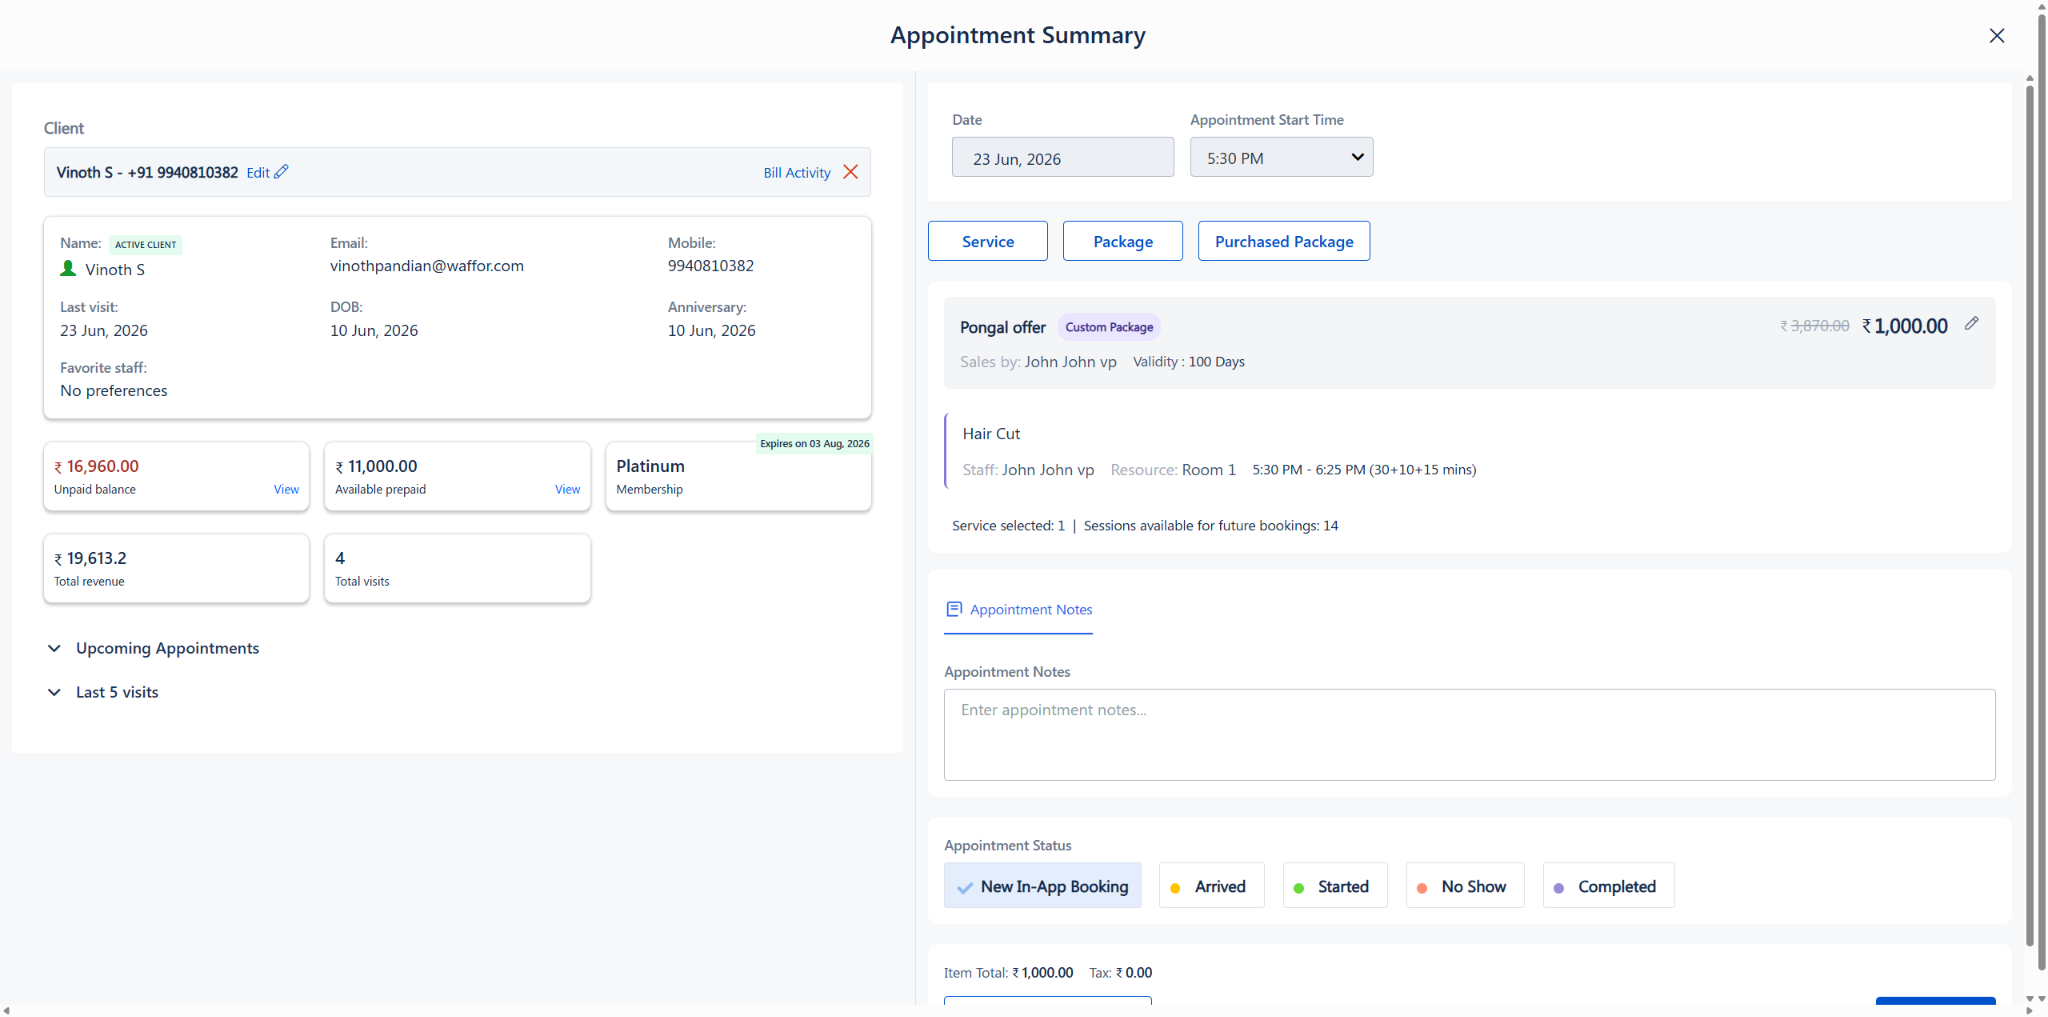
Step 6: Review the Summary and Checkout
On the Appointment Summary screen:
1. Review the package details, including the package price, validity, and the specific service scheduled for this visit.
2. You will see a helpful tracker indicating how many sessions are being used today and how many will remain (e.g., Service selected: 1 | Sessions available for future bookings: 14).
3. Set the Appointment Status (e.g., New In-App Booking).
4. Click “Checkout” to process the payment immediately, or “Save” to finalize the booking on the calendar.
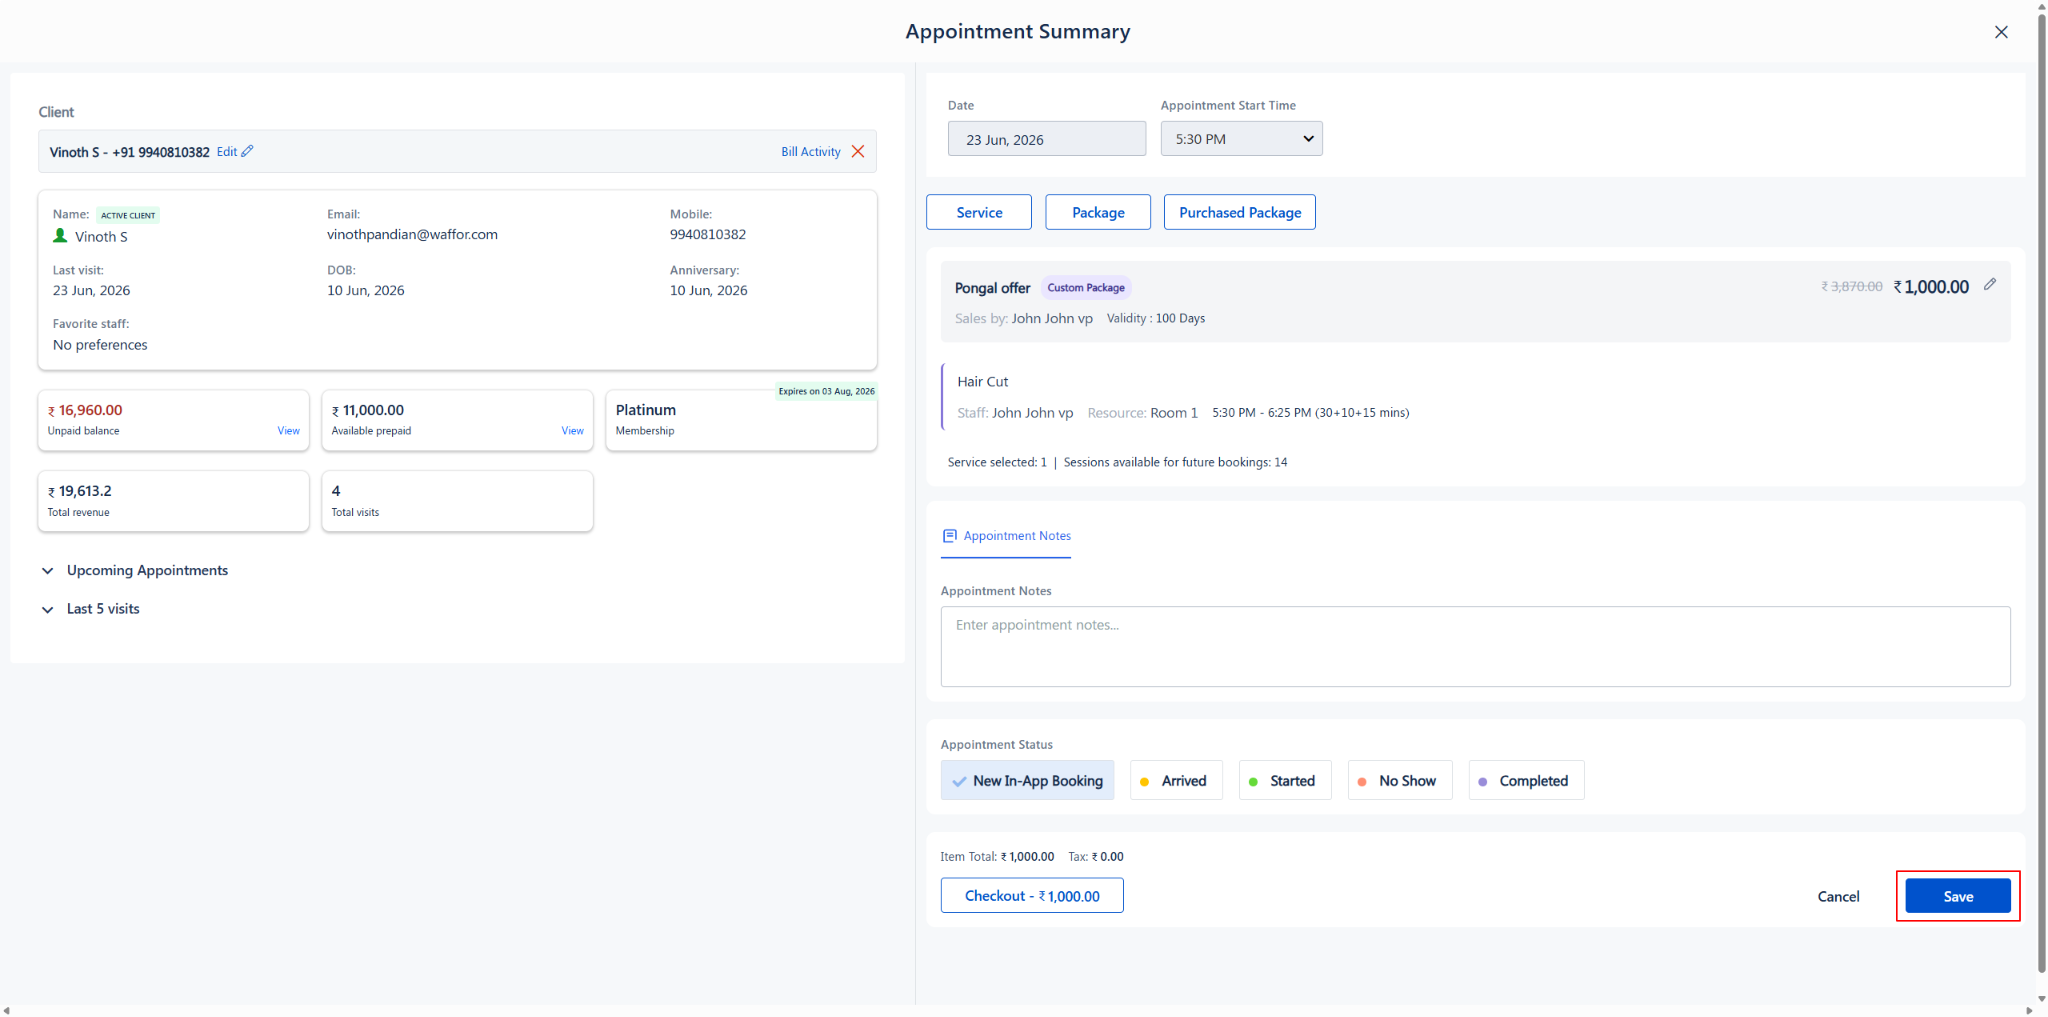
Remember: The remaining sessions will only be available for future booking after the checkout is completed and billed.
Appointment Summary showing package price, sessions used, and Checkout button
Use Cases
· Upselling at the Front Desk: A client calls to book a haircut, and the front desk successfully upsells them to a 10-session haircut package during the call.
· First-Time Visitors: A new client walks in for a spa day and decides to purchase a comprehensive wellness package on their first visit.
· Promotional Campaigns: Quickly selling a limited-time holiday package to a client and immediately booking their first session.
Benefits
· Seamless Workflow: Eliminates the need to ring up a package sale first and book the appointment second; everything happens on one screen.
· Accurate Sales Tracking: The “Sales by” dropdown guarantees that the correct employee is credited for the package sale right at the point of booking.
· Clear Session Management: Front-desk staff and clients get immediate clarity on how many sessions are used today and how many remain for the future.
Was this article helpful?
That’s Great!
Thank you for your feedback
Sorry! We couldn't be helpful
Thank you for your feedback
Feedback sent
We appreciate your effort and will try to fix the article